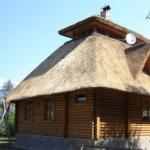
A barn in a dacha is one of the most important buildings; it is often one of the first to be erected. It can have different purposes. At the first stages of building a dacha, it serves as a shelter from bad weather, and later as a place to store equipment. A do-it-yourself garden shed can be made in various designs and from different materials. However, the simplest and most inexpensive to build is a wooden shed. How to build it and what to cover it with will be discussed in this material.
Optimal shed sizes
A barn in a country house should be easy to build and easy to use. The easiest to build is a wooden shed, for this reason most summer residents prefer this type. The simplicity of the design will ensure its quick construction and minimal investment. A convenient tool shed is one in which everything is at hand, so it is important to plan it correctly.

Fig.1.
The layout of the shed greatly depends on the purpose of its use. Depending on what and how much will be stored in it, the overall dimensions of the shed depend, as well as the presence of shelves and the layout of storage areas.

Fig.3.

Fig.4.

Fig.5.
- garden tools(rakes, shovels, pitchforks, etc.). To store this tool, a building measuring 1.5 x 1.5 m is sufficient. You can additionally install hooks or a special stand in it for storing pruners, hacksaws, etc.

Fig.6.

Fig.7.

Fig.8.
- Garden tools and additional materials(fertilizer, paint, materials for greenhouses and greenhouses, etc.). For these purposes, you will need a utility unit measuring 1.5x2 m. It will have enough space for wide shelves where additional materials will be stored.

Fig.9.

Fig. 10.

Fig. 11.
- Garden tools and park equipment(lawn mower, trimmer, etc.). To store the entire set of country equipment, you need a shed 1.5 m wide and 2.5 - 3 m long.

Fig. 13.

Fig. 14.
Shed construction diagram
The most universal size of the building: width 1.5 m, length 2.5 - 3 m. It will be quite spacious, you can install several rows of shelves in it and there will be room for a lawn mower and other large tools. Structurally, the utility block will be a rectangular building with a pitched roof.

Fig. 15.

Fig. 16.

Fig. 17.
The easiest way to build a shed is using frame technology. The frame is made of wooden blocks, and the facade can be sheathed with any material, from lining to siding. The roof can also be covered with any material; most often, corrugated sheets are used for these purposes.

Fig. 18.

Fig. 19.
To build a shed, timber with a cross-section of 80x80 mm can be used. In this case, the number of racks indicated in the drawing is sufficient. If the section of the board is smaller, the number of racks must be increased.

Fig.20.

Fig.21.
A 40x100 mm board can be used for the ceiling. To lay corrugated sheets, it is additionally necessary to make a sheathing from boards 20–25 mm thick.

Fig.22.
Foundation for a barn
Despite the ease of construction, a foundation for a barn is necessary. It is important to note two points. If you install a building without a foundation on the ground, the foundation boards will rot very quickly, even if they are pre-treated with an antiseptic. If the soil is prone to heaving and the foundation is not buried below the freezing level, then after winter the structure will sag and lose its original appearance.
For a wooden shed made using frame technology, three types of foundations are well suited: block, pile and monolithic slab.
- Block foundation- the easiest to assemble. This type of foundation is made of concrete blocks. The blocks are installed on a sand cushion in increments of 1 - 1.5 m around the perimeter. This type of foundation is good for use on soils with a low tendency to heave. Otherwise, after winter, the foundation blocks may settle, which will lead to the curvature of the building.

Fig.23.

Fig.24.

Fig.25.
- Pile foundation It is free from the disadvantages of block and can be used on any soil. Any piles can be used. One of the simplest options for piles is metal pipes, which are buried 1.5 m into the ground. For a wooden shed measuring 1.5 x 3 m, 6 - 8 piles are sufficient, depending on the thickness of the beam section at the base.

Fig.26.

Fig.27.

Fig.28.
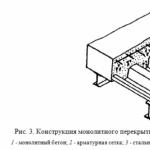
- Monolithic slab the most versatile option. It is made from cement-sand mortar laid on a sand bed. For a country shed, the thickness of the slab is 10 cm, and the thickness of the sand cushion is 15-20 cm. To increase the strength of the slab, reinforcement is used. A monolithic slab can be easily made without special equipment in 1 day. The slab has its own advantages; there is no need for flooring. The floor will be the foundation.

Fig.29.

Fig.30.
We build a barn using frame technology
Building a shed using frame technology is quite simple. They start by assembling the floor. To do this, install and fasten together 4 bars. The bars are connected to each other in half a tree. The beams are secured with nails or self-tapping screws. If the building is no more than 1.5 m wide, then no additional crossbars are required. If the width is greater, then additional crossbars must be installed, otherwise the floor will play.

Fig.31.
Next, install the vertical posts. To ensure that the racks stand level, they are leveled and temporarily secured to the base with scraps of boards. The racks are attached to the base with metal corners. The bars on which the rafters will be installed are secured to the installed racks.

Fig.32.
After all the vertical posts are assembled, install the horizontal crossbars. They are necessary to give the structure rigidity. All elements are fastened using structural metal corners with self-tapping screws. At the same stage, rafters are installed, window and door openings are formed.

Fig.33.
This is how the shed frame is assembled. The final stage of construction is the roofing and wall cladding. It is important to consider that if the utility block is sheathed with siding or corrugated sheets, then its walls must first be covered with OSB or plywood.
A suburban area is, first of all, a suburban farm. And any household requires storage space for tools, materials, firewood and other things needed for everyday life and work. We want to tell you how to build a shed at your dacha yourself.
Preparation
Selecting a location and marking
Depending on the purpose of the building, it is necessary to determine its dimensions and find a suitable location on the site.
Here the logic is like this:
- if you plan to use the room only for storing equipment and materials, a size of 3x4 or 3x3 meters will be enough for you;
- if you plan to also build a workshop, then it is better to take 3x6 meters.
We chose wood as the material for construction because we were satisfied with its price and ease of processing. Also taken into account was the fact that construction would not require wet processes, instead of which the parts would be quickly assembled using nails and screws.

If the site is new, you will need to rent a diesel generator for your dacha. This will solve the issue of powering the power tool and lighting.

Important! It is advisable that when standing near the barn, you can see the threshold of the house and the entrance. In addition, the utility block should not be too far from the house, since you will have to run there for firewood and other supplies, sometimes in the rain, sometimes at night.
Now you need to mark the site. To do this, we hammer in the pegs and pull the thread, making sure that all the angles are right and the diagonals match in length. It is better to orient it to the cardinal points so that the walls with windows face south, southeast or southwest.

Then you should remove the fertile layer of soil along with grass and turf. The resulting cleared area should be leveled, cleared of excess soil and debris and lightly compacted.
Excavation and foundation

So, any building needs a reliable foundation. We are building a barn in the country, not a castle, so the foundation should be lightweight and shallow.
Important! If the soil in your region is not heaving and the groundwater level is not too high, then it would be most appropriate to use a columnar type of foundation. If the soils are heaving or the groundwater level is higher than 1 meter, then it is better to opt for a strip structure.

We will assume that our soil is normal for central Russia, and we will stop at the pillars. For a building measuring 3x4 meters, it is enough to install 6 – 9 pillars (this depends on the thickness of the frame and the beams of the lower floor). We will put up 9 pillars.
- So, 4 pillars in the corners, one exactly in the middle of each side of the rectangle and one at the intersection of the diagonals. We dig holes at these points measuring 40x40 cm and 50 cm deep;
- Pour a gravel-sand mixture into the bottom of each hole and spill it with water.. Then we install formwork from plywood 30x30 cm with an extension above the ground level of at least 30 - 40 cm. We put a frame of 8 mm reinforcement into the formwork and tie vertical pins with threads with wire to fasten the timber, pour concrete;

- Before concreting, using a hydraulic level, we mark the concrete pouring level inside each formwork so that the shortest column is at least 15 cm above the ground, and all columns (upper ends) are in the same horizontal plane. After concreting, we wait three days, then remove the formwork;

- We cover the columns with bitumen primer, and after it dries - with bitumen mastic in 2 layers. After two days, the holes can be filled with clay. It is better to sprinkle the surface of the site with a sand-gravel mixture to the thickness of the previously selected fertile layer.

Important! Instead of concrete, you can use ceramic bricks, but a reinforced concrete structure will be stronger and more durable.
Construction of a barn

Now you can start building the barn itself.
You will have to work with your own hands, but in the case of working with wood, this is only a plus:
- We make the bottom trim: we lay 150x150 mm timber around the perimeter of the pillars and crosswise inside the platform through the middle pillar. We put roofing felt, join it into half the tree, put it on the pins and tighten it with nuts, which should fit into the pre-cut countersinks;

- We install racks (beam 100x100 mm), 3 meters high in front, 2 meters high in back. We put them on the pins with their lower end, level them and fix them on temporary jibs;

- We make the top trim; to do this, we connect the racks along the perimeter with crossbars made of 100x100 mm timber at a level of 2 meters, and we connect the front racks to each other separately at a height of 3 meters. We fasten the beam with metal corner plates on self-tapping screws in the place where it joins with higher pillars, in other places we join it halfway into the tree with nails;

We make the top trim.
The arrangement of a summer cottage begins with a barn. Owners of a plot of land erect an outbuilding immediately so that they have a place to store equipment, garden tools and other everyday little things. Modern materials have significantly simplified the construction of country sheds with their own hands and improved them.
How to build a shed with your own hands, what materials to use? More on this below.
A shed at the dacha: when can’t you do without it?
There are summer residents who build a shed “just in case,” but their plot remains uninhabited. Such situations are rare - usually country houses are used as weekend homes or seasonal housing. In both cases, you can’t do without a shed - garden furniture, lawn mowers, tree pruning tools, swings, decorative figures and other items are stored in it.

A pond or pool on the site must be periodically cleaned of silt, algae, sand, and dirt. Pool cleaning equipment can be conveniently stored in a shed. By the way, it can be built under the same roof as a bathhouse or a recreation area can be arranged near an artificial pond.

Sheds often store chopped wood for a fireplace or stove, hay for horses, animal feed, and fertilizer for plants. Sheds on a summer cottage often replace the owner’s workshop.
Samples of sheds at the dacha: photos
Various materials are used for the construction of country sheds:
- plastic;
- wood-polymer composite;
- brick, foam block or gas block;
- unedged board;
- wooden beam;
- corrugated sheeting
The aesthetic result largely depends on the material chosen by the summer resident.
Plastic shed
Such sheds are sold as a set and can be assembled in a few hours - the diagram is included in the kit. Plastic structures are used to store gardening equipment, tools, and watering hoses. Their advantage is a stylish design that fits perfectly into any landscape design.

There are also disadvantages. Plastic sheds can only be used in the warm season - they are not suitable for late autumn and winter, as the material deforms in the cold.
The second disadvantage is the fragility of the plastic, so you need to use the outbuilding carefully. The high cost cannot be discounted - not every summer resident can afford the purchase.
DPK sheds
WPC is a wood-polymer composite, a lightweight and durable material. It is used for arranging open terraces. Sheds and other auxiliary buildings made of WPC are supplied disassembled and assembled according to the same principle as their plastic counterparts.

Stylish design and practicality are the two main advantages of WPC structures. If a summer resident takes care of ventilation, the barn will serve him for decades. Hanging shelves and tool hooks can be mounted on the interior walls.
Brick buildings
Sheds made of brick, foam or gas block are permanent structures that take decades to build. Their advantages are obvious:
- They are not afraid of snow, rain, wind, frost and summer heat.
- The internal space can be divided into zones.
The area of the barn is limited only by the requests of the owner of the summer cottage.

Construction of a brick building requires certain physical and financial costs, basic knowledge of foundation construction, wall laying and roofing.
Shed made of unedged boards
A wooden structure is a simple and economical solution. To build it, you do not need to pour a capital foundation, let it stand, and then build walls. You can build such a barn in 4-5 days. It does not look as impressive as plastic structures, but the costs are several times lower.

Shed made of corrugated sheets
A minimum of physical costs will be required to build a shed from profile sheets. A frame is erected from a wooden beam or a metal corner, and then sheathed with a profile sheet.

We build a barn at the dacha with our own hands according to the drawings
Today, as an example, we will consider the construction of a frame country shed, built from wooden beams and covered with clapboard boards. A drawing of the shed is shown below.

Foundation
The frame building is light in weight, so a shallow strip foundation is sufficient for its construction. The width of the foundation must be 15 cm greater than the thickness of the wall, and the foundation must be deepened by 40 cm.

When pouring the foundation, formwork is used - it can be removable or permanent. The tape is filled with concrete mortar - after the concrete has dried, waterproofing mastic must be applied to the outer parts of the foundation.
Frame
To build the frame, you need a wooden beam of the following section:
- for main vertical buildings - 50x100 mm or 100x100 mm;
- for connecting elements - 40x40 mm or 60x60 mm.
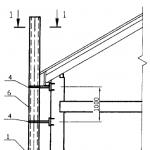
Below is a drawing of a shed with dimensions of 5000x2000x2000 mm. Vertical racks for the frame are installed at a distance of 1-1.5 meters from each other.

It is better to fasten the frame elements together with metal corners on self-tapping screws - this type of fastening is more reliable than nails. Using metal corners, the frame of the shed is also attached to the base - this is shown in the diagram below.

Before assembling the frame, you need to determine the locations for window and door openings. It is important to remember about the slope of the roof - for this, the front wall of the structure must be 20-30 cm higher than the back one.
After assembling the frame, the timber is treated with special solutions that will protect the wood from ignition, rotting, and swelling.
Roof sheathing
The distance between the sheathing bars depends on the roofing material used. A wooden beam is not suitable for arranging a soft roof - you need solid sheets of plywood.
But flexible tiles are used in the construction of country sheds in isolated cases - more often the roof is equipped with corrugated sheets, slate or metal tiles.

All of the roofing materials listed have wide sheets that are attached directly to the sheathing. The timber is laid perpendicular to the slope at a distance of 50-60 cm.
The profile sheet and metal tiles are attached to the sheathing with self-tapping screws with rubber gaskets, so as not to damage the polymer layer and not spoil the decorative properties of the roofing material.
Frame covering
The frame can be sheathed from the inside and outside or only from the outside, using different materials. It is advisable to open a barn lined with wooden clapboard with a special wood varnish.


Unprocessed, it looks faded. But if you open it with dark varnish, the effect will pleasantly surprise summer residents. Log houses in Norway are often built from unedged boards. In Russia, they are gradually adopting this fashion and using this material to decorate the facades of private houses.

When the frame is ready and sheathed, the roof is installed, you can install window frames and door frames.
Construction of a barn for a summer house on video
Summer residents are confused by the fact that a barn can spoil the impression of the site. There are two ways to solve the problem:
- Set aside a place for the construction of an outbuilding in the depths of the plot behind the house so that it is not visible.
- Improve the barn, turning it into a recreation area, planting it with climbing plants.
To help summer residents - a video on how to build a lean-to shed at your dacha with your own hands:
And for inspiration, here are a few photos with ideas on how to decorate a barn on a summer cottage.


In suburban areas, most new owners first install a small “temporary structure”. And the capital construction of a barn at the dacha with your own hands can be carried out even after the construction of the dacha itself. That's the right decision. A “temporary building” can serve as shelter from bad weather and a place to relax after work. But first of all, this simple building serves as a storage place for country equipment and tools.
Shed made from scrap materials
 A temporary structure for storing the same garden tools and other materials is simply necessary. In any case, this will be a frame option for building a barn in the country. The frame itself is made from a wooden block, or less often from a profile. A “temporary shed” is built from inexpensive material, most often it is a do-it-yourself slab barn, which does not require large investments and time for construction.
 A lightweight foundation can also be made for temporary construction. Usually it is enough to install it on posts. If the construction of a shed at the dacha will take place on reliable soil from which water drains well, then the foundation can be made as follows.
How to make a foundation for a small shed in the country:
- Mark an area that will be 1 m larger than the building.
- Dig a pit to 30 cm depth.
- Fill the pit with a cushion of sand and gravel.
- Pour water over the “backfill” and compact it.
- Make a sheathing from timber and lay it on a pillow.
The sheathing is a frame made from a wooden beam impregnated with an antiseptic, which will serve both as a foundation and as joists for the floor of the future garden shed.
What type of foundation to install
 No matter how easy the construction is planned, it is still better to make a reliable foundation. If you install a good-quality shed directly on the soil, the wooden foundation will rot very quickly.
If you are concerned about the task of how to build a wooden shed, and are deciding which foundation to choose for it, then we hasten to inform you that traditional types of foundations are used here: block, pile and monolithic type.
Block base
This option has its pros and cons. The positive aspects of building a block-type foundation include: the speed of installation and the affordable cost of the blocks. The disadvantages include the fact that the blocks are not recommended to be installed on soils prone to heaving. Heavy blocks settle on difficult soil, and over time the structure warps.
Pile or column foundations
 The best choice if you decide to build a utility block for your dacha with your own hands. Steel pipes can be used as piles. The pipe is driven into the ground up to 1.5 meters. The distance between the piles is also 1.5 m; if the planned width is larger, it is recommended to install intermediate supports (columns). A building 1.5x4 m will require only 8 pillars.
Monolithic foundation
 The most reliable type of base. For example, if you are building a large brick shed with your own hands, then you can build a monolith yourself. The depth of the pit is up to 30 cm, while the sand and gravel cushion will be 15-20 cm, and the slab itself will be 10-15 cm.
The advantages of a monolithic base also include speed of installation. One or two days are enough to fill. Another advantage of the monolith: it can also serve as a floor, which can also be additionally covered.
Installing a monolithic slab for the foundation or a strip base is not entirely rational. Exception: if you plan to build a heavy building, with thick, insulated walls, or if you are planning to build a metal shed for your summer cottage with your own hands.
 An affordable and acceptable option for a column-pile foundation. A timber base is also suitable for a lightweight structure. It all depends on the material and size of the shed at the dacha. For a lightweight construction, a base made of timber, which is laid almost on the ground, is also suitable.
Why build a utility block at the dacha?
The choice of material for building a shed depends on financial capabilities, personal preferences and the overall design of the site.
Brick
 Not everyone can build brick walls on their own. For an experienced craftsman, it is not a problem to build four walls one or even two bricks thick. If you choose a brick for construction, then experience is required. And if you take into account that the average cost of one brick is 15 rubles and multiply it by the number of pieces to get the required cubic capacity, then you get an impressive amount. Add to this the cost of crushed stone, sand and cement, and we will see that brick is not the most profitable material for building a utility block on a summer cottage.
The construction of brick walls requires the laying of a solid foundation, which will additionally result in monetary costs and an increase in the construction period.
Wood
Wooden construction is one of the most profitable options, especially for practical site owners who are asking the question: “what to build a shed from cheaply?”
 A frame made of timber is quickly constructed, which will only need to be covered with suitable material: boards, chipboards, MDF, siding. The advantages of frame construction also include the speed of work, which can be carried out by one person, without the involvement of specialists.
Wood requires care, even if it has been treated with antiseptics. Every year you need to inspect the building for rotting, treat open areas with special means, and repaint it.
Polymer materials
 With the development of industry, polymers are used in various industries, including construction. The material is widely used in the construction of industrial greenhouses, as it is resistant to humidity and ultraviolet rays. This option can be classified as an inexpensive project for building a shed, and a lightweight one at that.
The frame can also be made of plastic pipes, which are covered with polystyrene or polyvinyl chloride tiles. In this case, the result will be a completely environmentally friendly project. There is another budget-friendly way to build a shed from in your country house.
Profiled sheet
 Sheets of corrugated sheets can be used to cover any household buildings. The frame is built from a profile, a metal corner, a pipe, and wooden blocks are also used. A barn made from corrugated sheets is considered inexpensive to build, but there is a significant drawback. Without additional covering materials, the room will have high humidity. Condensation on iron collects during temperature changes and in cold (winter) times.
Blocks
Made from lightweight concrete, cement blocks have high technical characteristics that simultaneously combine wood and brick.
Building blocks include the following materials:

There are construction cement blocks based on expanded clay, and blocks containing sawdust are also produced.
Compared to its large size, the material is very light, which does not require equipment for lifting and moving on the site. The blocks can be laid independently. The premises are used as a utility block for tools, equipment and other inventory, and for other needs. The room is warm, and some summer residents get chickens or even small livestock for the summer season. The barn is quite suitable for raising such a farm, or combining it with other country buildings: a garage, a summer kitchen and a shower.
Walls made of foam blocks are erected quickly; you don’t have to be an experienced craftsman to make such a shed.
How to build walls from foam blocks
 Even such a simple construction requires adherence to technological nuances. When building walls, masons use a plumb line and a level. Strictly horizontal and vertical position of masonry is the main criterion for the quality of work of all masons.
Before starting masonry, the foundation is coated with a layer of mastic, on which roofing felt is applied on top. As experts advise, each row should be connected with metal mortgages, which are necessary for the strength and stability of the wall.
Step-by-step laying of blocks:
- The sand-cement mortar is mixed.
- Corners are being built.
- The masonry works like brickwork - the connection of two blocks is closed at the top with one piece.
- A cord is pulled between the corners around the perimeter.
- When laying, use a trowel and a rubber mallet.
 A separate issue is being considered - how to cover the roof. The choice of roofing material is huge. However, it is worth thinking about this in advance in order to focus on the fasteners in the walls, which should be installed on the basis of the selected roofing material.
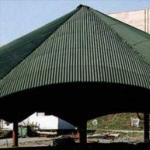
When the building is provided with a pitched roof, then one of the walls of the barn should be slightly higher to make it more convenient to make a roof slope. Experts advise building a gable roof. A gable roof looks more attractive, but the main thing is that such a roof will not retain snow, which is especially important in cold regions. In addition, there will be a spacious space where you can store all the tools and material until the next season.
The article discusses current construction methods, as well as the most popular materials that are used for the construction of country sheds. The choice of construction method depends on the preferences of the reader.
Construction of a frame workshop shed - video