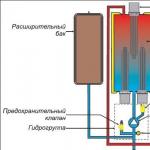
Wood is a material that “breathes”, and this is the main advantage of wooden houses. Therefore, there are doubts about the insulation of a house made of wood with foam. Some people argue that this can and should be done, others are sure that under the foam plastic the tree will begin to rot. However, experts say that this can be done, but only with a "breathing" insulation. Otherwise, you will deprive the building of its benefits.
There is a rule that says: the vapor permeability of materials towards the street should increase so that no obstacle is created for moisture to escape to the outside. If this rule is neglected, then moisture will condense at the border of the dense material, which leaves the room, which leads to the formation of condensate and rotting of the wood. Therefore, vapor permeability is a very important factor when choosing a heater.
Styrofoam has a lower vapor permeability than wood, so it is not the best option for insulation. But with the organization of a high-quality ventilation system, the amount of steam escaping will be minimal, therefore, there will be no harm from it. Therefore, if you have well-designed ventilation, then foam plastic can be used to insulate a wooden house.
Important! In no case do not use this material for insulation of rooms and buildings with high humidity (baths, saunas, kitchens, and so on).
Mounting process
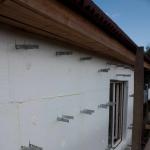
Before starting the insulation, it is necessary to check all the joints between the logs or beams. If the insulating material is uneven, then renew it and fill the voids with mounting foam. Next, boards are nailed vertically to the wall - so that their outer surface is flush with the plane of the wall. If there is a need, then for this you will need to cut off individual logs. Laths are nailed in the center of these boards, which will serve as a frame. The installation step of the rails should be 5 millimeters less than the width of the insulation.
Next, the foam is inserted into the frame, starting from the bottom. If the carcass distance is maintained correctly, then the material will be held in it due to the interference. If the sheets fall out, they should be secured with foam wedges or nails. The main condition is that there are no gaps between them. Next, a diffusion membrane is placed on the material. It is fastened with a stapler, and the joints are glued with adhesive tape. After that, you can sheathe the wall with the selected facing material.
Important! When installing the diffusion membrane, carefully read the instructions for use so that it fits with the correct side to the insulation.
How to glue styrofoam to wood?
Having figured out how to insulate a house with polystyrene foam, it is necessary to dwell in more detail on the methods of its fastening. There are several ways to do this:
- Fastening between the crate due to interference (as described above);
- Installation with special nails (fungi);
- Fastening with adhesives;
- Foam fixing.
The use of special nails is a fairly common practice when installing insulation, because they securely hold the sheets. But she has a drawback, which is the need to putty all the places in which nails are hammered. It is also necessary to take into account the fact that metal nails will act as an additional bridge for cold, because metal conducts it well. This problem can be solved with the help of plastic fungi.
Adhesives do not have problems like nails, but you need to be very careful when choosing them. So, the glue must be necessarily resistant to moisture and temperature changes, otherwise it will be useless. Most often, cement mortar with the addition of glue is used for this. As for mounting foam, it is rarely used for fastening, basically, it is needed to fill all the cracks.
Advice! It should be noted that the most effective method of fastening is considered to be "landing" sheets on a cement mortar and further strengthening them with nails.
How to glue styrofoam to wood?
If the walls of the room freeze in the winter and require insulation, then you need to pay special attention and purchase foam. But in order to complete the work, you need to learn how to insulate the walls with foam.
You will need:
Acrylic liquid nails
liquid foam
Self-tapping screws and washers
#1
Styrofoam is a cheap and warm insulation that is sold at any hardware store and has different densities. In addition to density, this material can have any thickness. Considering the question of how to glue the foam, you need to decide on the base and select the necessary glue. If the foam must be glued to the tree, then concrete contact, liquid nails on the foam or liquid foam will be required. You can use other fixing material that will hold the foam perfectly. The most reliable fastener for wood will be a self-tapping screw with washers. If the building freezes in winter, the walls are covered with frost, then the entire room will have to be insulated.
#2
Considering the question of how to insulate walls with foam, you should contact specialists who will provide all the information indicating the insulation of houses. Wooden buildings are easily insulated both from the inside and outside of the room. This will require acrylic-based liquid nails, because this glue is water-based and does not dissolve the foam. Having dealt with the glue, you should consider how to fix the foam. This will require pre-agreed wood screws and metal washers. But it is worth considering the whole course of work in more detail. It is more expedient to perform wall insulation from the side of the facade. By choosing this approach, you can avoid garbage in the room and reduce the living space.
EXPERT OPINION
#3
Next, priming is carried out with concrete contact and left for two hours to dry completely. After that, each sheet of foam is smeared with acrylic liquid nails and glued to the surface. The glue is applied in a zigzag pattern along the edges of the sheet and dotted in the middle, after which it is attached to the wall and attracted with self-tapping screws. Having considered this course of work, you can understand the question related to how to make foam plastic with your own hands. Having dealt with glue and fasteners, you should perform finishing work, which will indicate that the insulation of the building is completely finished.
#4
This will again require liquid nails or liquid foam. At the moment, you will need to glue the ends of the foam together and thereby seal all the seams. Liquid nails are squeezed out with a gun, after which a rubber spatula is used, thanks to which mashing is performed. When considering how to glue foam, it should be understood that liquid foam does this job perfectly. This glue is more like foam, which is squeezed out by pressing the sprayer. The essence of the work is quite simple, you should blow out all the seams with foam and give time to dry. In a short period of time, complete freezing will occur. Next, you need to remove all excess foam with a clerical knife.
This article was automatically added from the community
All photos from the article
Fastening foam to a wooden wall can be done in a variety of ways, and the choice of one technology or another depends on the design features and type of finish. It is important to choose the best option that will provide high thermal insulation and protect structures from adverse effects. In this review, we will figure out how to carry out the work and what factors to pay special attention to.

What you need to know about this type of insulation
We note right away that polystyrene is not the most popular solution for wooden buildings for a number of reasons:
| Low vapor permeability | As you know, for the best preservation of a tree, it is necessary that the moisture from the material can evaporate freely. But if the surface is covered with foam, then the moisture has nowhere to go, and condensation may form inside the wood, so a high-quality |
| Material stiffness | If you use mineral wool, then it can be, and it will hold without additional fastening. Styrofoam can also be positioned in a similar way, but sheets may crumble during operation. |
| The need for sealing joints | After the fastening is completed, the gaps must be sealed to prevent the penetration of cold, this complicates the process and makes it more laborious. Do not neglect this stage, since the result of the work largely depends on the insulation of the joints. |
Important!
High-quality foam should be selected, it is not worth saving and purchasing low-density materials, they are very fragile and can break even during operation.
In addition, it is desirable to use a heater with flame retardant additives in the composition, it is much more resistant to fire.
Mounting types
We figured out whether it is possible to sheathe a wooden house with foam plastic, and came to the conclusion that this option is appropriate when building a high-quality ventilation system. Now consider how to attach sheets to the surface.
crate
Do-it-yourself instructions are as follows:
- First of all, the frame is attached to the surface, in which the insulation will be located, the width of the spans should be 5 mm less than the width of the sheets in order to insert them tightly.
- Sheets are placed from the bottom up, if we are talking about walls, or from any convenient side, if the ceiling is being processed. After completion of work, it is necessary to check the surface for the presence of joints and cracks. If they are, then you need to seal them with polyurethane foam.

Using special fasteners
Consider how to fix the foam to a wooden wall using special fasteners, which are hats with a diameter of 5 or more centimeters and self-tapping screws, the length of which should be sufficient to securely fix the insulation to the wall.

The technology of work has the following form:
- First of all, you need to prepare the base- if there are gaps or significant irregularities in it, then they must be repaired to ensure the best effect.
- The workflow is carried out as follows: fastening is made from the bottom up, each sheet is fixed by several fasteners. The diagram below shows an option for saving fasteners, you do not need to hammer all five rondolas on one sheet, you can fix the element in the middle, and use the rest in the corners, that is, they will hold several sheets at once, which reduces material consumption several times.

- After completion of work, it is necessary to carefully inspect the surface and, if there are cracks, they must be filled with foam..
gluing
A very reliable option, and its only drawback is the high price of the trains, which is especially noticeable with large volumes of work.
The technology is simple, but requires accuracy:
- Before gluing the foam to the tree, it is necessary to level the surface, otherwise, with drops, the consumption of the adhesive composition will increase significantly, and the reliability of the connections may decrease.
- Next, you need to decide how to glue the foam to the tree, there are two main options: mounting polyurethane foam or a special adhesive, which is available in the same containers as foam, but has improved properties and increased yield. The second option is preferable, so try to use it.

- The surface must be free of dust and free of wet areas., as this negatively affects the adhesion of the composition. The composition itself is applied to the sheets with any option convenient for you - with a snake, around the perimeter, with dots. The most important thing is reliability, and the rest of the nuances do not matter.

- Next, the element is pressed tightly for a few seconds., after which it can be released, the glue begins to set within half an hour, complete solidification occurs in 24 hours.
Remember!
The final stage is the sealing of cracks at the joints, it can be moved either with the same adhesive composition or with mounting foam, there is no fundamental importance here.
Conclusion
In fact, attaching foam to a wooden base is not difficult, it is important to carry out this work in such a way as to ensure the best thermal insulation performance and prevent damage to the material due to condensation. The video in this article will walk you through the workflow in more detail and demonstrate some of the points described above.
Styrofoam is an excellent sound and heat insulating material. It and its varieties began to enjoy wide popularity among consumers relatively recently. Manufacturers, taking into account the needs and financial capabilities of buyers, produce polystyrene foam boards of various thicknesses. Insulation is used for finishing residential buildings and apartments, loggias and balconies, garages and sheds, warehouses and premises of budgetary institutions. For fixing insulation boards, foam glue and mounting nails are used, or, as they are also called, “umbrellas”.
Styrofoam gluing (click to enlarge)
Properties of foam boards
There are a number of other materials that can keep the heat in the house and isolate the room from unwanted sounds. However, the foam has some advantages over its counterparts:
- the lightest material
- easy to install;
- inexpensive;
- practical;
- perfectly copes with the functional purpose;
- does not absorb moisture;
- resistant to mold and fungi;
- durable.

Extruded polystyrene foam (click to enlarge)
Extruded polystyrene foam is akin to ordinary foam, but its density and performance characteristics far exceed those of the latter. However, for its installation, the same glue is used as for the foam.
How to fix the heater
With the decision to insulate the room, the first task is: how to glue the foam? On the building materials market, consumers are presented with the widest selection of adhesives for fixing polystyrene foam boards. There are ready-made adhesive-foam in cylinders, which is used with a special construction gun, and facade glue for polystyrene foam in the form of a dry mixture, packaged in moisture-proof bags weighing 25 kg. One bottle is enough to glue about 10-12 m2 of foam, while the consumption of a bag of dry mix is 5-7 m2 with continuous application to the sheet. The price of both materials does not have significant differences. It is worth noting that the consumption of foam adhesive, both foam and mixture, may depend on the degree of unevenness of the wall, the thickness of the layer and the method of its application.
Learn more from the video:
In addition to the structure and composition, glue for extruded polystyrene foam and conventional foam are distinguished by the temperature regime of application. There are building mixtures for summer use at air temperatures from +5 to + 35 ° C and winter - in the range from -10 to +5 ° C. Both types of mixtures can be used both outdoors and indoors.
Mounting methods
Consider the question of how to glue the foam to the wall of concrete, brick, wood. There are two methods for attaching foam to walls:
Mounting by gluing
In the first method, which is practiced for indoor insulation, polystyrene glue is applied directly to the insulation boards. Before sticking the foam to the tree, the surface should be treated with an antiseptic. A concrete or brick wall must first be cleaned of dirt and dust.
If the chosen material for the installation of the insulation has become foam adhesive for foam, then a layer of foamed adhesive is applied:
- along the perimeter + along the diagonals;
- along the perimeter + along one strip in the middle of the sheet.
A small amount of glue must also be applied to the edges of the foam.
Watch the video:
- no need to apply glue to the wall;
- a plate with adhesive foam should not be fixed to the surface to be insulated immediately after its application. Before gluing the foam to concrete or other surface, it is necessary to set aside the sheet with the applied adhesive. A couple of minutes later, the styrofoam board is pressed against the wall and held for a few seconds;
- excess glue that has come out should be immediately removed with a narrow spatula.
If fastening is carried out using a building mixture, then the adhesive is applied using a notched wide trowel. The layer of glue will depend on the gap between the teeth of the tool.
Subsequent work on insulation is similar to that described above. If the question arose of how to glue the foam on the ceiling, then there are no special differences between the insulation of a sheer wall and a horizontal surface.

The process of applying glue to the foam (click to enlarge)
Mixed method, which uses both glue and umbrella nails
The second method is used when insulating walls outside the room. In addition to the adhesive mixture or foam, the insulation sheets are additionally fastened with umbrella dowels. Important in this case is the moment that it is necessary to nail the foam only 2-3 days after gluing. The adhesive layer must dry out and then the plates will not move when they are reinforced with dowels. The number of nails per sheet is at least five pieces, and their length will depend on the thickness of the insulation. This method is the most reliable method of fastening polystyrene boards. In the question "how to glue the foam to the concrete on the ceiling?" it is better to use the second installation option.
After gluing the insulation to the surface of the premises, a plaster adhesive mixture for expanded polystyrene is used. It is designed for gluing reinforcing plastic mesh and plastering insulation boards.
How to choose glue
To make the right decision in choosing an adhesive for polystyrene foam insulation, it is necessary to weigh the pros and cons. The first points that should be taken into account are the price of the glue, the volume of its packaging, the area of the insulated surface, the place of work (inside or outside the room).
The video will help with the choice of glue:
Insulation of small areas
What kind of glue to glue the foam plastic if it is necessary to insulate a small area of \u200b\u200bthe surface, for example, a slope around the window? It is not advisable to buy a 25-kilogram bag of dry mix. Moreover, the process of using the building mixture entails additional work on cleaning the premises. A cylinder of glue-foam for insulating one slope will be too much. Therefore, it is worth considering an analogue in a smaller package. In this case, you can get by with a tube of liquid nails or silicone sealant, which have recently begun to be produced in small tubes that look like hand cream. Such glue on the insulation is easily squeezed out without the use of a construction gun. Another alternative for insulating a small area indoors is glue in plastic bottles without acetone or gasoline, which are not friendly with polystyrene foam and its analogues.
Thermal insulation of large rooms
In the case of insulation of large rooms, of course, it is worth resorting to cylinders of glue-foam or a dry adhesive mixture. The advantage of foamed glue is the relative cleanliness after the work done, the minus is the air spaces between the wall and the insulation board. Some experts tend to think that not a continuous application of glue to the surface of the foam, makes it possible for condensation to form under the insulation and mold to appear there.
Dry mounting adhesive, when insulating impressive areas, is somewhat more economical than using foam. And the ability to cover a sheet of expanded polystyrene completely eliminates the ingress of air under the insulation. But it will be necessary to carry out additional work on cleaning the territory after warming. When choosing a dry mounting adhesive, do not forget that it is based on cement, the quality of the adhesive itself will depend on the brand of which.
Can two boards be glued together?
Sometimes, to increase the thickness of the insulation, two foam boards are glued together. To resolve the issue: how to glue the foam to the foam, you should not resort to foam.

You can glue the foam together (click to enlarge)
It expands and can subsequently deform both sheets of insulation. For these purposes, it is better to use polyurethane foam adhesive. But it is worth noting that it will be cheaper to purchase a thickened sheet immediately than to glue the foam.
Now you know how to glue the foam with glue and, after weighing all the pros and cons, you can choose the most rational method for gluing this insulation. At first glance, gluing polystyrene foam does not seem so difficult, but it would be better to resort to the help of specialists.
Low cost and excellent thermal insulation properties make foam boards an increasingly popular building material. The durability of operation directly depends on the means of fixation, so it is reasonable to have a problem with how to glue the foam so that it performs its functions longer.
The main characteristics of the foam
Before gluing to a wooden, concrete or brick surface, as well as deciding how to glue the foam together, you need to learn about the properties and characteristics of this material. Styrofoam, or, as it is otherwise called, polystyrene foam, is formed as a result of foaming polymers. 98% of the material is a gas located in the smallest cells with very thin walls.
Typically, foam boards are used as insulation for the walls of building facades and for finishing ceilings, walls, slopes indoors, in basements, on balconies and loggias. Expanded polystyrene can be glued to a concrete, wood, metal, brick, plasterboard and gas silicate base.
The main characteristics of the foam:
- with a small mass, excellent rigidity;
- long service life;
- excellent thermal insulation properties;
- resistance to moisture;
- expanded polystyrene with flame retardants does not burn;
- does not pollute the environment during disposal after operation;
- protects from wind if applied outside the building;
- does not emit substances harmful to the human body, it is possible to work with this material without protective equipment;
- does not dry out and does not shrink during prolonged use, resistant to temperature changes;
- it is easy to work with foam plastic - it is easy to cut it, installation can be carried out using improvised means;
- molds do not develop on it;
- inexpensive.
Using expanded polystyrene as an insulation material instead of wood, brick, concrete or mineral wool saves time, money and indoor space.

The foam has disadvantages:
- breaks easily;
- has very poor breathability;
- is destroyed under the action of mixtures, which include nitrolac;
- deformed when hit on the surface of the solvent and ultraviolet rays.
Gluing methods and types of adhesive compositions
You can attach the foam boards to the surface with glue, dowels, or both at the same time. Foam plastic is usually fastened with adhesive compositions indoors, with dowels and glue - when working on the facade. Fixation only by means of dowels is used in extremely rare cases, this is due to the fact that the required level of reliability cannot be achieved in this way. If the roof is insulated, then polystyrene foam is simply embedded in the crate.
Foam gluing is carried out using dry formulations and ready-made adhesive mixtures.
Advantages of powder products:
- excellent adhesion (adhesion) with brick, plaster, concrete, cement;
- immunity to temperature extremes and precipitation;
- elimination of small irregularities on surfaces;
- relatively low cost.
Disadvantages of dry mixes:
- the adhesive composition must be prepared, it will take time, in addition, you need to know how to properly combine the powder with water in order to achieve a uniform consistency;
- you will need a mixing container and a construction mixer;
- dust is released during cooking.
Ready-made adhesives will allow quick and high-quality gluing of foam plastic to foam plastic, concrete, brick and wood surfaces, OSB panels or cellular blocks. The most commonly used aerosols in spray cans based on polyurethane foam. Such materials are very convenient, while one cylinder is enough to glue approximately 10 m 2 of foam boards inside or outside the building. The glue is resistant to temperature changes and high humidity, hardens in about half an hour and securely attaches the foam to the base.

Important
Never use mixtures containing toluene, alcohol or acetone for gluing foam, as they destroy the structure of the material.
The disadvantage of ready-made adhesives is the high cost. Popular ready-made adhesive mixtures:
- Ceresit ST 84 Express;
- "Titan Styro 753";
- Penosil.
When deciding how to glue foam, you should not write off other ready-made adhesives, for example:
- silicone sealant is used if it is necessary to fasten small fragments of thin foam with a leveled base;
- "liquid nails" - a universal adhesive composition made on the basis of polymers. For example, "Installation Moment", Dragon, which will perfectly connect the metal base with the foam. It is convenient for them to stick polystyrene foam to the ceiling.
Advice
Before gluing, clean the metal surface from rust, grease and paint.Stages and nuances
Gluing foam is carried out in several stages:
- Unplug electrical wiring.
- Clean the base from paint, whitewash, remnants of finishing materials and dirt.
- Remove irregularities deeper than 1 cm, that is, level the surface. If this is not done, then the foam plates will break during installation.
- Treat the surface with a primer, which includes antiseptics. This will improve adhesion and prevent the appearance of mold fungi.
- Wait for the primer to dry.
- Foam boards are usually glued from a corner or lamp. In the process of work, the desired configuration is given with the help of a mounting knife.
- If aerosol glue is used, insert the can into the gun and cut off the tip. Apply the composition on the wrong side of the foam board in strips along the edges (retreat 2-4 cm from the very edge) and diagonally. It is also permissible to squeeze out the glue with dots - in the center and in the corners.
- Dilute the dry mixture with water until a homogeneous consistency is obtained and spread the plate with a small notched trowel, a uniform thin layer should be obtained. Another option is to apply glue pointwise around the perimeter and in the middle, evenly distributing it over the surface.
- Press the foam to the base and hold for a few seconds. Remove excess adhesive with a damp cloth or even spatula.
- In the same way, glue the next plate end-to-end to the previous one. If a gap of more than 2 mm wide has formed between them, blow it with mounting foam or putty.
It is necessary to press the foam to the surface with the rule, and level it with the help of the building level.
Advice
When using additional fasteners (dowels), wait for the adhesive to dry completely and only then drill holes and drive in dowels-umbrellas.How and with what to stick to concrete, wood and brick surfaces
If it is required to mount expanded polystyrene to a concrete base during external thermal insulation work, then it is better to use dry compositions in the form of a powder. This is due to the fact that they have a cement component, polymers and sand, which provide reliable adhesion.
The best tools are:
- "T-Avangard-K";
- Ceresit CT 83;
- Armierungs-Gewebekleber.
The composition of "T-Avangard-K" is suitable for fastening foam plates not only to concrete, but also to brick bases, gypsum and cement plasters. The dry mix is available in 25 kg bags. One package is diluted with 5-6 liters of water. The powder is valid for 6 months from the date of issue. Available in summer and winter versions. The first one is recommended to be used at temperatures from +5 to +35 ° C, the second - from -10 to +5 ° C. The cost of one bag is, on average, 275 rubles.
Ceresit CT 83("Ceresit ST 83") is a high-quality, fast-hardening compound that is perfect for any mineral substrates. Available in bags of 25 kg, the finished mixture should be used within two hours. The price per bag varies from 413 to 539 rubles.
Ready-made adhesive mixture (glue-foam) Ceresit ST 84 Express should be used at temperatures from -10 to +40 ° C and in conditions of high humidity. It is perfect for concrete, brick surfaces, as well as cellular blocks and OSB boards. Adhesive foam Ceresit ST 84 Express consists of butane, propane and polyurethane. One bottle with a capacity of 750 ml costs 600 rubles.
For interior decoration and thermal insulation, rolled foam is most often used. For him, it is better to use powder mixtures based on gypsum.
plaster Perlfix issued by the company Knauf. Packed in bags of 30 kg. The glue will do an excellent job of gluing polystyrene foam to foam concrete, plaster, ceramic brick bases. It is not necessary to level the surface before using the composition. To improve the adhesive properties, the foam blocks are pre-treated with concrete contact. It is not recommended to work with glue if the air temperature in the room is below +5°C. One package Perlfix weighing 30 kg costs, on average, 280 rubles.
Styrofoam is a high-quality and at the same time inexpensive building material, which is successfully and often used as a heater in almost any room. For its gluing, dry mixes, ready-made adhesive compositions in the form of aerosols and "liquid nails" are used. When deciding which adhesive is better to glue the foam, it must be borne in mind that the composition in the form of a powder will be cheaper, but the finished mixture is much more convenient to use. When carrying out work outside the building, on the facade, be sure to use dowels for additional fixing.