From the name it is clear that now we will not talk about anything else, how about the assembly of the door frame. After all correct assembly of the door frame, this is the key to the correct installation of the interior door and, as a result, many years of operation of the door leaf, and the door frame itself as a whole, without problems.
We have already discussed with you how it happens *, also learned how it is carried out *, talked about how it happens * on the interior doors, it remains only to find out how it happens and consolidate the material read by looking video door frame assembly.
Tool for assembling the door frame.
In general, if you globally approach a tool that is designed to facilitate human labor when assembling a door frame for interior doors, there are a great many. but now we will take the tool that everyone has at hand:
1) Square.
2) A saw for wood or a jigsaw.
3) Chisel.
4) Hammer.
5) Screwdriver.
6) Roulette;
7) One person who read the release "door frame assembly" and an assistant.
For the assembly of the door interior frame, strangely enough, we need some kind of installation. You will have to stock up on the eighth with self-tapping screws and a thin drill bit for a screwdriver. Having collected this minimum *, you can start assembling the door frame with your own hands.
Assembly of the door frame of the interior door.
First of all, without hurrying, you need to assemble the box according to the size of the door leaf. To do this, we need to take a hinge bar, in a copy of two pieces, this is the one that is the longest and spread it on the floor in the size of our door leaf. From the top on the laid out hinge beams, put the door leaf and adjust the hinge beam to the size of the top of the door leaf, leaving a gap of a couple of millimeters from the end of the hinge beam, lutka.
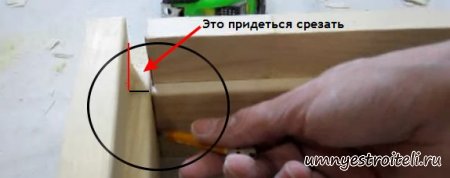
This is how it is shown in the picture. We draw a mirror mark on the second vertical bar and saw off:
Well, on the other side of the hinge bar, where there is excess left, we make a mark stepping back from the door leaf, also a couple of millimeters. Such a gap in the door frame will enable the door to walk freely in the box.
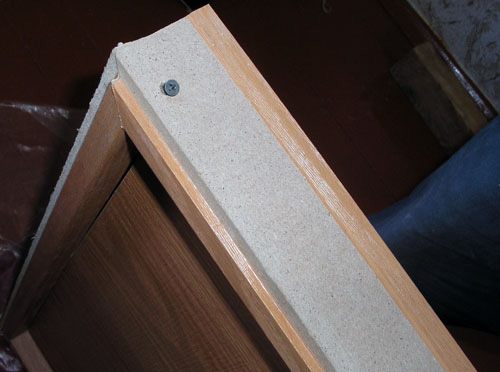
Let's go further: it remains for us to make a mark of the ceiling bar, vertical along our door with the loot (looped bar), horizontal together. We attach and make a mark on one side of the bar, because we will make the second side behind the face with the door and transfer it in a mirror to the second vertical bar, and according to the marks, we saw off unnecessary parts. There is still a little! We just have to cut down the protruding strips on the bars, designed to fix the door. To do this, we put the ceiling beam back to the vertical beam and, at the level with the ledge, mark the ledge of the door fixing strip, which we will cut off. Here in the photo you can see it well, how and where to make a mark. This action, in a mirror image, is repeated on the second horizontal ceiling strip on both sides:
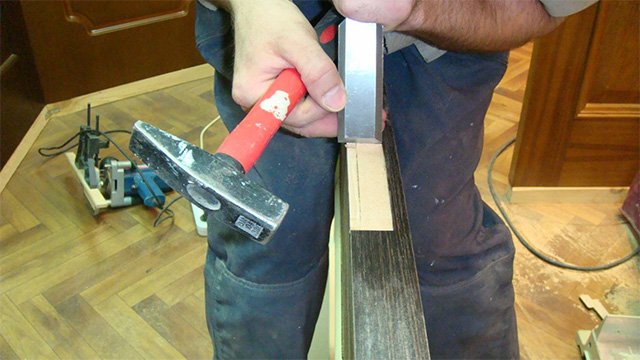
Removing the ledge is easy! Along the marked line, make an incision with a saw until the end of the ledge. After taking the chisel and using a pulley, from the end of the bar, simply knock down the ledge. This action can be performed both on a horizontal bar and on a vertical one.

Or make a mark on the horizontal, in principle, no difference.

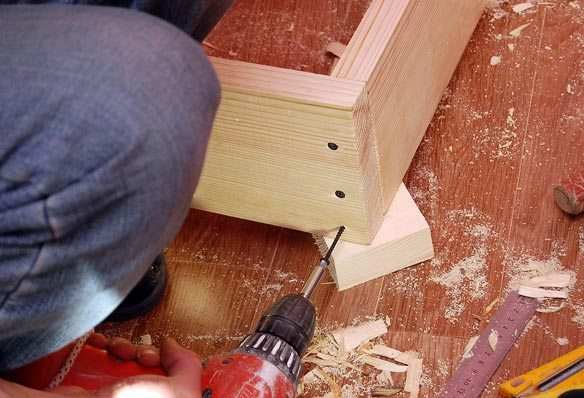
Now then we can fasten our entire door frame with self-tapping screws, having previously drilled in the places of the intended * boxes, with a thin drill. This is done so that the door frame does not crack at the moment the screws are screwed in, so to speak, they do not crush the loot (door beam). So!
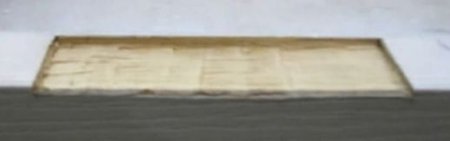
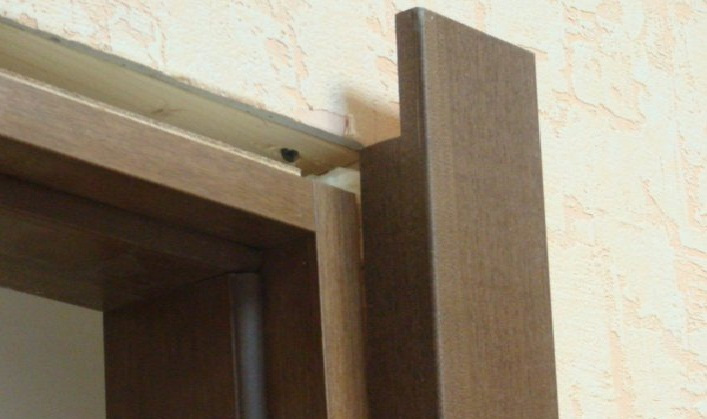
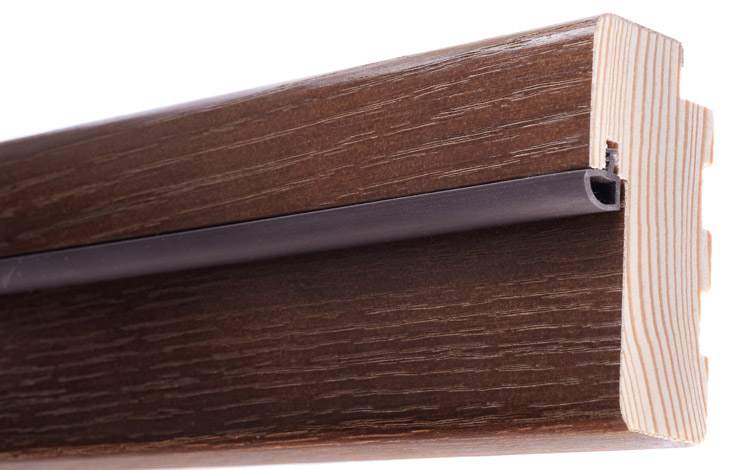
The box is assembled, it remains only to fasten the awnings. Marking for awnings, when assembling the door frame, we draw back twenty centimeters from the top and bottom of the door, and attaching the canopy itself to the door leaf, mark the length of the canopy with a pencil. From the side of the door opening, where we have made a mark for awnings, we retreat half a centimeter and make a groove, four millimeters deep, using a chisel and a hammer, as shown in the picture. We make a groove for the canopy both in the door and in the loot itself.

Finished groove made in the door frame.
Actually we fasten the canopy to the door leaf, and then to the loot. So it is produced door frame assembly... It remains only to consolidate the material by watching the video about the assembly of the door frame in the amount of two pieces.
Video:
Visual aid, door frame assembly video:
Assembly and installation of an interior door frame made of MDF is a complex process consisting of several stages. In order for the installation on our own to be carried out efficiently and without errors, it is necessary to carry out all the work in the correct sequence.
Preparatory work
Required:
- tape measure and pencil;
- laser level;
- square;
- hacksaw;
- chisel.
Installation of an interior door made of MDF begins with checking the walls for verticality. First, the height and width of the doorway are measured. It should be borne in mind that the walls in the house may not be perfectly flat, therefore measurements are taken at different points and at different heights. It must be remembered that there should be gaps of about 10-15 mm between the MDF door frame and the wall, both on the left and right sides, and at the top and bottom.
If the doorway is larger than the size of the MDF door, then with a small difference in width, you need to fill a block of the required width over the entire height of the opening. In the event that the door is much narrower than the opening, then it is partially laid either with a brick or with another suitable block, or a metal frame is made and sheathed with plasterboard. If the doorway is smaller, then it should be widened.

Then the preparation of the future MDF box is made. Since the standard door height is 2000 mm, then the size of the gap between its upper part and the leaf of 2-3 mm is added to it. If the presence of a threshold is assumed, then 2 gaps are added to the height of the door, which together equal 6 mm. If you install an MDF door without a threshold, then in this case a gap of 3 mm and a distance from the floor of 10 mm are added. This is necessary so that when opening the door leaf does not cling to the floor covering. As a result, for installation with a threshold it turns out: 2000 + 3 + 3 = 2006 mm; without threshold: 2000 + 3 + 10 = 2013 mm. Blank stands for MDF boxes are ready.
Next, the blanks for the threshold and the upper lintel are made. For this, the width of the door leaf is measured. To it is added a gap of 3 mm and a thickness of 30 mm of a profile bar, which is installed on both sides. For example, with a door width of 600 mm made of MDF, it turns out: 600 + 6 + 60 = 666 mm. After that, planting selections are made for the cut-to-size elements, i.e. on each side, those parts are cut off that protrude and because of this, when closing, abut against the door. To do this, a segment equal to the thickness of the rack is measured from the edge of the lintel, and a cut is made using a hacksaw with fine teeth. After that, the vertical installation of the jumper is carried out and its unnecessary part is chipped off either with a knife or with a chisel.
Assembling a box from MDF
Required:
- roulette;
- hacksaw or circular saw;
- miter box;
- hammer and nails;
- electric drill;
- self-tapping screws.
To obtain a high-quality result, the assembly of the MDF door frame must be carried out on a flat horizontal plane. There are several ways to make a door frame. First, it can be assembled using a spike connection. To do this, spikes are mounted in adjacent beams, equal in height to the thickness of the beams. In this case, both horizontal and vertical bars should have thorns, with the help of which they are connected to each other.
Secondly, the assembly can be carried out at an angle of 45 °. In this case, at the vertical bar only on one side (where it is connected to the horizontal element), a cut is made at an angle of 45 0. In the case of a horizontal bar, the same cut is made on both sides. When determining the length of the vertical beams, which should be the same, the height of the doorway, and the size of the gaps, and the thickness of the beams used must be taken into account. The length of the horizontal bar is made up of the width of the door leaf, the size of the gaps and the thickness of each of the vertical elements. To secure the structure, you need to use nails or screws. They must be screwed in at an angle of 45 0.
Thirdly, the structure can be assembled at an angle of 90 °. For this, the horizontal bar is simply applied to the vertical element and connected with self-tapping screws. In this case, the porch is sawn off on the parts that are located vertically. To prevent the MDF from cracking, holes are pre-drilled, the diameter of which should be 2-3 mm less than the diameter of the self-tapping screw. To obtain a rigid and reliable structure, each connection point is fixed with 2 self-tapping screws.
Installation of hinges
Required:
- detachable or one-piece hinges;
- chisel;
- carpentry hammer;
- drill;
- self-tapping screws.
Before starting work, they choose in which direction the door from MDF will open, i.e. towards or out of the room. Then door hinges are purchased that have different kinds and because of this, its own characteristics when inserting. To install interior doors, 2 hinges are required. And if this is an entrance structure, then to increase its strength, 3 hinges are used. In this case, the additional element is mounted just above the middle of the door to distribute the load.
Further from the lower and upper edges of the structure, 20 cm are measured, and marks are made at these places. After that, the products are applied to the end of the MDF door, aligned with their beginning and outlined along the contour. Then, using a sharp knife, cuts are made along the marked lines. The place for installing the hinge is cut out with a chisel and a carpenter's hammer. To do this, a notch is carefully made in the marked area with tools, the depth of which should be equal to the thickness of the loop, i.e. on average 3-5 mm. This is necessary so that the loop is securely fixed and does not protrude beyond the structure.
The work of installing the loop is carried out in stages. First, small notches are made around the perimeter of the structure, of which there should be several pieces. Then excess material is removed from them. Cutting is not carried out in 1 approach. It is necessary to apply a loop to the structure each time for verification, with the help of this it is easier to achieve a perfect depression. After that, markings are applied in those places where the hinges will be fixed with self-tapping screws. Then, in the same way, the second side of the hinges is fixed on the door frame. At the end, the MDF box is laid horizontally on the floor, and the door leaf with already embedded hinges is inserted into it. Further, using a school ruler with a thickness of 3 mm, the canvas is leveled inside the box so that the same gap is obtained on all sides.
Installing the door leaf
Required:
- polyurethane foam;
- wooden blocks;
- electric drill;
- self-tapping screws;
- acrylic lacquer;
- brush.
The MDF door frame is assembled in such a way that all fasteners are hidden under the hinge striker, as well as the door lock.
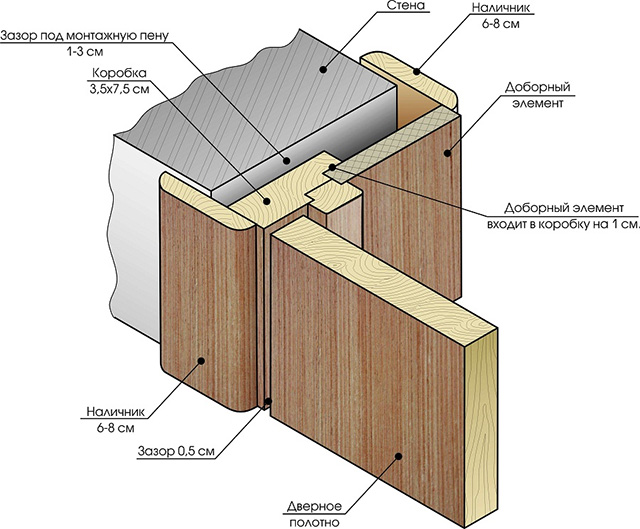
To get a gap on each side of the wall and the frame of the MDF box, you need to install wood lining. It is best to mount 4 pieces on one side. To fill the resulting gap, polyurethane foam is used, which must be applied very carefully, since after it dries, traces remain that cannot be removed. When applying it, the fact that it increases in volume by 3 times is taken into account. The foam hardens for about 3 hours, complete setting occurs in a day.
Then the assembled box must be installed in the prepared doorway, while placing the rack with hinges vertically. To fix it, you need to use self-tapping screws. After that, the door leaf is mounted, which is securely fixed. To fix the hinge post vertically, you need to make the door leaf motionless. Further, the fastening of the lock rack is carried out. So that in the future, from the natural deformation and wear of the hinges themselves, there are no problems with the door, i.e. with its opening and closing, it is necessary to bring out a gap between the door leaf and the pillars, which is exactly 3 mm.
At the end, acrylic varnish can be applied to the MDF door. This work must be done carefully. To prevent the leaf and the door frame from swelling, a thin layer of varnish is applied for the first time, after which it must dry completely. If necessary, then after that you can apply 2-3 layers of it. But before covering the next, the previous coat must dry. This completes the MDF doors.
Doors are more often purchased disassembled, when the door leaf is separately, and the door frame is generally just a set of profile timber made of wood. True, you should not be afraid of this, since the process of assembling the door frame with your own hands is quite simple.
Door frame mounting tools
- swivel miter box,
- puncher and screwdriver,
- hand saw,
- carpentry level and plumb line,
- Bulgarian,
- pry bar, nail puller, hammer,
- a set of hardware.
Preparatory work
So, you are already a model of your future interior door and have prepared the tools. Now, in order to install a new door frame, you need to dismantle the old doors.

To do this, the platbands are first removed, and then, trying not to harm the wall, they remove the old door frame with a hacksaw, a pry bar and other necessary tool.
If its fasteners cannot be unscrewed, then they can simply be sawed with a sander. After that, it will be useful to carefully examine the wall for the need to strengthen it.
If you find a lot of cracks on the surface, and the surface begins to crumble with slight impact, then for the reliability of installation and durability of the new door, you will need to additionally carry out concrete work to strengthen the doorway.
We measure and assemble the box
Without exaggeration, this part of the work when installing a door frame can be called one of the most important. Here it will be necessary to accurately calculate the length of the racks, as well as the upper lintel with or without a threshold (the lower bar in modern doorways, as a rule, is not done). The width and height of the door frame, ideally, should be 2-3 cm less than the size of the doorway, so that the gap between the bars and the wall is no more than 1-1.5 cm.

Sometimes it happens that the dimensions of the opening are much larger than the dimensions of the door and, accordingly, the frame. If the difference is relatively small, then a block of appropriate thickness can be filled over the entire width of the opening. If the size discrepancy is significant, then the opening is laid with bricks, or part of the wall is sheathed with plasterboard. But in any case, in order to avoid unnecessary expenses and efforts, dismantle the old door in advance, measure the dimensions of the opening, and in accordance with them, buy a new door.
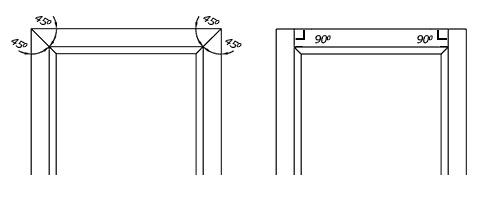
There are several options for assembling the box, but the most popular of them are two - with the fixing of the bars at an angle of 45 and 90 degrees. Different measurements are taken for each of them.
Advice. In some cases, when arranging the interior, use will be justified - where there is not enough space for classic drop-down doors.
We fix the bars at an angle of 45 degrees
The length of the vertical beams in this case is the sum of the height of the door opening, the thickness of the upper lintel, the threshold (if any) and the dimensions of the required gaps at the top and bottom. The latter are usually taken at 3 mm. Naturally, both vertical beams should be equal in length.
![]()
The lengths of the lintel and the threshold are calculated by adding the width of the door itself, the thickness of each vertical bar and the same gaps. Remember that to fix the door frame elements at an angle of 45 degrees, you need to thoroughly calculate the dimensions, make the necessary markings, and then cut the timber.
The connection is secured with a pair of screws in the pre-drilled holes. The screws are screwed into the bars at an angle of 45 degrees, and if the drilling is not done in advance, the wooden profile can simply crack.

We fasten the bars at an angle of 90 degrees
In this case, the horizontal profile of the door frame will lie on the vertical one. Accordingly, the dimensions of the vertical beams will be determined as the height of the door itself plus a pair of 3 mm gaps at the top and bottom.
This is for the option with a threshold. If the latter is not there, then instead of 3 mm of the lower gap, it will be necessary to add a whole centimeter, i.e. 10 mm, so that the door does not cling to the floor covering.

The width of the threshold and the upper headroom will be calculated as the sum of the width of the door leaf, double the thickness of the vertical bar and a pair of 3 mm gaps. In addition, so that the protruding part of the profile, on which the door rests when closing, does not interfere with connecting the bars to each other, it will be necessary to make landing samples.
That is, the porch - the protruding part along the edges of the horizontal bars, you just need to cut to the width of the vertical profile. This requires a minimum of tools:
- hacksaw,
- carpentry hammer,
- chisel.
Accordingly, with a hacksaw, you will need to carefully make a cut to the width of the protruding part of the profile, and then with a chisel using a hammer, simply chop off an unnecessary piece of the profile and clean the surface. Fastening is done in the same way with self-tapping screws at an angle of 90 degrees.
Installation of hinges
It is also a fairly simple, albeit crucial step in installing a door frame:
- Decide how the door will open (inward or outward) in order to choose the side on which you will need to hang the hinges;
- Place the door leaf and frame on a flat surface;
- Measure 20 cm from the upper and lower edges of the door leaf and apply marks for installing the hinges;
- Attach the hinges to the end of the door leaf at the mark, circle them along the contour, and then draw them neatly with a sharp knife along these lines;
- Further, in this place, using a chisel, you will need to make a recess with a depth corresponding to the thickness of the loop so that the latter does not go beyond the structure;
- Mark the place in the recess made for the self-tapping screws, drill the corresponding holes and fasten the loop;
- Do the same on the door frame with the second side of the hinges.

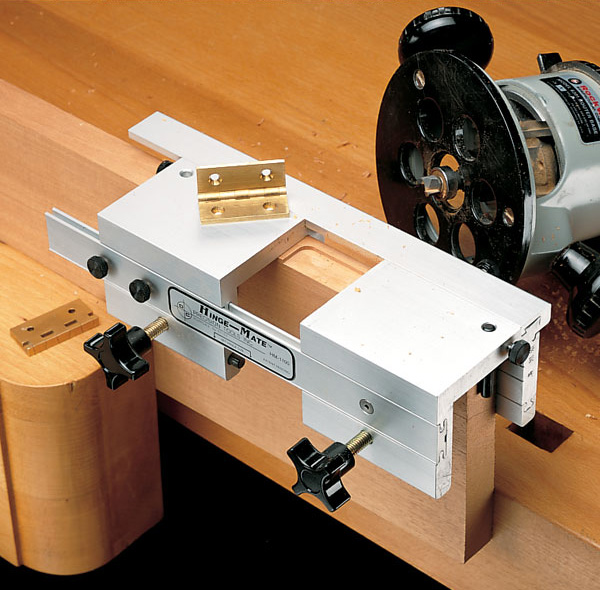
Cutting hinges into the door frame with a router
How to save money on? You can try it yourself, with your own hands, to assemble the door frame. This is not as difficult as it might seem at first glance. We bring to your attention detailed instructions on assembly.
Cooking material and tools
Because the it comes on improving the interior of the room, before starting the assembly, you need to decide on the material:
- Metal - has excellent strength, therefore entrance doors it will work best. But it must be borne in mind that working with metal requires special tools, skills and a lot of energy.
- Wood is a great combination of durability and environmental friendliness, so it is a versatile option. Noble types of wood are suitable for both exterior and interior doors.
- MDF (fiberboard) is an environmentally friendly material made from sawdust with a natural binder, has a smooth surface, looks good, and therefore is perfect for the case when you need to install interior doors. MDF is easy to process, is not afraid of moisture, in many respects it is not inferior to wood at a price almost two times lower.
There should be enough material:
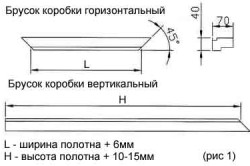
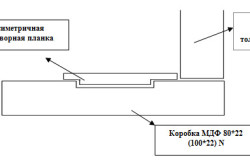
- timber under the door frame (two L + 8 cm long, where L is the door height and two more N + 8 cm long, where N is the width of the door leaf);
- platbands and (in case the width of the doorway is greater than the width of a standard timber).
If the box is without a nut, then only one bar of shorter length is needed - on the upper crossbar.
Prepare the necessary tools. We will need:
- slick;
- a hammer;
- a hacksaw (ideally, a special electric saw with a rotary mechanism would do, but we will assume that you are not an expert and do not have expensive tools);
- an electric drill with a replaceable bit, which can also be used as a screwdriver;
- level;
- carpentry knife.

For fastening, we will use screws of different sizes with a small pitch.
Suppose you have already neatly dismantled the door frame that you want to change.
Preparation of material according to the dimensions of the canvas, grooves for the curtains
Using the example of an interior door, let's see how a door frame is made with our own hands (approximate order). First of all, we need a meter (ruler) and a hacksaw.
- With the level, we measure the differences in the floor height in the opening for the door, remember or write down the difference in order to take it into account when preparing the timber by size. We measure the size of the door leaf.
- Using a hacksaw (preferably an end saw), we prepare a bar of the required size. If the saw is equipped with a function for measuring the angle of rotation, it is better to cut the end of the bar at an angle of 45 degrees. But for simplicity, it is easier for a layman to connect the bars end-to-end, choosing a quarter on long bars as shown in Figure 1.
Rule 1: between the door leaf and the frame there should be a gap of 3 mm (on the sides and top) and 8-15 mm (below) (Fig. 2).

- We make a selection under the curtains on the door leaf (option for). To do this, we put the door on the end and carefully make an incision on the upper end part with a knife, stepping back 20 cm from the edge, on each side. Then, using a chisel and a hammer, carefully select the recess so that the loop card is flush. We fasten the hinges to the doors with a screwdriver.
Rule 2: before tightening the screws, it is better to first make holes of a smaller diameter for them with a drill. This will prevent the material from cracking.
Start of box assembly
Now it's time to assemble the box parts for the interior door.
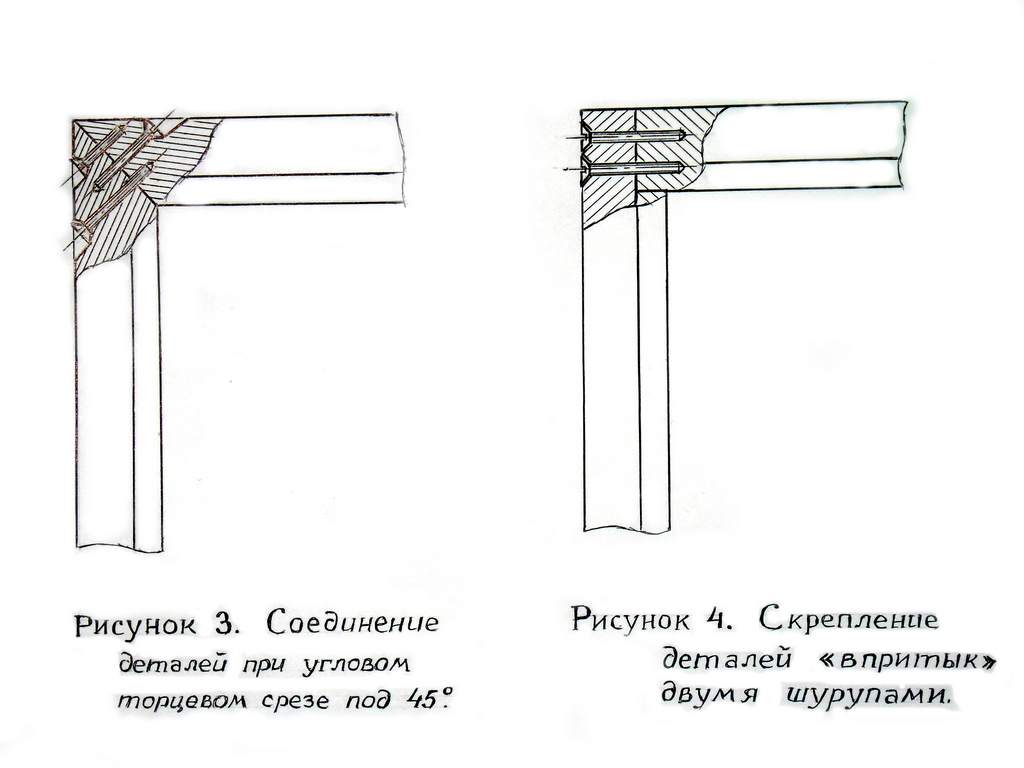
If the cut of the end of the timber was made at an angle of 45 degrees, the assembly of all the components (three bars or four, if there is a nut) passes through the fastening with three screws in each of the corners, at an angle of 90 degrees to the cut (see Fig. 3). Two screws should be installed on the side of the long bar and one on the side of the shorter one. Consideration should be given to slight misalignment of parts when tightening. Let's not forget about Rule 2.
If initially the cut along the ends of the timber was made evenly, then you need to assemble the parts together with two screws at each corner from the side of the long bars (Fig. 4).
- When the assembly of parts with your own hands on the floor is completed, you need to put the door leaf in the opening of the box and mark the hinges on the frame of the box, and then make a sample for them in the same way as on the canvas.
- Now the door frame must first be fixed to the wall. For this, it is better with the help of a partner, it is necessary to install the box in the opening.
- Using a spirit level, level it vertically, drill two holes for the flush heads of the screws in the hinge recess. The holes must be drilled exactly in relation to the horizontal and vertical axes of the bar.
- Now we attach the box to the wall with long screws.
Rule 3: if the wall is sheathed with gypsum board or is, you must first strengthen the opening by installing wooden beams inside the profile.
Fitting the box
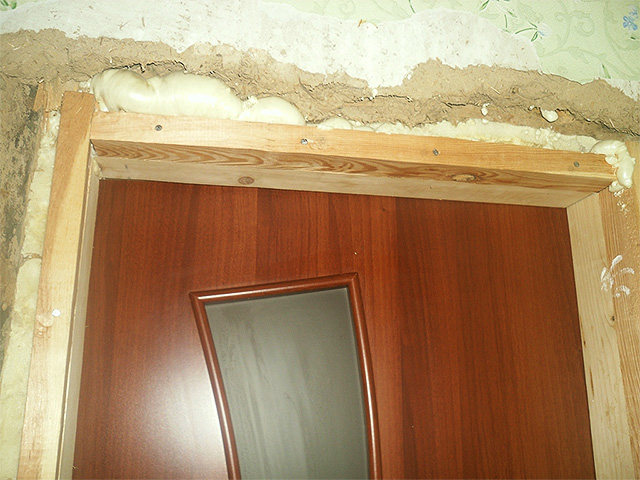
We fix the position of the door frame with pre-prepared wedges (spacers) made of wood, achieving a vertical position in level. Initially, the wedges must be installed on the side of the vertical bar already fixed at the end of the wall, to which the curtains will be attached, and on the horizontal upper bar.
We fill the free space between the frame and the wall with foam (from the inside of the doorway). We are waiting for the polyurethane foam to harden.

In the meantime, you can assemble the door latch:
- We make a hole with a drill to install the latch to the desired depth. The filling for the handle should fit freely into it.
- Drill the second hole perpendicularly for installing the door handles.
- Install the handles, secure with a key.
- Now you need to make a selection for flush installation of the latch strip, fastening is done with screws.

Installing and aligning the door
The next step is to install the door itself in the opening.
- We raise the door leaf to a vertical position, substitute a spacer or a piece of a bar under it, and, holding it, fix the hinges in the previously made grooves of the door frame by means of a screwdriver and screws. First we fix the upper curtain, then the lower one.
- We check the evenness of the door leaf, sitting on the hinges, by the level and evenness of the gaps (Fig. 2). We fit the door to the box, carefully leveling the hanging side with the upper wedge (photo).

Now we turn to the latch striker.
- We drill a hole of the required diameter, make a selection with a chisel.
- Before installing the striker, we drill into this hole and fix the door frame on the wall with the third and last screw.
- Now we install the spacers on this side. We mount the striker.
- We check the fastening: the door should not close or open by itself.
As you can see, assembling with your own hands is not so difficult.
There is very little left until the end of the work.
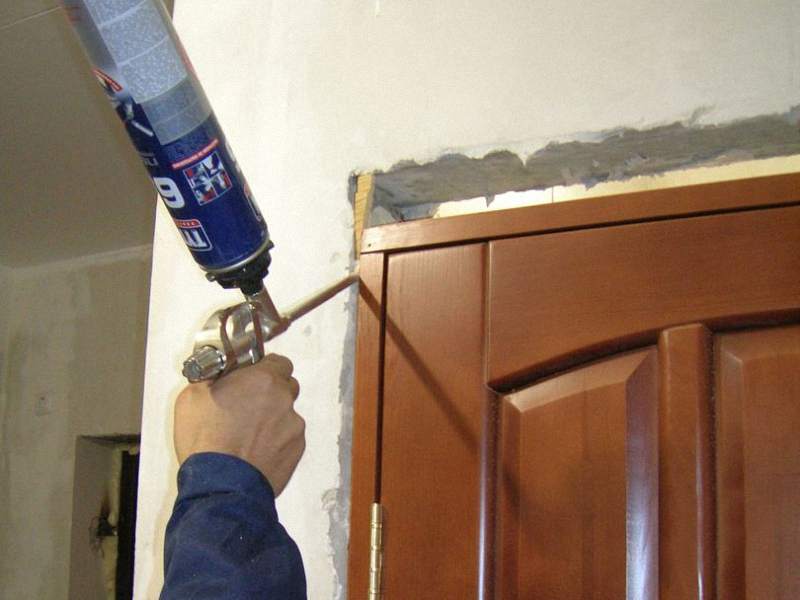
- We seal up the cracks between the wall and the frame of interior doors, both from the inside and from the outside, with mounting foam.
- If necessary, install additional strips by choosing grooves for them in the frozen foam.
- We install the platbands, having previously cut off the frozen foam where it interferes. Platbands are planted on silicone glue, which is applied to the box, fixed with nails with reduced heads.
- Do not forget about the decorative design of all the details that are in sight.
Installing the door frame of an interior door with your own hands is not as easy as it seems at first glance, so you need to approach this process with all responsibility. Before proceeding to work, you should carefully study all the theoretical aspects of the work, prepare the required materials and tools. In addition to studying the stages, you can watch a video containing detailed instructions for performing the work. This will allow for error-free editing.
In order to install an MDF box, of course, there cannot be a universal set of tools, but a list of the most necessary ones still exists. The first thing that will be required in almost any work is a pencil for marking, a tape measure with a square and a knife. To prepare grooves for locks with hinges, you cannot do without well-known chisels. In addition, you will need hammers, a plumb line, and a hacksaw. You need to purchase screwdrivers and pliers.
Do not be afraid of power tools, since installation is hardly possible without a drill or screwdriver. In addition, the screwdriver is used not only for driving screws, but also instead of a drill, only with less power. A puncher will be needed for installation in the same way as a miter saw, with which the elements will be prepared.
The ideal option would be a universal trimming tool that will allow you not only to prepare elements such as additional strips, but also to trim the trims. The router will be of great help in the work, with which you can quickly make holes for locks, hinges or crossbars.
Opening preparation
If you still wondered how to assemble an interior door with your own hands, the first thing to start with is to check how even the wall is relative to the vertical. This is done by measuring the opening along the horizontal axis and then along the vertical. Measurements are best taken in several locations. The main goal is to create a gap of about 1.5 cm.It should be borne in mind that it must be present on all sides, and the difference in size between the opening and the door should be 2-3 cm.

The scheme of the door frame in the wall opening
There are times when the door leaf does not fit the opening a little. What to do in this case? For example, if the opening is larger, you can narrow it a little by stuffing a plank of the required width over the entire area. If the difference is large enough, you can resort to brickwork, that is, lay the excess space with bricks.
You can use another option: to make a metal frame with the subsequent sheathing of the wall with plasterboard. If we talk about the ideal option, you must first make the necessary measurements, and then purchase the door and install it. This will avoid many of these problems.
Box assembly process
Today, there are only three ways how to do an interior door with your own hands: a tenon joint, fastening beams at angles of 45 ° and 90 °. As for the first option, special spikes are made on the adjacent beams. With their help, the connection takes place. The height of the studs is usually the same as the thickness of the timber.
What is the 45 ° assembly technology? At the junction of the horizontal bar and the vertical one, a cut is made on both sides at a specified angle. When determining the length of the beams located vertically, it is necessary to take into account their thickness, the height of the opening itself and the size of the gaps. They must be the same length.
As for the horizontal beams, you need to add the thickness of all beams vertically, the gaps, and the width of the door itself. Before trimming, you need to check the measurements several times, whether the calculations were made correctly. Fastening can be done with nails or screws, and they must be screwed in all at the same angle of 45 °.
If the connection is at right angles, then the element that is located horizontally is installed on a vertical beam. This method is one of the simplest, but it involves sawing off the vestibule on vertical beams.
As soon as the beams are ready, you can assemble the door frame of the interior door with your own hands. All work must be done on the most flat surface. When adjusting the bars, it is best to place something underneath, such as stools. To connect the structure, you need to screw two screws into the corner joints. How the door frame is assembled correctly can be seen in the videos presented.
How to install hinges?
The main thing is to decide on the operation of the door: where it will open. Before starting work, you will need to purchase the hinges themselves and all the necessary tools. The side of the blade for inserting loops should be chosen the one that is more massive and does not have any cracks or defects. The features of the tie-in depend on the type of loops. Installation of standard interior doors is most often done on two hinges.
As a rule, there are enough of them. If we are talking about entrance structures, three hinges can be installed here for greater reliability. For optimal load distribution, the third hinge is positioned slightly above the middle. You can determine the place where you need to install the hinges as follows: measure 20 cm from the bottom and top and make a markup. Then the hinge is applied to the marked place on the end of the door and outlined with a pencil, then with a knife.
Now, with the help of a hammer and a chisel, it is necessary to cut out a place under the hinges with a depth of about 3-5 mm, otherwise they will either hang out or bulge out. In order to get the ideal depth, you need to cut the tree gradually, applying a loop periodically. The final stage is trying on the hinges and marking the places for screwing in the screws. Next, holes are drilled. The hinges are fastened with screws.
How to mount the frame in the opening?
The unit is mounted using self-tapping screws. It would, of course, be possible to carry out anchoring, but this is not advisable. Most often, in order to secure the structure with high quality, 3 fasteners are enough. When assembling an MDF box with your own hands, the fastening elements must be masked with the hinge counterplate, as well as the lock. Further, installation takes place in the opening itself. The rack is also fastened with self-tapping screws.
The next step is to hang the canvas itself, which needs to be well strengthened. When fixing the door leaf in a vertical way, it becomes motionless. After that, the lock rack is attached. On the canvas, you need to bring out the same gap between the crossbar and the posts. It should not be more than 3 mm, otherwise the aesthetics of the door will be impaired.
If it is made, on the contrary, less than the specified size, then over time, due to changes in humidity and wear of the hinges, most likely difficulties may arise with closing and opening. In buildings with brick walls, before installing the racks, you need to prepare the mortgages for the screws. On each side, 4 wooden spacers are installed.
The gap formed in the process of work is removed with ordinary foam, but you should be very careful not to stain the coating of the door itself with it. The foam hardens, as a rule, for 3 hours, but the end of the process occurs in a day, when it becomes approximately 3 times larger in volume. When working with it, it is necessary to take into account the aforementioned property, since if you "overdo it", then the elements of the block may suffer.
It is worth noting that the assembly of the box is a rather complex process, which includes certain stages that require special attention. All work should be done step by step in order to avoid mistakes and disappointments. You can learn how to properly assemble the door frame of an interior door with your own hands from the video.