Depending on experience and knowledge of how to make a foundation for a stove in a bathhouse, the service life of the stove and the entire bathhouse as a whole depends. Therefore, it is important to be able to perform simple calculations on materials and choose the type of foundation depending on the size of the furnace, the type of soil and other factors.
Collapse
Why do you need a foundation for a stove in a bathhouse?
To answer this question, let’s look at the reasons that require installing a base for a stove in a bathhouse:
- The size of the foundation for the stove in the bathhouse and its design directly depend on its dimensions and weight. A large stove, even made of metal, will require the building to be equipped with a base for it. Sizes increase, weight increases. According to the rules, if the mass of the heater is less than 200 kg, you can not make a separate pillow, but mount the heater on a ready-made foundation;
- floor material. If it is made of flammable materials, you will need to make a non-flammable base for a solid fuel stove. In this option, you can simply lay out a brick cushion, making it larger than the dimensions of the stove by at least 1 m;
- Definitely, a separate structure will need to be made for the brick heater even when laying the main foundation. Such a device will protect the heavy structure from destruction during shrinkage or soil movement;
- the structure of the main base and the bathhouse building itself are affected by the force of gravity, shifted from the center. At the same time, the load is distributed unevenly, increasing at the place where the stove is installed. To this we can add that during operation a large amount of thermal energy is released. Concrete, when heated, transfers heat to the soil, it dries out, settles, and voids form under the foundation.
Therefore, it is important to make at least a pile or brick foundation for the stove in the bathhouse.
Standard scheme
Classification
By depth level
The grounds are divided:
- Shallow. The depth of such a base is a maximum of 700 mm; they are capable of providing a reliable base for stoves weighing one and a half tons. For the cushion, a 150 mm layer of sand, crushed stone or gravel is poured.
- For larger ovens. foundations are made taking into account freezing and soil types.
By type of design
When installing heaters of different materials, lay:
- One of the most popular designs for small-sized stoves is a base made in the form of a tape. The trench for the strip foundation is made according to the dimensions of the furnace;
- monolithic reinforced layer of concrete and reinforcement is widely used in capital construction. Using a monolithic slab, you can equip a foundation for a large sauna stove when installed on non-radiant soils;
- foundation made of supports with a concrete base. Work can be done on sandy and radiant clay soils. A simple and reliable foundation of this type can be made on a finished base by drilling 4 large-diameter holes;
- base with a concrete slab, which is installed on screw piles. In this case, there is no need to dig a pit and pour a large volume of concrete.
According to the material of manufacture
For work, 3 types of materials are used:
- The most common, but expensive material is concrete. With its help, most types of foundations in capital construction are made. This is the optimal solution for an industrial furnace in a bathhouse plant.
- Brick. It is used to create a base for most foundations for small homemade steel sauna heaters.
- Rubble stone is used to make the foundations of bathhouses and stoves. The material is inexpensive and easy to work with.
How to calculate the amount of materials needed?
For calculations, it is important to take into account not only the size of the stove in the bathhouse, but also the depth level and the type of base itself. When calculating, first of all you need to know:
- the thickness of the layer of sand and gravel cushion. You can calculate the amount of sand using the volume calculation formula. To do this, you will need to measure the length of the trench or pit, the width of the fill and the thickness of the layer. After multiplying, you get the required number of cubes of sand and crushed stone;
- Concrete calculations are made using the same formula. Having calculated the number of cubes, you can order ready-made concrete; it must be purchased with a small reserve;
- This formula will help you calculate the number of bricks. Knowing its dimensions, it is easy to determine the amount in 1 cube and calculate the required number when making a brick foundation for a metal heater;
- To stock up on reinforcement, you will have to decide in advance on the design of the base and, based on this, determine the approximate footage of the rods. But here you should take into account the remaining unmeasured ends when cutting long lashes.
Calculation example
For clarity, let’s look at an example of calculations for a bathhouse with an area of 48 m2, for a monolithic slab for a total area combined with the base for the stove. To work, you need to decide on the cubic capacity of the base, the thickness of which is 20 cm. We multiply the length, width and thickness of the base - 6 m width, 8 m length and 0.2 m height of the foundation. We will need 9.6 m 3 of concrete.
But it is necessary to take into account the dimensions of the reinforcing layer. To lay it, 4 segments are used to place along the long side - 32 m of reinforcement and 3 lintels along the width - 18 m. Now you can determine the cubic capacity of the reinforcing layer, it is equal to 1.5 m 3.
As a result, for the base you will need to order 8 m3 of ready-made concrete and 48 m of reinforcement.
Making a foundation for a sauna stove with your own hands
The base for a stove in a bathhouse is a simple operation that does not require much experience. Any steam lover can do the job. How to pour a foundation for a stove in a bathhouse - for this it is important to determine the design of the base, calculate and order the required amount of materials, and prepare tools. You need to make a foundation for an iron stove in a bathhouse with your own hands - just lay several rows of refractory bricks on a ready-made foundation for the entire building.
General requirements
Several points can be highlighted here:
- Large margin of safety and reliability of the design.
- High level of resistance to ground movement.
In this case, the depth of soil freezing in your climate zone when digging a pit, as well as the structure and type of soil, must be taken into account. When following the recommendations, the foundation is not subject to cracking or damage throughout its service life.
For various soils, the minimum pit depth is accepted, regardless of the climate conditions in this place:
- dry sandy soils - minimum pit depth 50 cm;
- rocky soils – up to 400 mm;
- clay soil, loam - you will need to make a pit up to 1000 mm deep. This also takes into account the soil freezing depth for your region;
- wet marshy soils - the distance increases and becomes from 1000 mm.
It is not recommended to make strong foundations on bulk soils, especially if large fragments of soil were used during filling. The size of the foundation for the stove in the bathhouse is made taking into account the protrusion beyond the dimensions of the stove by at least 100 mm on all sides.
Monolithic

How to pour a monolithic foundation for a stove in a bathhouse, in what cases is it necessary to equip a heater with such a foundation? In a small individual bathhouse there is no need to make such a separate base.
To work you will need:
- dig a pit according to the size of the stove, to the depth required for your region;
- make a sand cushion, 150-200 mm thick, compact the layer;
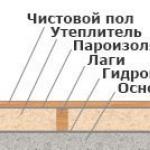
- fill the pit with expanded clay for a thermal insulation layer and cover it with film or roofing felt for waterproofing;
- make formwork along the contour of the slab from boards or other available material. In the case of a large base, the formwork is secured with several stiffening ribs, which also serve as beacons for pouring an even layer of concrete;
- make a reinforcement layer from reinforcement with a thickness of 10 mm. It is better to knit the reinforcement with wire; for welding you will need to prepare or buy couplings;
- We gradually fill the base with concrete and stretch its excess with a rule of a flat board or steel profile;
- the layer needs to be compacted. For this it is better to use a vibrator.
- While the concrete hardens, it must be watered with water, in this case the top layer will not crack.
The monolithic foundation is ready, the surface can be strengthened by ironing it with a layer of cement
Columnar with base plate

The foundation for a stove in a bathhouse of this design can be installed on top of the main one. In this option, use a reinforced concrete slab of a suitable size or you will have to fill it, making permanent formwork for it from corners or channels. This design protects the stove and the building from damage due to shifts in the layers of the earth in different seasons. It is recommended to install on loams and clay. All work is carried out in several stages:
- Having marked 4 installation points for the pillars, we drill holes in the ground for them to the required depth. The minimum size of pillars for large stoves is 200 mm; for small steel heaters, use a section of 80-100 mm;
- the bottom is filled up and compacted with crushed stone. Layer size 15-20 cm;
- We make permanent formwork from roofing felt or other durable material, roll it into a roll of the required size and insert it into the hole;
- we fill the cavities with concrete and compact the layer;
- after a week, we lay several layers of waterproofing on top of the pillars. To do this, you can use polyethylene or roofing felt, the main thing is that the edges extend beyond the dimensions of the oven;
- we lay the finished one or fill the area with mortar, making a homemade monolithic slab.
Work is done. This type of foundation is most suitable for a metal stove in a bathhouse.
On stilts

This foundation for the stove in the bathhouse is made in the same way as the previous one. With its help, steam rooms are equipped on marshy soils and bulk soil. For piles, concrete or steel rods of the required size are used. For installation, smaller diameter holes are drilled to the main soil and then the piles are driven into the ground.
A monolithic reinforced concrete slab larger than the stove by at least 200 mm is poured on top.
With the help of such a foundation, those who like to cool off after a steam room in an ice hole can set up a bathhouse not far from the river bank, the main thing is that the environmental prosecutor’s office agrees with this.
From rubble stone

The foundation for a stove in a bathhouse with a base of rubble stone is carried out in the following sequence:
- make the pit larger in size by at least 15-20 cm;
- make a sand cushion;
- We make formwork along the contour and place several spacers - beacons;
- We lay a layer of film from the inside to waterproof the foundation;
- lay out 1 layer of rubble and fill the voids with crushed stone. Layer thickness 150-200 mm;
- fill a thin layer with cement mortar;
- After the cement has hardened, lay out the 2nd layer of rubble and apply a layer of mortar. We repeat the operation several times;
- Having checked with a level that the installation is correct, we level the layer, adding solution to the required areas;
- the foundation should not reach the top of the formwork by 70-80 mm. We cover the entire area with a layer of roofing material with melted bitumen.
The foundation for a small iron sauna stove is best made of brick, laid out in rows on the finished concrete base of the sauna.
Brick
Making such a foundation for an iron stove in a bathhouse with your own hands is not difficult. Let's look at the option of making a base for a heater from a barrel.

For this:
- we mark the area for the stove, making it 300 mm larger;
- Lay out the first layer of brick longitudinally on the cement mortar and clay;
- the second row is laid out across. This is done to connect the layers.
- in the middle part of the foundation from the middle of the front part we make a niche for the ash pan and the blower. We close this cavity with a door.
For metal furnace
The foundation for a metal stove in a bathhouse is made at the stage of the main work on making the base for the room.
For this:
- We deepen a separate pit to a depth of 500 mm at the location where the furnace is installed. At the same time, we take into account an increase in the dimensions of the pit by 20 - 1000 mm, depending on the material of the future floor in the bathhouse. If wood is to be used, the foundation must extend at least 500 mm on each side;
- Having leveled the bottom and removed the soil, we fill the base with an even 200-300 mm layer of slag;
- We compact the layer using a manual tamper. Then expanded clay is poured on top for thermal insulation;
- fill the base with a solution of cement and sand and let it harden;
- lay out a layer of roofing material, fill it with ready-made or homemade concrete;
- Having laid the flooring, we proceed to the final operations. We lay out several rows of refractory or ordinary building bricks. The first row can be laid on edge to increase the gap to wooden floors.
Remember - if the walls and ceiling of the bathhouse are made of wooden parts, in this case the foundation for a metal bathhouse stove must be planned taking into account the required minimum distances:
- to walls – from 700 mm;
- ceiling – 1000 mm;
- floor - 140 mm.
To protect the walls you will need to make screens. It is better to make them covered with foil on the front side. In this case, the heat will be reflected from the screen, spreading throughout the room.
Which option is best to choose?
Several factors influence the choice here. To equip a large public bathhouse, you will need to make a monolithic foundation or a pile foundation when building on swampy or bulk soils.
In this case, you will not need to make a base at all if you are installing a small heater for a steam room made of steel or lay 2-3 rows of refractory bricks on top of the finished concrete floor. It will speed up the production of a foundation for a large stove on poles. This design can be used to equip a steam room in an old bathhouse by removing the wooden floor along the contour of the future base and drilling 4 holes in the ground.
Conclusion
It is better to make a reliable foundation for your stove, enjoy fragrant steam and leisurely conversation with friends, than to end up with a rickety or even burnt-out sauna that did not have a reliable and durable foundation for the sauna stove. You should not be lazy and skimp on your own safety.
←Previous article Next article →The external contour of the bathhouse base is connected using supporting structures for partitions into a single system.
This approach ensures uniform settlement of both the bathhouse and the heating boiler. Laying the foundation for heating equipment occurs in the following order:
- the site is leveled and marked along with the rest of the supporting structures of the bathhouse;
- a pit is dug for the foundation;
- its bottom is leveled with a sand-crushed stone cushion of the required thickness;
- going and;
- Work is being carried out on waterproofing and reinforcing the furnace foundation.
The cross-section of the supporting structure or the thickness of the base slab is calculated based on the following data:
- the weight of the furnace, which in turn depends on the main building material and the size of the equipment;
- masses of additional structures of chimneys, tanks for heating water, etc.;
- soil composition, depth of freezing and occurrence of soil water.
What is the difference between brick and metal?
A metal stove is much stronger than a brick stove. Installation with a slight distortion or deformation of the base will not cause much damage to a metal stove, whereas for a brick stove such movements of the foundation mean complete failure. Hence the need for a high-strength foundation for a brick kiln. Metal stoves are usually quite lightweight, which makes it possible to do without a separately laid foundation. A foundation for an iron stove in a bathhouse is not required. For them, it is necessary to provide proper fire protection measures - asbestos sheeting, a sheet of roofing iron under a metal stove, protruding beyond the stove by at least 25 cm, and in front of the firebox - at least 40 cm.
A brick kiln, having a much larger mass, cannot tolerate deformations of the base and needs a full-fledged foundation, designed to withstand the high pressure of the kiln and compensate for shrinkage processes. There should be no connection with the common foundation, otherwise the difference in the pressure created on the foundation can lead to destruction.
Depth of laying the foundation for the furnace
When assessing the depth of the furnace foundation, it is necessary to take into account the location relative to the walls of the bathhouse or house, as well as ensure the stability and reliability of the furnace base.  If the foundation under the walls of a house or bathhouse has a shallow depth, then the foundation for the stove is located at the same depth. If the furnace is located near a foundation with a large depth, the base of the furnace is raised and placed on a sand bed. It should be noted that the minimum depth for laying the base for the furnace is 50 cm in both cases.
Foundation for the stove. Example
A stronger and more reliable foundation is made for brick stoves, since the weight of this structure exceeds the weight of a metal one.
- Dig a hole depending on the location of the furnace foundation. The width and length of the pit should be 20 cm larger than the dimensions of the stove foundation.
- To save concrete, the finished pit is leveled, half filled with sand, thoroughly compacted and checked for horizontalness.

- Waterproofing is placed on top of the sand and formwork is made.
- The top of the pit is poured further with concrete to ground level, which can be reinforced with metal rods for greater reliability. Mortar recipe - one part of cement contains 2.5 parts of sand and four parts of gravel. Next, the foundation surface is checked for horizontalness using a building level.
- After the concrete has hardened, about 5-6 days, the formwork is dismantled, waterproofing is applied and the foundation for the furnace continues to be built to the level of the finished floor. Part of the base above ground level can be laid out of brick or formwork can be made and filled with concrete mortar to the floor level.
- The gap between the edge of the pit and the foundation is filled with sand and thoroughly compacted.
Foundation for a furnace on a reinforced concrete slab
This technology is used on soils where the lower layers of soil are weak and the upper layers are more reliable.
Remove the top plant layer of soil, about 20 cm, and level it. Sand, crushed stone or gravel are poured, compacted and a reinforced concrete slab with a thickness of 12 to 15 cm is placed on the resulting base or made on site.

Brick stoves can be installed on a stove with an area of no more than 2.5-3 m2, and light metal stoves with an area of about 1.5 m2. Of course, the larger the area of such a base, the stronger and more reliable the foundation will be.
You can make the stove yourself. To do this, after the stage of laying gravel, it is necessary to install formwork corresponding to the dimensions of the slab. After this, you need to pour concrete to a height of 5-7 cm, correctly lay the reinforcement or reinforcing mesh and pour it to the desired height. Before the solution has set, it needs to be leveled.
After the solution has hardened, it is necessary to apply waterproofing and continue building the foundation for the furnace to floor level. This can be done with brick, rubble or with concrete using formwork.
After a week, coat the upper part of the resulting base with hot tar and cover it with roofing felt.
When installing the stove, it is necessary that its center of gravity coincides with the middle of the stove. When making such a base, about 1-2 m 3 of concrete is saved.
Foundation for a stove on a columnar base
For heavy stone stoves, a columnar foundation of four pillars located at the corners of a reinforced concrete slab or a welded frame made of metal profiles is suitable. 
To erect pillars, you need to use a regular hand drill to make holes to the depth of soil freezing.
Then we take asbestos pipes, install them in the pits and fill them with concrete. The width of the asbestos pipe is taken based on the bearing capacity of the soil and the weight of the furnace. How to do this for a house is written in the article Calculation of the foundation. Using the same scheme, calculations are made for the furnace.
Then we install the finished slab or make formwork and fill the slab on site. The height of the pillars depends on the height at which the slab will be installed.
You can also install a frame welded from steel profiles on the poles, which will serve as the foundation for the furnace.
If you choose the exact option foundation for the furnace and do all the work correctly, the structure will last for many years.
Base for a metal sauna heater
With a sauna stove weighing up to 750 kg, you can do without constructing an individual supporting structure - just install a protective floor covering. However, if the floor is wooden, its strength characteristics should be sufficient. It is advisable to check the condition of the joists under the flooring and, if necessary, carry out spot repairs of the area.
A layer of clay mortar is applied to a durable wooden flooring, on top of which a sheet of asbestos is laid in such a format that its edges protrude 25-30 cm beyond the contour of the stove. Excess clay is removed by rolling a paint roller over the asbestos, after which the mortar is given a week to harden and dry. A sheet of galvanized roofing iron of an even profile with a thickness of 0.8-1.0 mm of the appropriate format is laid on top of the asbestos.
 Protective materials for sauna stoves – asbestos and galvanized sheet steel
To avoid future injuries, the corners of the iron sheet are given an oval shape and pressed to the flooring with self-tapping screws. The protective platform for the heater is ready.
 Options for arranging a protective platform for a sauna heater
For a metal stove, sometimes an individual load-bearing base is still installed, and there is a reason for this - wooden flooring and logs in a bathhouse age faster and lose strength.
The sequence and technology of constructing a foundation for an iron stove in a domestic bathhouse:
- construction of a pit with a depth of 0.5 m and dimensions in plan that are 10 cm larger than the dimensions of the heater;
- bottom planning with backfilling of crushed stone with a layer of at least 30 cm and compaction;
- installation of concrete preparation on top of crushed stone from liquid cement-sand mortar 5 cm thick;
- after the solution has dried, perform waterproofing with 2-3 layers of roofing material coated with bitumen mastic;
- formwork installation;
- production and laying of a reinforcing mesh frame with a cell of 8-12 cm from steel or plastic reinforcement of variable profile with diameters of 8-10 mm (the finished frame should be located in the lower part of the volume of poured concrete - at a distance of 5 cm from the waterproofed base);
- laying a 20 cm layer of concrete prepared in a ratio of 2:5:8 (cement, sand, small crushed stone);
- when the concrete reaches 70% strength (in a week), lay brickwork on top of it to the floor level.
 Construction of an individual load-bearing platform for a metal furnace
Important! The entire volume of the foundation for a small metal stove in a bathhouse can be made of brick laid on mortar. .
What to consider when planning the foundation for a sauna stove
Let's consider the case when the weight of the stove exceeds 700 kg; the material is brick. What parameters should be used to select? In general, the choice is made for the entire building at once. The terrain of the site is taken into account - whether planning is needed, how difficult or costly it will be.
Dependence on soil type
- For difficult terrain, slopes or folds best to use screw piles, which eliminate expensive and not always possible excavation work. In addition, they can be screwed in manually without involving complex construction equipment.
- For dense rocky soils you can get by with shallow tape foundation. In this case, its purpose is to level the site and establish a plane; the bearing capacity of the soil does not require complex measures.
- Soils with high groundwater levels require pile type of foundations. Digging a pit in such conditions is tantamount to the formation of a small lake on the site, so screw or driven piles are used, immersed in the soil to the level of dense layers.
- At large depths of soil freezing done strip foundation buried below the freezing point. The depth of the pit in such cases can be more than 2 meters, which is too much for the base of the furnace. The issue is solved by the formation of a sand cushion, tightly compacted and leveled. The thickness of the cushion is such as to bring the bottom mark of the furnace base to the required height, where the next layer is laid - a butcher block or reinforced concrete slab.
- Areas with high seasonal elevation changes - soil heaving- require or pile a foundation resting on dense layers of soil and raising the entire building above ground level, or arrangement of a continuous monolithic slab, a massive, durable reinforced concrete base. Such a slab moves along with the ground surface, preventing deformation of the building fixed on it. A solid slab foundation is reliable and durable, but requires a significant investment of money and labor, since it is usually built for the entire bathhouse. A separate stove for the stove will not work in difficult and wet soil conditions; its area is insufficient.

Foundation in a bathhouse under a stove, examples of step-by-step work
It is impossible to imagine a Russian bathhouse without a stove. Today, like hundreds of years ago, the furnace must be placed on a pre-prepared foundation, for which the floors are dismantled, a pit is dug and concrete is poured. It is best to start this process at the construction stage, but sometimes the stove is chosen at the last moment, which is why the floor has to be “unraveled.” The task of the foundation is, firstly, to distribute the load from the main structure. Secondly, ensure an adequate level of fire safety. About how to properly make a foundation in a bathhouse for a stove, which one to choose and what is needed for this - in our article.
- When building a foundation for furnaces, it is important to consider the weight of the structure. If its weight does not exceed 750 kg and its construction is supposed to be carried out on the first level, then a reinforced concrete base will be sufficient. If the mass of the furnace exceeds the specified indicator, this is the basis for the construction of a separate foundation.
- For a stove that is relatively light in weight, it is recommended to choose a columnar foundation. In such a foundation, sufficiently recessed pillars perform the task of piles, and a reinforced concrete slab placed on the ground acts as a support. This option for constructing a foundation structure has gained a reputation as the most reliable structure.
- The construction of a foundation for a brick kiln requires special attention. In this case, it is important to prevent even minimal deformation changes in the foundation structure. Otherwise, there is a high probability of cracks occurring in the brickwork, which will subsequently lead to fragmentary or complete destruction of the stove structure.
- The stove foundation should only take the load from it. You should not connect the stove foundation to the base of the house. A gap of 5 cm should be made between the two bases. This gap should be filled with sand in two layers. Or pave it with waterproofing material.
- To correctly determine the size of the future foundation for the furnace, you need to proceed from the structure of the soil and the mass of the furnace structure. When determining the depth of the foundation, you should take into account the water level of the soil, strength and heaving, freezing depth and the level of the foundation of the house.
Before starting construction, the density of the soil must also be taken into account. This point is especially relevant when constructing heavy furnace structures. The most suitable are clayey and sandy soils, as they are sufficiently dense and do not contain excess moisture. If the soil has a loose, heterogeneous structure, it must be compacted before starting work.
Foundation for the stove photo:
Installation of a pile foundation with a slab
One of the types of foundation for a furnace is a pile structure, which is characterized by good reliability and ease of installation.

Foundation on stilts
- We make markings on the ground according to the dimensions of the future oven and measure 10 cm in each direction - this will be the size of the foundation.
- We put pegs and pull the rope.
- We make formwork from wooden boards, fastening them together with nails, and set them according to the size of these holes. The formwork is a wooden box without a bottom.
- We make waterproofing using polyethylene, which we staple along the perimeter to the walls of the formwork.
- Pour sand onto the bottom, compact it well and fill it with gravel to a depth of 15 cm. Fill with water.
- We fill the finished piles and inserted into the hole with concrete mixture.
- We take a technological break for 2 weeks.
- Now you can fill the entire foundation with concrete mixture.
- Cover with polyethylene and let the foundation harden for at least 2-3 weeks.
We remove 20 cm of the plant layer of soil using a bayonet shovel.
Vegetable soil layer removed
In each part of the peg we drill holes with a diameter of 20 cm to a depth of 50 cm.
Pile foundation for the furnace
We knit the reinforcing bars using 0.8 mm wire and twist them well.
Knitting reinforcement mesh
We install a reinforced frame.
Foundation reinforcement
We roll up thick sleeves of roofing felt and insert such piles into the pits. Asbestos pipes can be used as piles.
Ruberoid sleeves
How to make a foundation for a stove
 When making a foundation for a Russian brick oven, you must adhere to the requirements for the foundations of any other structures. Of course, this type of foundation has its own characteristics that you need to know about.
Preparing for work
If you decide to make a foundation for a stove for a wooden house with your own hands, then, first of all, you need to decide what dimensions will be at the design.
When designing, keep in mind that on each side it should be 50 millimeters more than the size of the stove. For example, if you plan to stove size 1/0.7 meter, then the foundation should be 1.1/0.7 meters.
Once you have decided on the dimensions of the structure, you can choose the location of the furnace. Also consider where the chimney will be located; an exception is made only for barbecue stoves. For all other stove options, this is a very important point, because an ill-conceived chimney can rest against the supporting structure on the roof. To correct such a deficiency, you need to spend a lot of time and effort, so it is better to avoid troubles and make accurate calculations immediately.
If the foundation is made for a Russian stove, then it is not necessary for it to come into contact with the foundation of the house. Such structures have different pressures, and upon contact they can be deformed, which will lead to troubles with both bases.
Making a foundation pit
 The foundation pit is an important component of the foundation, without it cannot be avoided. It happens that builders remove only the top layer of soil, thereby saving material and time, but this should not be done recommended. The pit should be made below the freezing level of the ground. These characteristics have individual parameters for each region.
You can make a shallow foundation, but then you must use piles. If the soil is sandy and dry, then it will be enough to make a pit half a meter deep. And for heaving soil, it is necessary to dig a pit at least a meter deep. When the foundation has been marked, they begin to dig the pit, while the width and length must be made with allowance for the formwork.
The formwork itself made with boards 2 centimeters thick, they are knocked together into shields and then fixed in the pit with spacers. A ten-centimeter layer of crushed stone is poured onto the bottom of the pit, leveled and compacted.
We do waterproofing and filling
Making the solution:
- 1 part cement;
- 3 parts clean sand;
- 5 parts of crushed stone without impurities.
First you need to mix all the components in a convenient container. When you get a homogeneous mass, you can start adding water little by little. The mixture should be constantly stirred, you need to add water until it works consistency of thick sour cream, only then the solution will be ready. The finished solution can be safely poured into the formwork. It is recommended to do the pouring in one day, otherwise the foundation will end up consisting of several layers, which may crack during operation.
Foundation on stilts
 For a shallow foundation it is necessary use piles:
- To begin, remove the vegetable matter. layer 25 centimeters.
- Then you need to use a drill to make holes a meter deep 20 centimeters in diameter.
- In the bottom of the holes made, crushed stone is filled and compacted.
- It is necessary to insert into the made wells roofing felt rolled into a sleeve.
- Further holes are filled with concrete mortar.
You can do it a little differently if you have asbestos or polyethylene pipes the required diameter and length. Then pipes are simply inserted into the holes, and after 10 days the foundation is being poured.
Today, screw piles have become popular instead of concrete ones, but to install them you need to use the services of specialists. This can only be done with skills and good practice. Watch the video how they work specialists with screw piles.
If you decide to make a stove, you should definitely consider foundation design. Even if you really want to save money on construction, it’s better not to do this, otherwise, that’s all. the building may collapse. Only by making a high-quality foundation with your own hands, you will be able to use it for many years, and step-by-step instructions will help you with this instructions and video lessons.
Kinds
 Modern construction uses a wide variety of materials to Russian stove and foundation. It can be made not only at home, but also in a bathhouse; what could be better than a Russian stove in a Russian bathhouse? Most often done these types of foundations:
- monolithic;
- pile;
- tape;
- screw;
- under a stone stove;
- under an iron stove.
For low-rise and wooden houses they often do strip foundation for the stove.
If the stove is made of iron, then the last option is most suitable, in which there is no foundation as such. Thanks to the design of the iron stove, a high-quality and durable floor covering is sufficient for its foundation.
Often done slabfoundation, especially for brick kilns. The movement of the soil has no effect on the reinforced monolithic slab, but if the structure is very large, then it will not cope with it. Groundwater also affects destructive to her. This stove is not suitable for installations in baths. The cost of such a foundation is low, but its reliability is not the best. There are many videos on the Internet that will help you easily decide the right type of foundation.
Foundation for an iron furnace
Despite the fact that iron sauna stoves are usually light in weight, even for the lightest thin-walled model it is advisable to have a separate foundation. The thing is that even a slight misalignment, sometimes invisible to the eye, leads to accelerated wear. And only the presence of a solid foundation guarantees its absence, and therefore long-term operation of the stove.
Making a foundation for an iron stove is not difficult. Necessary:
- Dig a pit of a suitable size. The size of the foundation should be 10-15 cm larger than the dimensions of the stove (more is possible, less is not possible). If the metal furnace is built with a brick screen, then the indentation is calculated from the outer edge of the screen. The depth of the foundation and pit depends on the type of soil. On non-heaving soils, 50-60 cm is sufficient.
- Compacted crushed stone is poured with liquid cement mortar. The approximate ratio of materials for its manufacture is as follows: take 4 parts of sand for one part of cement, the amount of water depends on the state of the solution - it should be of medium thickness.
- After the layer has dried (in a day or two), a waterproofing layer is laid. This can be roofing felt in two layers or one of the new bitumen waterproofing materials (roll or coating).
- The formwork is set according to the selected foundation dimensions.
- Instead of a concrete layer, you can use bricks. They are placed on a cement-sand mortar.
Crushed stone is poured into the bottom and compacted thoroughly. The compacted size of this layer must be at least 30 cm.
Foundation for an iron furnace
A layer of concrete is poured. For one part of cement you need to take 2.5 parts of sand, 4 parts of fine gravel or expanded clay (with expanded clay you will get a more thermally insulated base). First, cement and sand are mixed dry until an even color is obtained. Then gravel or expanded clay is poured in and everything is mixed again. When all parts are evenly distributed, dilute with water. Water usually goes a little less in volume than cement. We carefully level the laid out solution, checking its horizontalness using a building level.
The foundation for the stove can be covered with bricks: it looks more attractive this way
The formwork can be removed after three days, and the concrete gains its design strength in three to four weeks. For normal ripening, it must be regularly moistened with water: sprinkle generously 2-4 times a day, depending on the temperature. There should be no puddles, but the solution should get wet well. If it's too hot outside, cover the base with plastic wrap to prevent moisture from evaporating quickly.
There is a moisturizing option that does not require frequent spraying: cover it with burlap or some other fabric, add a good layer of sawdust, and wet it. This is enough for a day.
A concrete base is cheaper and stronger, but requires more physical effort, even if you have a concrete mixer. The disadvantages of concrete include the difficulty of dismantling it.
How to line the foundation for a metal stove
If the upper part of the base is cast from concrete, then outwardly it has an unattractive appearance. You can line the foundation with bricks from the outside, but this is only if conditions permit: the brick is still of decent size. For other cases, cladding with thick ceramic tiles (thick ones) is suitable. Porcelain tiles are likely to crack at high temperatures. Perhaps a natural finishing stone would be suitable.
When tiling, place washers made of thick soft metal (copper or aluminum) under the legs of the stove. Sharp, hard legs often scratch the front surface of the tile, causing it to crack. The washers will be insurance against scratches.

Heat Resistant Tile Adhesive
The tiles are laid on a special heat-resistant glue (there are such). The grout is also selected appropriately - resistant to high temperatures. You can do without grouting: carefully open the seams with glue. If you do everything carefully, the appearance will be normal. The grout only looks good at first. Then, when ash and soot are added, you will be tortured to scrub it off.
Concrete foundation
To build a foundation for the furnace you will need:
- Cement.
If your soil contains a large amount of sulfates and the groundwater level is quite high, we recommend that you use SSPC grade sulfate-resistant cement. The difference between SSPC cement and conventional PC is the ability of concrete made from this brand of cement to withstand the destructive effects of sulfates dissolved in groundwater.
- Coarse sand without inclusions. The ideal option would be to use mountain sand, but sea and river sand are also suitable. We have already discussed methods for cleaning sand from impurities on the pages of our Internet resource.
- Formwork material.
- Crushed stone.
- Ruberoid or dense polyethylene.
Tools:
- Solution trough
- Shovels: bayonet, shovel
- Building level
- Hammer, nails, hacksaw for formwork construction
- Construction stapler
Do I need to go deeper?
You can begin to build the foundation for the furnace. Many may wonder whether it is necessary to go deep into the ground when laying a foundation for a stove with their own hands. Our answer is definitely. Sometimes there is an option in which the foundation is arranged with shallow depth. Only the top plant layer is removed and after installing the formwork the foundation is poured. This is completely the wrong way. The foundation slab, arranged in this way, will be constantly under stress, especially in winter. The motivation for economical consumption of building materials when constructing such a foundation is not justified. The penetration must be carried out to a depth below freezing level in your region. You can use a shallow foundation for a bathhouse under a stove, but with the obligatory installation of piles under the main foundation slab.
Pit construction - main parameters

Digging a pit
For dry, sandy soils it happens 500 – 600 mm is enough. But on heaving soils this depth should not be less than 1000 mm. We repeat - this is the correct foundation design.

Proper laying of the foundation
According to the markings of the swarm pit. The size of the pit must allow the installation of formwork. But if the soil on your site is dense enough and the edges do not crumble, you can do without it. In any case, it all depends on the specific location and soil. When the formwork is installed, the bottom of the pit is filled with layer of crushed stone 100 mm thick. Crushed stone must be leveled. After this, it is necessary to compact the crushed stone using a manual tamper.
Waterproofing and filling
To waterproof the foundation, a layer of roofing material is attached to the inside of the formwork using a construction stapler. You can start filling
It is important to know that the upper level of the foundation should be 60 - 70 mm lower than the main floor of the building. Prepare the solution according to the following proportions:
- Cement 1 part
- Sand 3 parts
- Crushed stone 5 parts
Sand and gravel must be clean. Additional inclusions reduce the adhesive properties of the mortar mixture. It would be ideal if the sand and crushed stone are washed with water.

- First prepares dry mixture of cement, sand and crushed stone. Can be used.
- After shoveling and obtaining a homogeneous mass, water is gradually added until a solution of consistency is formed thick sour cream. The solution can be poured.
Try to complete the filling in one day. Otherwise, several layers will form in the foundation, which can lead to cracking.
Construction of the foundation
Under a metal stove You don’t have to build a separate foundation and limit yourself to fire safety shutoffs. However, if the weight approaches the limit value (700 kg), and it consists of the weight of water in a fully filled boiler plus the weight of stones plus the own weight of the stove- it is better to equip a separate foundation for a metal furnace. To do this you need:
- Dig a pit (to a freezing depth, but not less than 50 cm), fill it with crushed stone and compact it thoroughly.
- A concrete layer is poured on top, which must completely harden. The composition of the solution is cement with sand 1:4.
- Double layer of waterproofing (roofing felt or similar sheet material),
- Filling the main slab with a solution of cement, sand, fine gravel. While the solution has not hardened, the horizontal line is checked and adjusted if necessary.

Foundation for a brick oven requires a more thorough approach and is made as durable as possible.
- A pit is being dug. Most often, this is done simultaneously with a common foundation pit for the entire building.
- A layer of sand is added to remove the bottom of the pit. Sand is poured in layers of 15 cm, each layer is spilled with water to compact it. Subsequent layers of sand are added only after the water has subsided. This technology makes sand compaction easier and provides a dense layer. After this, a rubble layer is laid - broken brick, concrete, thickness - 20 cm. Again a layer of sand, spilled with water - and so on until a dense cushion is formed that does not settle when compacted.
- A layer of crushed stone 10 cm thick is laid.
- Formwork for the main foundation slab is erected on top.
- A reinforcement frame, welded or knitted, is installed inside the formwork.
- Concrete is poured to a height that does not reach the floor level by 5-15 cm. It is kept until completely dry.
- The surface is generously lubricated with tar, several rows of brickwork are laid on top to the floor level, on which the construction of the furnace itself will begin.
Useful video
The specialist explains the intricacies of construction:
Options
The most common options for building a foundation are considered, proven by frequent use and quite reliable. In some cases, other types of foundations are used, for example, pile-slab. With this method, the monolithic slab rests on piles buried to dense layers of soil.
The good thing about this method is that the possibility of settling of the bedding and the butting layer is excluded, the piles stand firmly and motionless. Driven reinforced concrete piles or screw piles are used as piles, making it possible to independently screw them into the ground. The installed piles are trimmed (extended) to the required length and tied with a channel belt (grillage), which serves as a support for the slab.
Nuances that must be taken into account during construction
Experts advise maintaining reasonable proportionality in the ratio of the weight of the furnace to the power of the foundation. We must remember that the foundation itself is also subject to sedimentary processes that can upset the balance base, create a distortion or disruption of the plane. The thicker the butt layers, the higher the risk of sedimentary deformations.
Hence the rule: the foundation must correspond to the load. This applies to such types as monolithic, brick, rubble and slab foundations, which are, in fact, variants of the same foundation.
Pile foundations that require the use of equipment must be designed in advance and pile driving work must be carried out simultaneously with general work, otherwise the equipment will not be suitable for the work site. At all, all work on the construction of a bathhouse should be designed and carried out simultaneously so that one does not get ahead of the other. In this way, errors and inconsistencies in construction stages will be avoided.
Screw piles can be screwed even inside a finished building, if there is room for the gate to move. This option may be needed when constructing a stove in an already completed building or when reconstructing a bathhouse.
In conclusion, it should be noted that the issue of reliable and competent placement of the stove is quite complex and responsible, but it is necessary to understand it, since the safety of the entire building, the comfort and safety of people may depend on the correct actions. Before starting work, it is necessary to thoroughly study all available materials for the chosen construction method, find out the geological conditions of the area, and ensure compliance with building codes and regulations. This will ensure long and reliable service for your bath.
You may also need the following materials from the section on bathhouse foundations:
- Height and depth of the foundation,
- How to do it right and how to do it yourself,
- How to fill correctly
- Which foundation is better?
reference Information
Where to buy, order:
Sauna stoves >>>
Completion of foundation work

Ruberoid protects the brick from moisture, which, coming from the ground, destroys it.
As for the inside of the foundation for a Russian stove, it is done “under backfilling” (at first they simply lay stones, then use a liquid solution - pour the stones with it). The foundation for the stove is built from rubble, without reaching the level of the floor itself (finished floor). Leave 14-15 cm. Ordinary clay bricks are laid at the very top of the masonry, which occupy a whole row. The foundations for the pipe are constructed in the same way. Now it is necessary to arrange waterproofing. Most often they take roofing felt, which is laid in two layers. Both glassine and roofing felt will do. Another brick row completes the work.
The foundation for a brick stove should be made one row lower from the border of the finished floor. And in order to protect the stove mass from moisture, a waterproofing layer is laid, on which the last brick row is laid. This should be equal to the clean floor. In the case of installing a foundation under a pipe, the same operations are carried out separately. When laying corners, its correctness must be checked after 4 rows, better even after 3, which is done with a plumb line or using templates in the shape of a metal square.
You cannot connect the foundation masonry for a Russian stove with the walls of the room, since there is a possibility of destruction of the masonry if the walls in the house settle or the structure being built settles.
It is also desirable (and quite relevant) that the owner does not encounter the problem of laying pipes under the foundation. This is a rather serious and complex matter. Therefore, it is initially necessary to determine the location of utilities at the design stage. Then there will be no unexpected expenses in the house and you won’t have to change anything on the go. The foundation for a Russian stove will meet all expectations, and there will be no need to reconstruct it for a long period of time.
Innokenty Andreevich Vlasov
Ivan, in this case you need to start from a 10 liter bucket. Fill a full bucket with sand and add 1/3 of cement, mix everything - 10 liters. or.
How is ready-mixed concrete calculated for 1 square meter of screed 5 cm thick? How much sand and cement will this require? So as not to buy too much. Want.
For different brands of concrete, if measured by volume, then only the ratio of sand and crushed stone to cement changes, and water is always taken exactly half of the volume of cement.
A few additions: 1. If you need to perform high-quality waterproofing with liquid rubber, it is advisable to use geotextiles over the entire surface. Consumption.
How and with what to make the upper border of the foundation cladding (natural stone, flagstone)?

Copyright 2014–2017, moifundament.ru
- foundation work
- Reinforcement
- Protection
- Tools
- Installation
- Finishing
- Solution
- Calculation
- Repair
- Device
- Types of foundation
- Tape
- Pile
- Columnar
- Slab
- Other
- About the site
- Questions to the expert
- Editorial
- Contacts

- Foundation work
- Foundation reinforcement
- Foundation protection
- Foundation Tools
- Foundation installation
- Finishing the foundation
- Foundation mortar
- Foundation calculation
- Foundation repair
- Foundation structure
- Types of foundation
- Strip foundation
- Pile foundation
- Columnar foundation
- Slab foundation
Why do you need to make a foundation for a stove?
Every process and component in the construction industry plays a very important role. Failure to comply with the technology will certainly lead to the destruction of the structure in the very near future.
The lack of a foundation will soon affect reliability and safety. Therefore, if you plan to use the stove for a long time, then building a reliable foundation is an integral part of the construction.
An important condition is the independence of the base for the stove-heater from the main foundation. In this case, the weight of the entire building will not affect the resistance of this component. Otherwise, the weight of the stove and the weight of the entire structure will put enormous pressure on it, which can cause deformation and destruction.
For example, the average weight of a stove made of brick will be 500 – 700 kg, which is an impressive figure. And if you add the weight of the entire building, you can only imagine what kind of destruction the foundation will undergo in just a couple of months.
If this component is not present at all, then using the bathhouse for its intended purpose may not work at all.
Concrete
The classic base for a furnace is a concrete slab, which is made by pouring cement-crushed stone mortar into a deep pit.
Circuit and device
The general structure of the foundation is the same regardless of the type of furnace and soil; usually it is a solid base in the form of a cube, which is made from a large amount of concrete mortar. The base structure is clearly shown in this diagram:

The diagram shows the base that we calculated above for a stove weighing 1150 kilograms.
Materials and tools
To install a high-quality concrete foundation, a certain list of materials is required:
- Cement;
- Coarse sand;
- Boards for formwork construction;
- Crushed stone;
- Waterproofing, which is ideally served by roofing felt or polyethylene film.
Also, to install a concrete foundation for a brick oven with your own hands, you need the following tools:
- Container for preparing mortar or concrete mixer;
- Bayonet and shovel shovels;
- Measuring tools: tape measure, corner, level;
- For making formwork: hammer, hacksaw, nails;
- To install waterproofing, a construction stapler;
- For laying the base, a manual tamper is used.
Preparation of the solution
The base for the furnace must be strong, so the concrete solution is prepared in the following proportions: 1 part cement, 3 parts sand, 5 parts crushed stone. This consistency can withstand large ovens for a long time.
Manufacturing instructions
- It doesn’t matter what kind of brick or concrete base is installed under the stove, it is initially necessary to dig a foundation pit for it. The depth of the pit depends on several factors: the mass of the stove, the type of soil, and the presence of groundwater. The width and length of the pit must correspond to the dimensions of the heating system and additionally have a certain margin of distance for the formwork. In order not to accidentally make a mistake, it is recommended to first prepare a drawing of the future concrete foundation.
- After this, formwork is installed, the dimensions corresponding to the final values of the dimensions of the structure, according to the drawing and diagram, which should have been prepared in advance. Sometimes formwork is not needed - if the soil is very hard and does not collapse from external influences on it.
- After the formwork is ready, the waterproofing is laid, attached to the formwork using a stapler.
- Pieces of brick or large stones are poured into the resulting hole - this is necessary so that the resulting concrete slab under the stove does not sag and is well adhered to the ground, as shown in the photo below:
- Then the concrete solution is poured so that the base rises 6 centimeters above the floor. When pouring, carefully measure its evenness using a building level and level it to perfection.
- If it is possible to line the ground part of the foundation with brick or rubble concrete, this can be done this way:

Before installing the heating system, the foundation under the furnace should dry for about 10 days; during the first week, spray the concrete surface with plain water.
Foundation for a furnace, what is the role of soil?

Features of laying a stove foundation depending on the type of soil.
It is better to build the foundation for the stove on solid soils. These include, for example, granite (rock), limestone. They have great compression resistance and are resistant to negative temperatures and groundwater. Dense soils (for example, clay or sand) are also a solid basis for the foundation, if the moisture content in them does not exceed the permissible level. The difference between bulk ones is their loose and more varied composition. Therefore, such soil is removed until dense soil is found, or it is thoroughly compacted. Clay sandy soils, loams and sandy loams are well suited as bases for foundations.
Only on macroporous soils, which contain clay, but with large pores, it is impossible to make a foundation for a Russian stove, since the ingress of water liquefies such soils and they become fragile.
The foundation is laid in a soil layer with high humidity using strong materials (both artificial and natural origin), such as concrete, rubble stone and others, which are resistant to the destructive influence of water.
The foundation is laid in dense and dry soils using lime (or cement added to it) mortar. If the humidity is excessive, only a cement solution is required.
The reliability of the operation of the sauna stove depends on the foundation. The article provides examples of foundation manufacturing depending on the furnace material and soil properties. The durability of the furnace depends on the correct manufacturing of the foundation. The base of the heating module is built according to long-established building codes, and failure to comply with repeatedly proven construction technologies leads to distortion of the furnace and the formation of cracks in the walls of the building.Choosing the type of foundation for a sauna stove


The type of foundation for a stove in a bathhouse depends on the weight of the building and the properties of the soil, so study the following information:
- For purchased metal stoves that weigh around 250 kg, a solid base or shallow foundation is sufficient.
- Brick ovens are more massive, weighing at least 700 kg, and a reinforced concrete foundation is required. The weight of a brick kiln can be determined based on the approximate mass of a square meter of masonry - 1350 kg (about 200 bricks plus mortar).
- For furnaces weighing over 2000 kg, a reliable reinforced concrete foundation 1.5 m deep is built.
- The height of the furnace foundation is made in three ways: up to the floor level, at the level or slightly higher. The foundation is made below floor level so that air enters the furnace from below, from under the floor. Advantages: floors warm up faster, and combustion air does not come from the steam room.
- On slurry soils for medium-sized brick kilns, a pit with a depth of 60-70 cm is prepared.
- If the site has loam or clay, find out the freezing depth of the ground for your area. Dig a pit below the freezing point. If there is no data, go deeper one and a half meters.
- Make sure the groundwater is far from the surface. The foundation is minimal if water is close, but the area of the structure is increased to ensure stability.
- If the soil contains sulfates, use sulfate-resistant cement of the SSPTs grade in construction.
- It is advisable to make the foundation of the stove and bathhouse at the same time. In this case, the pits are made of the same depth.
- The size of the foundation for the stove in the bathhouse should exceed the size of the stove by 100-150 mm in the horizontal plane.
- Formwork is necessary if the edges of the foundation pit are loose and crumbling.
Foundation for iron and light sauna stoves


Despite the light weight of metal products, the foundation for an iron stove should not be connected to the foundation of the room. When marking the pit, plan to ensure that after construction there is a guaranteed gap of 5 mm between the foundations of the stove and bathhouse.
The foundation for a metal furnace is made as follows:
- Mark the pit on the surface of the earth. The horizontal dimensions of the pit must exceed the dimensions of the lower base of the oven by at least 10 cm.
- If you want to subsequently sheathe the slab with brick, consider the indentation from the front side of the proposed wall.
- Dig a pit 50-60 cm inside the marking if the soil is not heaving. For heaving ones, increase the depth to 1 m.
- Pour crushed stone into the pit and compact it. Backfill thickness - 30 cm.
- Prepare a cement-sand mortar using a 1:4 ratio. Use cement grade M200. The solution should flow freely.
- Fill the crushed stone with the solution and leave to dry for 2-3 days.
- Waterproof the cement pad with roofing felt and hot bitumen.
- Make formwork from thick boards according to the design dimensions and install it in the pit.
- Prepare concrete using the following proportions: 1 part cement, 2.5 parts sand and 4 parts fine gravel. It is allowed to replace gravel with expanded clay, which has heat-insulating properties.
- Pour concrete into the hole and level the surface to the horizon.
- The foundation should dry for about a month. To prevent cracks from appearing, moisten it with water often - just spray it generously.
- Instead of concrete, brickwork is often placed on a cement pad.
- The concrete foundation has an unsightly appearance. To improve it, it is often covered with brick or thick ceramic tiles. The latter option is preferable due to the light weight of the tiles.
Making a shallow foundation for a stove in a bathhouse


The most popular type of foundation, because most brick kilns weigh 1000-1250 kg. Used if groundwater is deep underground.
To make a high-quality foundation for a stove in a bathhouse with your own hands, perform the work in this order:
- Dig a hole 70 cm deep, its dimensions should exceed the dimensions of the stove base by 20 cm. Measure the distance between the foundations of the stove and the bathhouse, the permissible size is 50 mm or more.
- Expand the bottom of the pit by 10 cm in all directions. The “heel” will allow the foundation to resist soil movement.
- Cover the bottom with sand (15 cm layer). Tamp it down, pour water on it, make sure the water is completely gone.
- Pour broken brick, stone, and crushed stone into the hole in a 20 cm thick layer and compact it.
- Pour sand again, level it with a shovel and pour water. Repeat the operation until all the voids are filled with sand.
- Pour crushed stone into the hole, level it and compact it. The final thickness of crushed stone is 10 cm.
- Build formwork around the perimeter of the pit. Provide a gap of 10 cm between the wooden wall and the edges of the pit, or more if possible.
- Make a reinforcing frame from an 8 mm rod and install it in the hole.
- Fill the hole with concrete and level the surface horizontally.
- Cover the foundation with film for better hardening (2-3 weeks).
- Moisten the foundation as described above.
- After a month, remove the formwork. Cover the side walls and the top surface with waterproofing in several layers.
- Fill the remaining cracks near the foundation with sand.
Slab foundation on a columnar support for a sauna stove

It is used on heavily heaving and clayey soils or in cases of significant soil freezing depth. You can also build on dry soils to save building materials.
Follow the following operating procedure:
- Remove the soil inside the marking by 150 mm.
- In the corners, drill cylindrical holes with a diameter of 20 cm (4 pcs.), the depth of which is 30-50 cm below the freezing level. The wells should not extend beyond the markings.
- Pour crushed stone into the wells in a layer of 10 cm and compact it.
- Install roofing material rolled into a cylinder into the holes, which will serve as formwork and waterproofing of the pillars.
- Make a frame for the wells and pit from a rod, install them in their regular places. For the frame, reinforcement or wire with a diameter of 8 mm is suitable.
- Prepare a concrete solution (see proportions above) and fill the pit. First, fill the wells with concrete and compact it with a vibrator, then the foundation pit. Fill everything without interruptions so that the pillars and slab form a monolith.
- After the concrete has hardened, about a month later, waterproof the foundation in any way. To achieve durable concrete, moisten it daily.
Pile foundation for a stove in a bathhouse


A simplified version of the previous foundation. Withstands the heaviest ovens. It consists of piles of various designs and a reinforced concrete slab 15 cm thick.
A simple but expensive option involves the use of purchased metal piles. Thanks to special blades, they are screwed into the soil, simultaneously compacting it. Screw the products 30-50 cm below the soil freezing level. Install a monolithic reinforced concrete slab on top of the piles, leaving a few millimeters of gap between the base of the slab and the soil for shrinkage. Attach the slab to the piles. Waterproof the surface with two layers of roofing felt and hot bitumen impregnation.
Instead of metal piles, concrete piles can be made, as in the case of a slab foundation on a concrete support. The stove should be larger in size than the oven. Instead, it is allowed to use a welded metal frame.
Rubble concrete foundation for a sauna stove

It is used when there is a large amount of construction waste made of stone, brick, crushed stone, it is popular due to the low cost of building materials.
Suitable for furnaces up to 2 tons, but can be used instead of buried foundations.
It is made as follows:
- Dig a pit 1-1.2 m deep for heavy stoves or 0.6-0.8 m for stoves up to 2 tons. The horizontal dimensions should exceed the dimensions of the stove by 20 cm.
- Compact the soil at the bottom of the hole, add 15 cm of crushed stone to the bottom and compact it again.
- Make formwork according to the dimensions of the foundation and lower it into the hole. Waterproof the formwork from the inside.
- Place large stones up to 15 cm in size at the bottom of the pit in a layer of 30 cm. Pour crushed stone into the pit and fill the voids between the stones.
- Prepare a cement-sand mortar at a ratio of 1:3, dilute it with water to the consistency of liquid sour cream and pour the stones in the pit. Check that there are no gaps between the stones.
- If after the first laying half of the pit is filled, repeat the operation with stone, crushed stone and mortar and finish the job in one day. If the pit is deep, continue working the next day. The last layer of stones is laid at a distance of 7 cm to the floor level.
- Ensure that the top plane is horizontal with cement mortar.
- How to care for concrete during hardening is described above.
- After the foundation has hardened, waterproof all surfaces.
Recessed foundation for a stove in a bathhouse


To decide how to make a foundation for a bathhouse stove in your area, find out the composition of the soil. On clay or loess soil and for furnaces weighing more than 2000 kg, a buried foundation is built. The reason is in the properties of the soil: porous clay expands in frost, and loess soil turns into liquid mud in rain.
The foundation for heavy furnaces differs from a shallow foundation in the depth of the pit and reinforcement. For dry soil, the pit should be deeper than 80 cm. Often, in order not to find out the type of soil, the pit is dug 1.5 m deep. The distance between the foundations of the stove and bathhouse is at least 50 cm. The sequence of work is the same as when making a shallow foundation . To make reinforcing mesh, use a rod with a diameter of 12 mm.
To get acquainted, we suggest watching a video about arranging a foundation for a stove:
A well-made foundation guarantees the longevity of the stove. Therefore, coordinate the choice of the type of foundation with an experienced stove maker, who will also advise how to pour the foundation for a stove in a bathhouse. Neglecting construction technologies can lead to a tilted chimney and roof failure.
The bathhouse is an excellent means for spending fun leisure time and preventive health measures. But many novice builders have one very important task before building it - how to make a foundation for a stove in a bathhouse with high quality and without wasting resources.
Indeed, the construction of such a structure itself is not cheap, and if the use of materials is inappropriate, then such construction will cost a pretty penny.


In this article we will talk about the types of foundations for stoves, whether a foundation is needed for a stove in a bathhouse as such, and also consider its construction for different types of stoves.
Preparation
Before starting any land and construction work, you must definitely decide on the future type of stove. The need for laying additional foundation elements may depend on the type of heat source itself (read also the article “Strip foundation for a bathhouse: from excavation work to pouring concrete”).
It will perform a protective function and is suitable for baths that are used once a week, because in winter the ground freezes to a considerable depth and its homogeneity is destroyed.
Experienced experts recommend laying the foundation for a sauna stove no less than the depth of soil freezing. You can learn this parameter from building climatology; in the southern districts of Russia the figure will be about 60-70 cm, and further to the north it will increase.
An important factor for construction is the type of soil, it can be:
- Sedimentary or alluvial. It is found in areas where previously there were reservoirs and is well suited for any foundation. If you come across porous clay, then you need to dig a little above the freezing level, because it swells greatly from water and expands when freezing;
- Soil containing sand and gravel is least susceptible to frost and is perfect for any building;
- Bulk soil consisting of crushed stone or gravel, after a few years, becomes a good basis for the foundation for a stove in a bathhouse. In the case when it is not “seasoned”, it must be thoroughly mixed with crushed stone and compacted;
- Permafrost - northern Siberia, etc. In such a situation, the foundation must also provide good thermal insulation from frozen soil.


Important. It is not recommended to place such a foundation for a bathhouse stove closer than half a meter near walls and main structures. The fact is that if it subsides or gets washed away, it can damage these structures.
The dimensions of the base will depend on the dimensions of the stove itself, but it must protrude ten centimeters from all sides.
Construction for an iron stove
It must be said that although iron stoves are light in weight, they also need to build a foundation. The fact is that with even small distortions, such a device will wear out more, and only if there is a high-quality base, there is a guarantee of its long-term operation.


It should be noted that building a foundation for an iron stove in a bathhouse is a simple matter and can be done with your own hands; this requires:
- Dig a pit of the required dimensions, with the required depth depending on the type of soil and location;
- Then crushed stone is poured into the bottom of the hole and compacted. When compacted, this layer must have a thickness of at least 300 mm;
- Next, cement mortar is taken and poured on top of the crushed stone. In a few days it will dry out and you will need to put waterproofing on it;
- A layer of concrete is poured on top of it, and the resulting surface is carefully leveled. If you have bricks on hand, they will work well instead of concrete.
This foundation is solid and its price is reasonable. And the main thing is that it does not require much physical labor.


Brick oven base
Such stoves are heavy, so the foundation for them must be more massive. Note that it weighs up to 4 tons dry and about 8 tons wet. In order to approximately calculate this indicator, you need to multiply the weight of one brick by their number and add 40-50% to the weight of the mortar.


Important. The ideal option is when the foundation for the stove in the bathhouse is poured simultaneously with the laying of the foundation of the structure itself. In this case, it will be monolithic and more resistant to external environmental influences.
If you have non-heaving soils on your site, then a reinforced concrete slab with a thickness of 150-200 mm will be enough for you, but provided that it is completely monolithic (without voids). To increase the stability of such a structure, it is recommended to make piles; in this case, they can be made from asbestos pipes with reinforcement filled with concrete.
The construction instructions allow the use of roofing felt sheets as formwork in such conditions. To do this, they are rolled up and additionally reinforced and filled with concrete.
The piles are installed below the freezing point of the ground. A hole is dug under them, crushed stone is poured onto the bottom and compacted, and after that the pile itself is made (see also the article “Columnar foundation for a bathhouse with your own hands - a real master can do anything”).
After a week and a half, a slab is laid on it, and then waterproofing is organized. A good option is metal screw piles. They are screwed into the ground in a short time, but their noticeable drawback is the price and the call of a team of specialists.

Concrete and rubble base for a brick kiln
The foundation for a sauna stove made of bricks can be made of concrete and rubble.
To implement this you need:
- Carry out excavation work - dig a foundation pit;
- Crushed stone is poured onto its bottom and compacted. It is recommended to make this layer at least 150 mm. If you have very heaving soil at the construction site, then it is better to apply another layer. It is made from sand and filled with water twice and only after that with crushed stone;
- Next, work is carried out on pouring the foundation;
- Work is being carried out to install waterproofing on the inside of the formwork; for this, rolls of roofing material and bitumen impregnation are used. Large stones are laid at the bottom and crushed stone is poured between them;
- Cement mortar is poured over the stones so that at least 60 mm remains to the floor level. The surface is leveled and covered with roofing material to dry for two weeks.
Important. When building the base of the furnace, it is necessary to leave a distance between it and the foundation of the building. This is done so that during operation it can rise and shrink. If you neglect this advice, the oven may collapse.


Conclusion
Many craftsmen uninitiated in the intricacies of the construction process ask themselves the question: is a foundation needed for a stove in a bathhouse at all? As you can understand from this article, it is absolutely necessary, because thanks to it the oven is not subject to deformation processes. The latter can appear due to high humidity of the soil on which the bathhouse is located, as well as severe frosts.


In this article we looked at the details of the construction of several types of foundations; if you adhere to the above technologies during construction, you will be able to build a good bathhouse for many years (see also the article “A font for a bathhouse - features of independent arrangement”). In the video presented in this article you will find additional information on this topic.
How to make a foundation for a stove in a bathhouse with your own hands
It is advisable to pour the foundation for the stove together with laying the foundation for the bathhouse. But if this is no longer possible, you can do it in a ready-made bathhouse.


The dimensions of the foundation depend on the size of the stove: the foundation should be 5-10 cm larger in all directions than the dimensions of the stove, and its height should be equal to the height of the bathhouse foundation. The depth of the foundation and its thickness depend on the weight of the stove and the type of soil (the choice of foundation type is similar to the choice of foundation for a bathhouse).
The most common foundation options are concrete or cement-based rubble. A layer of waterproofing is laid on top of the finished foundation, and bricks are either laid on it or a layer of concrete is poured, which is sometimes decorated with ceramic tiles.
Furnace foundation height
There are three options here:
- below floor level;
- on the same level;
- higher.
Questions may only arise about why to make the base of the furnace below the finished floor level. The answer consists of two parts:

Also, as a bonus, with this arrangement there are no problems with drying the floor. Only this is only true if the drainage and waterproofing of the floor is done correctly.
Everything will work if the blower is located below the level of the finished floor. If the foundation is made at the same level as the floor or higher, and air intake needs to be organized from the underground, the metal furnace is modernized (the option on the right in the photo). A thick-walled metal pipe with a gate is welded into the sidewall. The damper regulates the level of air supply and combustion intensity. Just note that if the integrity of the stove is damaged, it will be removed from the warranty (if any).


In the same way - by welding the pipe - combustion problems of an already installed stove are solved. Problems arise due to lack of oxygen. And it is provoked by current technologies: to reduce heat loss and heating costs, we make thermoses in our houses and baths. If you forget to make ventilation or make it insufficiently efficient, then the stove burns poorly. Here, however, there is an option that does not require making changes to the furnace: the pipe coming from the ventilation hole in the foundation is brought out in the area of the ash pit. Sometimes it is enough to bring it under the boards, sometimes you need to bring it level with the floor or a little higher. Not the best or most aesthetic option, but the stove will burn normally.
Please note that if the foundation of the stove is located close to the base of the bathhouse (house), it is necessary to make them disconnected. This means that they should not touch each other. There should be a gap between them of at least 5 mm for an iron stove and 50 cm for a brick stove. In the case of an iron stove, the gap can be filled with a layer of heat insulator (basalt cardboard).
Despite the fact that iron sauna stoves are usually light in weight, even for the lightest thin-walled model it is advisable to have a separate foundation. The thing is that even a slight misalignment, sometimes invisible to the eye, leads to accelerated wear. And only the presence of a solid foundation guarantees its absence, and therefore long-term operation of the stove.
Making a foundation for an iron stove is not difficult. Necessary:

The formwork can be removed after three days, and the concrete gains its design strength in three to four weeks. For normal ripening, it must be regularly moistened with water: sprinkle generously 2-4 times a day, depending on the temperature. There should be no puddles, but the solution should get wet well. If it's too hot outside, cover the base with plastic wrap to prevent moisture from evaporating quickly.
There is a moisturizing option that does not require frequent spraying: cover it with burlap or some other fabric, add a good layer of sawdust, and wet it. This is enough for a day.
A concrete base is cheaper and stronger, but requires more physical effort, even if you have a concrete mixer. The disadvantages of concrete include the difficulty of dismantling it.
How to line the foundation for a metal stove
If the upper part of the base is cast from concrete, then outwardly it has an unattractive appearance. You can line the foundation with bricks from the outside, but this is only if conditions permit: the brick is still of decent size. For other cases, cladding with thick ceramic tiles (thick ones) is suitable. Porcelain tiles are likely to crack at high temperatures. Perhaps a natural finishing stone would be suitable.
When tiling, place washers made of thick soft metal (copper or aluminum) under the legs of the stove. Sharp, hard legs often scratch the front surface of the tile, causing it to crack. The washers will be insurance against scratches.


The tiles are laid on a special heat-resistant glue (there are such). The grout is also selected appropriately - resistant to high temperatures. You can do without grouting: carefully open the seams with glue. If you do everything carefully, the appearance will be normal. The grout only looks good at first. Then, when ash and soot are added, you will be tortured to scrub it off.
Foundation for a brick oven
The weight of such a stove is usually very large (up to 8 tons when wet and up to 4 tons when dry), so the base must be solid. To roughly calculate the weight, you can multiply the weight of one brick by its quantity and add 40% to the weight of the mortar (clay mortar has a very large weight). There is one more feature: the foundation for a brick kiln cannot be placed near the walls; it must be at least 0.5 meters away from the main structures.
Dimensions
The dimensions of the foundation for a brick kiln should be no less than 10-15 cm larger than its dimensions. But this is when the groundwater is low. Then, for greater stability, the base can be deepened as much as the weight or degree of heaving of the soil requires. For example, on sandy loam soils for a medium-sized brick kiln, it is enough to deepen the foundation to 80 cm. If the soil is loam or clay, then you will have to dig below the freezing level of the soil. In general, the depth of the furnace base is equal to the depth of the building’s base.
If groundwater is close, you will have to deepen it to a minimum. In order to achieve normal stability in this case, the foundation is made much larger in length and width.
Foundation on stilts
A heavy brick oven on non-heaving soils can be placed on a reinforced concrete slab 15 cm thick (the slab must be monolithic, i.e. without voids).
To increase the stability of such a foundation, it is advisable to make piles. They can be made from asbestos-cement pipes, reinforced with reinforcement and filled with concrete. Sheets of roofing felt, roofing felt, etc. can be used as formwork (instead of pipes). which are rolled into a tube. They are also reinforced, then filled with concrete and backfilled. The production of piles one to one repeats the technology of constructing a pile foundation.
One option is to use metal screw piles. Due to the presence of special blades, they are screwed into the ground, which speeds up the process. Their disadvantage is the price and a large number of low-quality products. Advantages: quick installation and soil compaction that occurs when such piles are screwed in. If the soil allows, you can screw them in yourself, otherwise (on hard and rocky soils) the work of a special machine is required.

The depth of the piles is 30-50 cm below the freezing depth of the soil (crushed stone is poured onto the bottom of the hole dug under the pile, it is compacted, and then they begin to make the pile). 10 days after production, a monolithic reinforced concrete slab is laid on the piles. A waterproofing layer is laid on top of it (roofing felt in two layers, hot impregnation with a bitumen composition, etc.)
Concrete and rubble foundation for a brick kiln
You can make a foundation for a brick kiln from rubble and concrete. It requires a minimum of costs (if you find a bottle nearby). To do this you need:
- Dig a pit (larger in size than the required foundation);
- Place a layer of crushed stone on the bottom and compact it. The thickness of this bedding in a compacted state is at least 15 cm. On highly heaving soils, another layer is made of sand, which is double-filled with water to compact it. Only after the water has receded again and the sand has dried, crushed stone is poured. Next, we continue the process of pouring the foundation using generally accepted technology.


- The next step will be to install and waterproof the formwork according to the dimensions of the future foundation. Waterproofing of the inner surface of the formwork is carried out with bitumen impregnation or a layer of roofing felt. Then you need to lay large stones on the bottom, and fill the space between them with small crushed stone.
- The laid stones are poured with cement mortar (for 1 part 400 cement, take 3 parts sand and part (slightly less) water).
- The layers are repeated until 6 cm remains to the floor level. The surface of this layer is carefully leveled.

When making a foundation for a furnace, there must be a distance between it and the main foundation . This is necessary so that during operation the foundation for the furnace can freely rise and fall, causing shrinkage. Failure to comply with this condition leads to destruction of the furnace. The distance between the main and stove base is filled with sand and/or roofing felt.
In order for the shrinkage of the brick kiln to be uniform, it is advisable to lay the brick pipe (it is the one that gives the main part of the load) as close to the center of the kiln foundation as possible.


To insulate the stove foundation or not
There may be several situations here, and in one case insulation is desirable, in another it is quite possible to do without it.
If the foundation of the building is insulated, but the floors are not. A common situation in baths. The heat that leaves the oven will heat the floor. More firewood will be required, but the comfort of staying in the bathhouse will increase. Here it is at your discretion. You can do insulation, or you can not.

The foundation is without insulation, but the floors are made with insulation. In this case, insulation of the furnace foundation is necessary: you will warm the ground and thaw the foundation of the house. This is not only unnecessary, but also harmful: every thawing of the foundation brings closer the time when it begins to collapse. Not to mention that it will take a lot of time and wood to burn the firebox, and the floors will still remain cold. Insulating the foundation in this situation will also protect the stove from freezing. It may not protect you completely, but it will freeze less and warm up faster.
So with this option, you include a layer of insulation in the foundation pie. Then divide the concrete layer into two parts and place a heat-insulating layer in the middle. This can be basalt cardboard, hard mineral wool mats, high-density extruded polystyrene foam (not polystyrene foam, it cannot withstand loads). The layer of concrete laid on top must be reinforced. Lay a ribbed rod of 10-12 mm lengthwise and crosswise in increments of 20 cm. At the joints, tighten with plastic clamps, or tie with wire, just as reinforcement for a foundation is knitted.
Both the floor and the foundation of the bathhouse are insulated. You can do without insulation. But to reduce firewood consumption, you can save heat. If there is no insulation at all, it is probably better to still put in a heat insulator. Although, the stove still warms the floor. In general, in this case, it’s up to you to decide.
It is necessary to install a metal sauna stove taking into account its weight, as well as taking into account the fire safety requirements prescribed in SNiP. It is important to protect the wooden floor on which the heating unit will be installed from spontaneous combustion. An important point is the calculation of the strength of the floor, because even the smallest heater with a water tank places a serious load on wooden floors.


Furnace location
Metal sauna stoves are either electric or solid fuel. And the installation of wood-burning units has the greatest number of difficulties, which will be discussed further.
A wood-burning sauna stove is traditionally located in the steam room, but the door of the firebox can go into the adjacent room, onto the street, or the wood is loaded from the steam room.

In the first case, when the firebox is brought into the dressing room or washing room, oxygen is not burned in the steam room, and one unit heats two rooms at once. Moreover, this option implies the arrangement of fire protection not only for the wooden floor, but also for the wall of the bathhouse. In addition, there is difficulty in installing the stove - if the installation hole was not provided during construction, it becomes necessary to break / saw out part of the interior partition.


The second option, when the firebox goes outside, is associated with similar installation problems. Additionally, the disadvantages include increased heat loss and the inconvenience of regulating the intensity of fuel combustion and adding firewood (you will have to leave the bathhouse outside).


The third option is one of the most common. The stove is installed on an existing wooden floor with the obligatory arrangement of a fireproof base under the stove and protection of the wall located behind the stove. The problem of oxygen burning is solved by installing effective ventilation. Often the air supply is installed from the underground room (irrelevant for a monolithic foundation - slab). A stove installed in this way is easy to monitor during the steaming procedure, but there is not always a place in the steam room to store firewood and protect it from getting wet.

Regardless of which direction the furnace door of the stove faces, the unit must be installed at a safe distance from visitors to the steam room, so as not to provoke burns from accidental contact with hot metal or hot steam from stones.


Calculations
SNiP II-25-80. Wooden structures
SNiP II-25-80
A metal stove, together with a heater, a water tank and a chimney, has a certain weight. Cast iron units are especially massive, as well as stoves lined with brick.
If a foundation is laid under the furnace, and also if there is a reflective brick screen, the load on the beams and floorboards is quite significant. Before installing the stove, you should find out its weight, then calculate the strength of the floors so that the floor does not break under the unit under any circumstances.

Floor beams can be made from solid solid deciduous/coniferous trees, provided their length is up to 5 meters. If it is necessary to use beams over 5 meters in length, it is better to use glued beams that can withstand increased loads.


Beam 10×15 cm, solid
It is important to know the exact length of the beam. This value is taken to be equal to the length of the span that will cover the joist plus the depth of the “nest” or notch made to secure the element. The length of the notches is usually from 70 to 150 mm.
The cross-section of the beams is selected rectangular or square, less often - an I-beam profile (a combination of solid wood and OSB/plywood). The best cross-sectional ratio of a rectangular beam is 1.4 to 1. The beams are made with a width of 40 to 200 mm and a height of 100 to 300 mm. Rounded logs (11-30 cm) are rarely used for arranging the floor in a bathhouse, despite their high resistance to bending deformation.


The pitch between the beams is usually chosen within the range of 30-120 mm, guided by the width of the slab insulation, the location of the support posts of the frame bath, or the dimensions of the subfloor sheets.


On a note! You can use online services to calculate the floor load. Each of them requires entering accurate information about the type of beams and joists, cross-section, and dimensions.
Calculator (Excel format).
Calculation of a wooden subfloor
About loads and rigidity
According to the set of building codes numbered 2.01.07-85, any loads are divided into:
- permanent (they are also long-lasting) - from interior partitions and external walls, roofs, soil pressure, etc.;
- variables, i.e. arising from furniture installed in the bathhouse, equipment (including stoves) and visitors, as well as snow, wind loads and some others.
Rigidity is characterized by the ratio of the deflection to the length of the beam (beam). This figure for interfloor beams is 1/350.
The values of the maximum breaking load on the beams are presented in the table.


Video - Floor calculations
Accurate calculations of the maximum load on a wooden floor are quite complex; they are performed by specialists when designing large objects. For the floor of the bathhouse on which the stove will be installed, you can use approximate values of the maximum load.
Thus, if the heating device, together with the base plate and other structural elements, weighs no more than 400 kg, then it can be installed on floors with support joists of the following sizes:
- if the step between the logs is 60 cm, then the dimensions for a span length of 2 meters are 75×100 mm, 3 m - 75×200 mm, 4 m - 100×200 mm, 5 m - 150×200 mm; 6 m – 150×225 mm;
- if the step between the logs is 1 m, then the dimensions for a span length of 2 m are 75×150 mm, 3 m - 100×175 mm, 4 m - 175×200 mm, 5 m - 150×225 mm, 6 m - 175×250 mm.
If your stove weighs more, then it is worth reducing the pitch between the logs or increasing their cross-section. For stoves weighing more than 700 kg, a separate base is required, not connected to the main foundation. Installing such structures on a wooden floor is unacceptable. However, only brick sauna stoves with brick chimneys have this weight.
On a note! A bathhouse is a room with increased fire hazard. Use fire-retardant impregnation for all wooden elements of the bathhouse before installing the stove on the floor.
Video - Ermak stove. Installation
Foundation for a sauna stove
Those who build a sauna with their own hands often think about the advisability of arranging a foundation for an iron stove. It would seem that the unit weighs relatively little; you can lay a sheet of metal and use it. However, according to the fire inspectorate and in accordance with SNiP standards, flammable surfaces must be reliably isolated from hot surfaces.
A properly equipped base will also provide the stove with a long service life, because... at the slightest distortion, metal heaters fail faster.
Option one


We set up a simple non-combustible base directly on the wooden floor.
Step 1. We take measurements of the oven dimensions. We transfer the dimensions of the heater onto the floor boards (in the place where the stove will be installed). We take a meter ruler and expand the drawn rectangle so that in the future, in front of the firebox, the wooden floorboards are covered with steel by 50 cm, and on the other three sides the fireproof plate “looks out” by at least 5-10 cm.
If the furnace door is located in the next room, then in front of the loading chamber we make markings for the steel flooring (50 cm), and in the steam room we make markings for the foundation of the furnace (plus 10 cm to the dimensions of the furnace). At the same time, we make markings on the wall for cutting out the opening. If the stove is purchased as a factory type, then the dimensions are indicated in the instructions; in the case of installing homemade stove equipment, the distance between the metal walls of the heater and the inner surface of the made window is 25-50 cm.

If loading firewood will be done from the street, you should only take care of the markings inside the room. It is assumed that the area in front of the firebox door will be filled with concrete or lined with non-combustible paving slabs.
Step 2. If necessary, we break out or cut out part of the interior partition (the outer wall of the house).
Step 3. We take a fireproof plate and cut out a piece identical in size to the mark drawn on the floor. The prices for some types of slabs can be found in the table.
Name, brandDescriptionCost, rub.
We screw the slab to the floor with self-tapping screws.
Step 4. Soak fireproof bricks in water (full-bodied red bricks can be used, but fireclay bricks are preferable). Mix the masonry mortar.


Lay out the bricks in a continuous layer. Adjust the horizontal level. If necessary, tap the bricks with a mallet or add a layer of masonry mortar.


Brick laying. Scheme
We lay out the second row in the same way as the first.
Step 5. We take a stainless steel sheet and apply heat-resistant glue diluted according to the manufacturer’s instructions. We lay the sheet on the bricks, tap it with a mallet, and check the level.

You can install the stove on such a base after 24-48 hours.
Option two
If the stove structure is too massive and the floors are not strong enough, it is worth making a separate foundation that is not connected to the main support of the house. Such work is carried out at the construction stage of the bathhouse or after completion of construction. Moreover, the second option involves making a rectangular or square hole in the floor, associated with dismantling work.
Step 1. For the foundation of a sauna stove you will need a pit with dimensions slightly larger than the size of the stove. Such a pit should be dug to the freezing point of the soil. 

Step 2. We compact the soil using a hand tamper. We fill in 20 cm of fine gravel and tamp it down. We pour sand (10-15 cm) on top of the gravel, followed by compaction.
Step 3. We arrange waterproofing - we cover the walls of the pit with roofing material or a two-layer thick polyethylene film.
Step 4. We make a frame from reinforcement bars. The distance from the walls and bottom of the pit to the frame is 5 cm. We use supports for the bottom row of reinforcement or stick pins into the cushion, onto which we fix the rods with wire or welding.


Step 5. Mixing concrete. We pour it into the pit. There should be 20 cm left from the top point of the poured concrete to the line of the finished wooden floor. We compact the concrete with a deep vibrator and cover it with two layers of roofing felt. To fasten the layers of roofing material we use bitumen mastic.


It is recommended to continue work after 21-28 days. To shorten this period, instead of pouring concrete, you can make brickwork up to the finished floor line. In the case discussed above, only two rows of bricks are laid up to the finished floor line.
A sheet of steel or ceramic tiles are laid on the floor in front of the firebox. This coating will protect the wooden floor from fire if coals fall out.
Video - Foundation for a stove
Installation of stove, tank and chimney
The sauna stove is installed on an equipped fireproof base without fastening to it.
If the firebox is remote (opens into the adjacent room), then a brick is laid in the wall opening, and there should be a gap between the masonry and the metal walls necessary for laying heat-resistant sheet insulation. The gaps between the masonry and the wooden wall are foamed with mounting foam, and fire-resistant mastic (sealant) is used to seal the joints between the metal stove and the brick portal.


If the firebox is located in a steam room, then the wall behind the stove is covered with solid brickwork (half a brick) or covered with a stainless steel sheet 3-5 mm thick. In this case, the stove must be at least 10 cm away from the wall.
Note! Preliminary lighting of the stove before installation is a mandatory procedure prescribed by manufacturers of solid fuel units. This is necessary to completely harden the body paint and eliminate the appearance of odor in the steam room from chemical fumes that may appear during heating.


Video - Furnace water tanks
Chimney sandwich. Installation


Sandwich chimney pipes are easy to install and are characterized by increased heat saving due to the mineral wool insulation between the outer and inner walls. Such a chimney provides good draft, and soot and condensation do not accumulate on the inner surface. For the production of sandwich chimneys, only acid-resistant stainless steel with a long service life is used. Therefore, such a chimney is considered the best option for a sauna stove.


During installation, it is important to observe fire safety measures to avoid spontaneous combustion of the wooden sauna floors (wood ignites at a temperature of 170-270 degrees).


You must not make mistakes during installation and try to save insulating materials!


Fire protection is provided by galvanized sheets and asbestos fiber laid between the chimney walls and the ceiling. It is important to choose the length of the chimney so that a pipe joint does not form at the location of the ceiling. If the chimney pipe is longer than 6 m, then additional fixation is carried out with brackets and clamps.


Step 1. On the ceiling above the installed sauna stove we make markings for installing the cutting pipe.
Step 2. We cut the ceiling according to the markings.
We apply fire retardant impregnation to wooden elements.
Step 3. We insert a cutting pipe (a metal box with a hole for a pipe) into the cut hole.
We fix it with self-tapping screws at the corners. Between the ceiling and the steel walls of the pipe we insert sheet asbestos or basalt insulation.

According to standards, the thickness of the insulation should be 7-7.5 cm (that is, this is the distance between the walls of the box and the ceiling). The minimum distance from the pipe walls to the beams is 130 mm. And from the chimney to the walls of the bathhouse there must be a distance of at least 380 mm.


Step 4. We connect directly to the stove pipe (by welding or using a fireproof sealant) a section of an uninsulated single-circuit pipe. You cannot connect the sandwich chimney directly to the stove pipe - the insulation will burn. It is necessary to install a damper (smoke valve) on the same section of the chimney.

Step 5. We connect a single-circuit pipe with a start sandwich (adapter). All connections are sealed.


Step 6. We connect the first section of the sandwich chimney to the adapter. We connect the sections of the sandwich chimney in the bathhouse not “by condensate”, but “by smoke”, that is, the walls of the upper element must overlap the walls of the lower section of the pipe (see figure).


We additionally strengthen the straight sections of the chimney at the joints with wide metal clamps.


When the chimney is brought out through the cutting pipe, we put on a rectangular steel sheet from the attic side. We fasten the sheet with self-tapping screws to the floor boards.


Step 7 We bring the chimney to the roof. We cut a hole in the roof. To pass the pipe through the roof, a special element is used - a roof groove. This is a pipe with an aluminum sheet soldered to it. We lubricate the aluminum sheet with fireproof sealant, and then fasten it to the roofing material (for example, metal tiles) with self-tapping screws.

The roof trim will prevent the chimney from coming into contact with the roofing pie materials. From the inside (under the roof), we seal it with basalt insulation and cover it with a steel sheet. Sheet in advance, i.e. Before the pipe comes out through the roof, we put it on the chimney.


Step 8 The last stage is calculating the height of the chimney above the roof of the bathhouse. This indicator can be clarified in the table.
ConditionsLength of chimney above roof 

All that remains is to secure the deflector cone. Installation is complete.
Video - Installation of a chimney for a sauna stove
In order for a metal sauna stove installed on a wooden floor to work efficiently, and for the steaming procedures to have a healing effect, do not forget to lay high-quality stones, for example, by attaching a special mesh to the stove body. Cover the stove with bricks as desired, but be sure to leave a gap between the body and the brickwork.
The traditional Russian bathhouse and the stove in it are often considered as a single whole. But in order for the furnace to operate successfully for a long time, it is necessary to install it correctly on a foundation specially prepared for this. It is necessary for any type of stove used - both metal and brick. Moreover, if done correctly, it not only plays the role of a supporting structure, but also provides an additional level of fire safety.
Types of foundation for a furnace and requirements for it
Before installing a stove in a bathhouse, it is necessary to check the presence and compliance with the requirements of the foundation for it. In most cases, it is recommended to carry out work on laying the foundation for the furnace simultaneously with other similar work. This leads to approximately the same shrinkage of all structures. But if this does not happen, it is quite possible to perform them in a ready-made bathhouse.
You should pay attention to an important point - under no circumstances should you install a stove in a bathhouse on a wooden floor. A sauna stove without a foundation is a potentially weak point of the structure, and also does not meet fire safety requirements. Before installing the stove in a wooden bathhouse, it is necessary to carry out work on the foundation.
When installing a foundation for a stove in a bathhouse, the following factors must be taken into account:
- the dimensions in the horizontal plane should be at least 5-10 cm on each side greater than the dimensions of the stove that will be subsequently installed;
- the height of the structure should generally be at the same level as the rest of the bathhouse foundation;
- the depth is determined by analogy with the same indicator for the rest of the foundation, but taking into account the expected load from the furnace.
The most common foundation options for a sauna stove are concrete or rubble. We should not forget the mandatory rule that 2-3 layers of waterproofing are required on top of the foundation, which is necessary for the normal and long-term operation of the structure.
As a conclusion, we can say that before correctly installing the stove, as well as installing the pipe coming from it, it is necessary to build the foundation correctly and in accordance with the requirements of the technology.
The stove in the bathhouse is the main component of the equipment, because without it, this room can be used for sanitary and hygienic purposes - for washing, it can only be used as a shower room.
Regardless of the type of bathhouse - Russian or Finnish, the thermal performance of the stove in it should be higher than that of heaters for residential premises. Therefore, a sauna stove is a fairly heavy device, especially taking into account the weight of the heater - a container for stones that acts as a heat accumulator. Accordingly, for a statically reliable installation of the stove device, it is necessary to build a sufficiently strong foundation or even an individual foundation for the stove in the bathhouse.
Types of stove heaters in a sauna room
Let's take a closer look at what, depending on the type of stove unit, a sauna heater is installed or built on, and how the foundation for a stove in a sauna is laid.
Requirements for the load-bearing base or foundation of a sauna stove
The design and material of the foundation must ensure the static stability of the furnace and the safety of its operation. Based on these requirements, the base of the heater, independent of the main foundation of the building or being part of it, must have the following characteristics:
- strength – withstand compressive loads from its own weight and the mass of the heater;
- resistance to temperature changes - despite the thermal insulation layer, the foundation is in contact with the furnace body, which is always warmer than the ground;
- immobility is a parameter that implies the absence of any displacements relative to the bathhouse structures.
In addition, there are a number of rules that apply to independent stoves:
- the distance from the heater base to the foundation of the building must be at least 5 cm;
- the depth of the furnace foundation is at least 0.5 m;
- the parameters of the base of the furnace unit are determined by the type of foundation of the building (with a strip foundation - equal depth, with a pile foundation - support at the corners on piles).
The most technically competent, and therefore reliable, is to design a furnace foundation at the stage of developing a building project, when all available factors are taken into account as much as possible:
- dimensions and weight of the stove;
- groundwater level and the amplitude of its fluctuations;
- characteristics of the upper soil layers and the depth of dense soils;
- degree of soil freezing and heaving;
- relief of the building site.
 Some tabular values for the construction of a stone furnace foundation in various types of soil.
 If a sauna stove is being built in an existing building, then its base is constructed taking into account the known parameters of the building’s foundation.
The simplest situation is when the building is built on a monolithic reinforced concrete slab foundation, and the problem comes down only to the placement and layout of the furnace in relation to the existing building structures.
Types of sauna stoves
The sauna stove is selected depending on the size of the room. That is, the larger the bathhouse, the larger and heavier the stove, and therefore, the more powerful the foundation needed for it.
Based on the material used, sauna stove heaters are divided into the following groups:
- stone (brick);
- cast iron;
- steel.
The weight of stone heaters for baths can reach one and a half tons, industrially made cast iron units together with stones in the heater can be 200–500 kg, steel stoves are even lighter.
 Types of sauna stoves based on material of manufacture: brick, cast iron, steel
 Important! According to building codes, installation of a stove heater weighing less than 750 kg is permissible without constructing an individual foundation - directly on a floor with sufficient strength characteristics. However, a more reasonable solution would still be to place the device on a separate base, preventing the unit from skewing under its own weight over time.
Foundation for a brick oven
Of the many types of foundations, the following types are used as the basis for a stove heater:
- monolithic, as a variety - monolithic-columnar;
- tape;
- blocky.
The determining parameter for the suitability of a structure is its feasibility for independent construction and the possibility of installation without special equipment - various types of piledrivers, the rental of which requires significant expenses.
 Installation of piles - screw and reinforced concrete
 In addition, the use of a columnar (pile) foundation is a rather rare situation, since for the construction of a house they try to choose an area with problem-free soil, which eliminates the need to pour or screw in supports under the base of the stove.
Monolithic stove base
The dimensions of the stove foundation in a bathhouse are tied to the weight of the heating unit and the characteristics of the soil, so when constructing it, you must adhere to the following general rules.
The weight of stone stoves starts from 700-750 kg, so the construction of a solid reinforced concrete foundation for them is mandatory.
The depth of laying the stove foundation should be below the freezing point, be at least 0.5 m, and the maximum should be equal to the value of laying the foundation, since it should be taken into account that the newly laid wet stove is twice as heavy as the working heater.
Important! In the northern regions, the depth of laying the foundations of buildings (2 m or more) may be too large for a stove heater, so a pit dug to the required depth is filled with sand or gravel with layer-by-layer compaction.
Depending on the weight of the furnace and the characteristics of the soil, the foundation is buried or not buried.
If the stove weighs more than 2 tons and the soil contains loess or porous clay, a pit for the stove base is dug at the rate of 1 m of base height, with preliminary leveling of the bottom with a backfill 10-15 cm thick of crushed stone or sand. Formwork is constructed along the walls to the full height, which is removed after the concrete has gained strength, and waterproofing is made from roofing felt and bitumen mastic on the side and top surfaces of the concrete base.
 Recessed foundation type
 Under furnaces weighing 1 - 2 tons, a shallow foundation is constructed - 0.7-1.0 m, which, if the groundwater is low, it is advisable to connect it to the foundation of the building by anchoring - this will prevent its possible displacement during soil heaving.
 Schemes with options for layer-by-layer execution of a shallow concrete foundation
 When laying small and medium-weight sauna stoves, a type of monolithic base is popular - a structure made of brick laid on a cement-sand mortar, which provides significant savings compared to the use of ready-mixed concrete, the cost of which also includes the cost of reinforcement.
 Monolithic stove foundation using bricks
 No less popular among budget options for recessed furnace support structures is a base made of rubble stone, which is also laid on a mortar with subsequent alignment of the side walls for high-quality waterproofing. Preparing rubble is a labor-intensive operation, but justified in terms of cost savings.
 Support structure for a sauna stove, made of rubble stone
 Technology for constructing a rubble structure:
- a pit is dug - 1-1.2 m for heavy heating devices, 0.7-0.8 m - for units weighing up to 1.5 tons (the plan dimensions should exceed the dimensions of the stove by 20 cm);
- the bottom is leveled and compacted using a tamper, followed by filling and compacting a layer of crushed stone 15 cm thick;
- According to the dimensions of the supporting structure, formwork is made and lowered into the pit, the internal surfaces of which are pre-lined with thick cellophane
- large rubble fragments are laid on a compacted base in a layer of 30 cm, after which the voids between them are filled with crushed stone;
- the resulting stone layer is covered with a cement-sand mortar of liquid consistency, prepared in a ratio of 1:3;
- In the same way, each subsequent stone tier of the foundation is laid out - but in such a way that after laying the last one, 6-7 cm remains to the floor level (it is advisable to fill the entire volume in one day;
- a leveling screed is applied on top of the last layer of concrete;
- a week after filling, the formwork with cellophane is removed, after another 20 days all surfaces are covered with waterproofing.
Important! The dimensions of the stove foundation should exceed the dimensions of the stove base by 10-15 cm, and the horizontal section of the chimney pipe should be located in the center of the stove in plan.
Strip furnace foundation
The technology for constructing this concrete support structure differs from a monolithic one only in the geometry of the pit - the dimensions of the monolithic bases are tied to the dimensions of the heater, and for a strip heater they are determined by the width of the trench, made within 0.7 - 1.2 m, depending on the heaving of the soil and the weight of the stove .
 Table of dependence of trench cross-sectional dimensions on soil heaving value
 Considering that the configuration of a strip furnace base requires large amounts of labor and materials for the construction of formwork, this type of support for a heater is rarely used - the savings in concrete in this case are not significant.
To help you understand the information clearly, this video will be useful:
Base for a metal sauna heater
With a sauna stove weighing up to 750 kg, you can do without constructing an individual supporting structure - just install a protective floor covering. However, if the floor is wooden, its strength characteristics should be sufficient. It is advisable to check the condition of the joists under the flooring and, if necessary, carry out spot repairs of the area.
A layer of clay mortar is applied to a durable wooden flooring, on top of which a sheet of asbestos is laid in such a format that its edges protrude 25-30 cm beyond the contour of the stove. Excess clay is removed by rolling a paint roller over the asbestos, after which the mortar is given a week to harden and dry. A sheet of galvanized roofing iron of an even profile with a thickness of 0.8-1.0 mm of the appropriate format is laid on top of the asbestos.
 Protective materials for sauna stoves – asbestos and galvanized sheet steel
 To avoid future injuries, the corners of the iron sheet are given an oval shape and pressed to the flooring with self-tapping screws. The protective platform for the heater is ready.
 Options for arranging a protective platform for a sauna heater
 For a metal stove, sometimes an individual load-bearing base is still installed, and there is a reason for this - wooden flooring and logs in a bathhouse age faster and lose strength.
The sequence and technology of constructing a foundation for an iron stove in a domestic bathhouse:
- construction of a pit with a depth of 0.5 m and dimensions in plan that are 10 cm larger than the dimensions of the heater;
- bottom planning with backfilling of crushed stone with a layer of at least 30 cm and compaction;
- installation of concrete preparation on top of crushed stone from liquid cement-sand mortar 5 cm thick;
- after the solution has dried, perform waterproofing with 2-3 layers of roofing material coated with bitumen mastic;
- formwork installation;
- production and laying of a reinforcing mesh frame with a cell of 8-12 cm from steel or plastic reinforcement of variable profile with diameters of 8-10 mm (the finished frame should be located in the lower part of the volume of poured concrete - at a distance of 5 cm from the waterproofed base);
- laying a 20 cm layer of concrete prepared in a ratio of 2:5:8 (cement, sand, small crushed stone);
- when the concrete reaches 70% strength (in a week), lay brickwork on top of it to the floor level.
 Construction of an individual load-bearing platform for a metal furnace
 Important! The entire volume of the foundation for a small metal stove in a bathhouse can be made of brick laid on mortar.
Conclusion
Despite the responsibility of the design, the support base for a stove of any size in a bathhouse can be built independently. At the same time, it is important not to make mistakes in the direction of reducing the load-bearing characteristics of the foundation - when assessing the soil and calculating the weight of the heater, and a moderately overestimated potential does not have negative consequences for the bathhouse.
The main point of the article
- The functionality of the foundation being built for a sauna stove depends, first of all, on the correct assessment of the ratio of the dimensions of the sauna/stove weight/type and size of the supporting structure.
- The load-bearing capacity of the furnace base depends not only on its support area, but also on the depth of the foundation, which, in turn, is determined by the region and soil characteristics.
- Installing a stove foundation in a bathhouse, especially for a metal stove, is quite possible to do independently. However, if the heater is a heavy Russian stove, it is still better to entrust this work to specialists, since its construction should be carried out on the basis of design data calculated by professionals.