The vast majority of floors in both private and apartment buildings are made of wood. The support for a multi-layer, pie-like wood structure is most often logs. Logs are long bars made of wood (less often metal and reinforced concrete) laid transversely to the finishing flooring, serving as its solid foundation. This structure is installed both on a monolithic concrete floor and on supporting posts and beams. Installing floors on wooden joists is very profitable due to the relatively low price of materials and ease of installation.
Advantages of installing floors on joists
Logs installed as a support on a wooden floor are very functional. In addition to their direct responsibilities, they also:
- create a uniform load on the ground in a private house and the floor (if the floor is laid in an apartment building);
- level the surface under the covering (adjustable floors can be raised or lowered with your own hands to create a perfectly flat surface, regardless of the initial parameters of the room);
- create a free, ventilated space between the ceiling and the floor in which communications that are undesirable for public viewing can be hidden;
- increase the sound insulation of the room;
- facilitate the procedure of floor insulation.
In addition, individual joist bars can be easily replaced if necessary, without spending money on large-scale renovations in the house.
Structural features of floors on joists
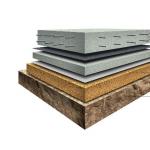
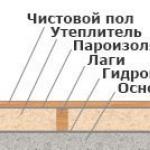
The installation of a finished wooden floor on joists is somewhat reminiscent of a multi-layer cake, in which it is necessary to lay boards, joists, a waterproofing layer, insulation, and a finishing floor covering over the floor in layers.
 Installing a floor on joists involves laying waterproofing and insulation
 Moreover, regardless of the type of flooring, the insulated floor pie includes additional elements:
- a layer of waterproofing between the ceiling and the joists;
- lag bars;
- subfloor (preference is given to plywood boards);
- waterproofing insulation coating;
- the insulation and vapor barrier itself;
- boards - finishing coating.
This design of floors on joists is relevant for the first floors of private houses. All subsequent floors do not need such serious insulation; installation of a waterproofing layer of the pie in this case is only necessary in direct contact with concrete and brick.
 It is necessary to insulate the floors of the first floors and concrete or brick foundations
 Technology for self-production of logs and selection of wood
Logs can be purchased at the store, or you can make them yourself. The second option will be relatively cheaper. Wood with a moisture content of no more than 15-17%, 2nd or 3rd grade, is best suited for these purposes. Logs can be made from pine, fir, spruce, aspen and larch.
If you make the logs yourself, keep in mind that the cross-section of the beam should be rectangular. The height is approximately twice the width. The required size is determined based on the parameters of the room, to be more precise: based on the exact distance between the links of the timber frame.
 The size of the bars depends on the distance between the strapping links
 In addition, it is necessary to take into account the thickness of the insulating layer and the size of the spans. In the illustration you can see approximate calculations with laying lags at a distance of 70 cm from each other.

If your room has an intermediate size between the indicated values, you should take a larger value as a basis. This way you will have a certain supply of material, which will allow you to lay it without gaps and make the structure more durable.
To make a wooden floor with your own hands, you can use both edged and tongue-and-groove boards. The second option is much preferable, because its design involves a groove and a tenon, therefore, installing a fine finishing coating is no longer so relevant.
 It is preferable to use tongue and groove boards due to the tongue-and-groove system
 You can use floorboards made of cedar, larch, spruce, aspen and pine. The most expensive and durable materials are solid oak and pine: provided that the installation is carried out correctly, they will last for several decades. In turn, larch is excellent for rooms with high humidity, because it is not susceptible to rotting, and healthy aspen and alder boards are great for sleeping areas.
 Oak and pine boards will last a long time
 If you purchase first-grade floorboards, you don’t have to spend money on the final flooring, and at the final stage simply sand the boards and varnish them.
The main thing is that before laying, be sure to treat the boards with antiseptic antifungal preparations and impregnate them with a water-repellent composition.
If you are installing a wooden floor with your own hands, be careful when choosing wood: the boards should be dry, but not overdried. Wet wood, after drying and under the pressure of furniture, can become deformed. Always buy boards with a margin of 15-20% in case of need for trimming, mistakes and defects.
How to independently calculate the required distance between lags?
When you install a floor on logs, use the rule: the thicker the floor board, the wider the installation and the farther apart the logs are located.
For example, for a board whose size is 5 cm, you can make a step (the distance between the lags) of one and a half meters.

If you use thin boards, you can take small steps so that the board does not sag. The most common step length between joists is 50-70 cm.
 The distance between the lags is most often 50-70 cm
 Also keep in mind that you will need additional space to make it convenient to lay the insulation inside. If the size of the base does not correspond to the values in the table, then it is calculated upward.
Basic rules for installing joists
When installing logs yourself, you should strictly follow the following rules:

Installation of wooden floor joists
Wood is a flooring proven by time and centuries of experience. When laid correctly, it can serve for decades without losing its visual appeal. In addition, this is the most environmentally friendly, “breathable” floor, guaranteeing a high degree of heat and sound insulation of the premises of both a private and apartment building.
 Wooden floor construction with joists
 To make laying a wooden floor on joists quick and comfortable, you will need the following tools: level, hammer drill, saw and axe, hammer, nail puller, drill, screwdriver and keys. And also the following materials: floorboards (sometimes the role of the subfloor is given to plywood boards), logs, insulating material, fasteners (anchor bolts, screws and nails).
If all the necessary materials for installation are available, you can begin laying the logs on top of the soundproofing material. As already mentioned, the surface must be leveled, checking its horizontalness with a building level. The boards are attached to the joists using dowels.
Now it’s worth taking a closer look at the entire technology of installing floors on joists in a private house.
The first step is marking the work area and preparing the base. First, you should compact the soil and secure the formwork with ten-centimeter sides. A reinforced mesh is placed at the bottom and then the concrete mixture is poured. You need to wait a couple of days for the concrete to dry. After this, a waterproofing polyethylene film is laid on top of the concrete floor, and then supporting structures are constructed.
If the floor is cold, the space that remains under it after its construction must be filled with sand or expanded clay (do not fill it to the top, you need to leave about 5 cm of free space).
 You can insulate the floor using expanded clay
 The second step will be to ensure normal ventilation of the space under the floors. For these purposes, small holes are made along the perimeter of the plinth (for every 15 sq.m.), which, in order to prevent mice from entering the house, are covered with a non-ferrous metal mesh.
The next step is insulating the floor. Expanded polystyrene, isospan or thermal insulation roll material are perfect for these purposes. This material is laid on a waterproofing layer of isolon, which is attached to the joists in advance using an industrial stapler.
After laying the insulation, you can begin laying the plank covering over the joists.. Installation must begin from the corner of the room. The boards are screwed directly to the joists using self-tapping screws.
 Scheme of a wooden floor
 If the boards are processed and sanded well, they can play the role of finishing flooring. If a layer of finishing coating is expected (laminate, parquet, linoleum, etc.), you can begin laying it immediately after finishing the work with attaching the boards to the joists.
Thus, installing a floor on wooden joists has many advantages over laying the floor directly on top of a concrete or soil floor. In addition to the fact that it smoothes out all the unevenness of the floors and distributes the load evenly, it also perfectly insulates the home and promotes sound absorption.
There are a large number of different construction methods with which you can install a wooden floor on logs. Climatic as well as geological features directly influence the choice of one method or another. The financial capabilities of the home owner also play a significant role.
In order to correctly carry out this work process, it is necessary to take into account all the features, as well as the purpose of the building itself. But still, no matter which repair option you choose, all actions will be carried out in accordance with classic solutions that are effective and reliable.
Main types of floors with joists
- this is a rather broad concept, so a timber beam with a rectangular cross-section is far from the main explanation of this subject. They have the following technical features:
- The minimum thickness of the plates should be 160 mm;
- In cross-section, the dimensions of the logs should be 15 cm;
- With minimum parameters, the step size during installation should be 60 cm.
If you want to produce with reinforced concrete reinforcement, it is recommended to use a metal channel. The material from which the logs are made does not matter much. In any case, they will perform one function, which is to be a reliable base for the final floor covering. In order for such an installation to hold securely, compacted soil, wooden beams, and concrete slabs can be used for strengthening.
Subfloor: is it necessary or not?
Considering the geological situation, you must determine whether the spatial distance between the ground and the joists should be maintained. If this is not necessary, then you can save a certain amount of effort, money and materials. In order to find out whether a subfloor is necessary or not, you need to be guided by seasonal readings of the groundwater level.
 Subfloor in a wooden house.
 If the water is low enough, then you can arrange a simple and inexpensive installation of the floor along the joists. The main thing is to ensure that such flooring is not excessively cold. This option is great for building bathhouses or cottages. In areas where a warm climate prevails, such a floor can be installed on buildings with a high base.
If groundwater is high, this can negatively affect the wood. In order not to damage the structure, it must be placed above ground level.
As a frame for strengthening and construction, you can use small columns made from bricks. You can also use materials such as monolithic concrete and foam concrete. Before erecting a bathhouse or residential building, you must visit the local weather service to find out about the groundwater level.
Classic schemes
If there is an underground space, then all the schemes that are known today can be divided into two types:
- Wooden floor on joists with underground;
- Floor covering without underground.
Those structures that do not have a subfloor are colder, but they can be insulated using certain materials. Floor coverings with subfloors have wider varieties. It can be equipped with thermal insulation, which is located between the joists or supporting parts.
The simplest cold floor
This structure must be installed on dry ground. First you need to completely remove the layer of soil with vegetation. After thoroughly clearing the soil, it must be thoroughly compacted. The area intended for flooring on joists should be completely covered with sand, crushed stone or construction waste. The backfilled layer must also be thoroughly compacted. This can be done using a heavy deck that can be nailed to a regular stick in the form of a handle.
 Floor frame with joists.
 After this, another layer of slag or clay with increased density is made. The frame for the flooring with joists will be mounted on this layer. The thickness of the layer should be several times greater than the thickness of the timber used for repair work.
You should pay attention to one very important thing. If you use slag for construction, then it must be delivered to the work site at least a year before the start of the process. According to the requirements, the slag should lie for approximately this amount of time. You must place the logs in the last filled layer with your own hands. Their top line should be flush with the plane of the base.
Before placing lumber in the ground, they must be treated with an antiseptic substance. Installation of this type should be carried out following a certain step. It directly depends on the width of the floorboards. Since tongue and groove boards measuring 37 millimeters are usually used to complete this repair, a distance of 60 centimeters should be maintained. It is not appropriate to use too thick boards for the construction of a bathhouse. With constant interaction with water, moisture and steam, they will deform and deteriorate.
 Lag step calculation table.
 Thus, you can see that for construction it is very important that the lag pitch is observed for high-quality floor installation. The annual rings on adjacent floorboards should be directed in different directions. Thus, these elements will independently take care of their technical condition.
Insulated coating
First you need to make a pit, which is then filled with thermal insulation. The layer of thermal insulation material should be covered with a second layer, which consists of bags for lime or cement. These bags need to be stacked in several rows.
After this, a layer of crushed stone is laid, the thickness of which should be about 8 centimeters. It should be compacted and filled with lime solution. A roofing material covering is installed on top. A fiberboard sheet with a thickness of about three centimeters is mounted on it. Finally, you need to make a final layer of small or medium expanded clay.
Sorry, nothing found.
This entire base, which is made for the floor along the joists, must be filled with a small layer of concrete mortar. Most of the solution should contain sand. After the solution has hardened, it should be covered with sand and follow all the instructions that are described a little higher in this article.
Cold floor with warm underground
First you need to carry out standard preparatory work. The process differs in that if the base is prepared, then it is not necessary to make an embankment of calcined sand. In this case, it is enough to make small columns that are needed under the floor joists. In order to create such a support, foam concrete blocks should be used. Each column is a separate and independent part, which is installed and poured separately from the others, according to preliminary markings.
 Foam concrete blocks to create support.
 You should pay attention to the fact that the finishing boards must be installed crosswise in relation to the joists. If additional sheathing will not be installed above the joists, then they must be installed across the boards. It is necessary to clearly plan the installation, determine the optimal distance and make other additional calculations.
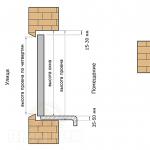
The markings should be made on the part that will be supported at the end of the entire structure. The first joist should be positioned so that there is a distance of about 15 centimeters between the wall and the side. This distance must be maintained on both sides.
 An example of correct installation of logs on posts.
 You can see an example of such an installation in the photo. A builder who independently engages in such construction and does everything at his own discretion can slightly move the posts in a way that is more convenient for him. The foundation for supporting parts should be poured in a continuous row or near each support separately.
It is imperative to take into account the fact that the level of the foundation must extend beyond the contour of the support by at least five centimeters. It follows from this that the formwork for the floor along the joists should be installed in such a way that the foundation strip is larger in width and length than the row itself by about 10 centimeters.
The same parameters for the foundation must be observed when the supports are installed in a separate manner. When you pour a concrete base, you must remember that all actions must be carried out according to specific instructions. To begin with, the earth is compacted. After this, the formwork is installed, the height of the sides should be 10 centimeters. To strengthen it, a mesh of reinforcing rods is attached to the bottom. Next, the concrete base itself is poured and dries for three days. After complete drying, waterproofing and installation of supports are done. The construction of a wooden floor along joists with waterproofing can be done using ordinary polyethylene film.
 Waterproofing can be done with ordinary polyethylene film.
 If it is necessary to level the surface of the supports, use a cement-based solution. If it is necessary to apply a layer whose thickness is more than 5 centimeters, then a mesh of reinforcing bars is immersed in the cement. After the support is leveled, a layer of waterproofing should be placed on it. After this, you need to place a wooden covering 3 centimeters thick, which is treated with an antiseptic substance. This type of lag installation is simply necessary for the floor. Even the logs themselves must be treated with an antiseptic, otherwise all the work is worthless.
The underground space, which is typical for a cold type of flooring, is completely filled with slag or expanded clay. It is allowed to leave only a small layer of free space, 5 centimeters in size. There should also be a small technological opening for air circulation in the underground.
 Floor design diagram with underground.
 According to modern construction requirements, which must be adhered to when building a wooden floor on joists, if the building area is 15 square meters, then there must be two openings for air circulation, which must be located in two opposite baseboards. The general parameters of these holes should be about 20 square centimeters. To prevent these holes from being damaged by the sharp teeth of mice, they should be closed using a mesh made of durable non-ferrous metal.
Designing a warm floor covering with cold
If you decide to create similar floors using logs, then in this case the technology is slightly different from the previous one in that the insulation is not placed in the subfloor, but in the frame, which is made from logs.
In order to install the insulation, it is necessary to attach two slats to the beam on both sides. These slats will hold the subfloor in place.
The subfloor is covered with plastic film, after which mineral wool or a layer of expanded clay is installed. It is worth leaving a small hole for ventilation between the thermal insulation and the top floor of the joists. After this, a wooden floor on joists cannot do without installing a vapor barrier. Finally, the vapor barrier layer must be covered with boards.
Another distinctive feature is that the method of creating ventilation for a warm covering with an uninsulated subfloor has been slightly changed. In this case, openings are used for air circulation, which are placed directly in the base. Holes should be placed every 5 meters. In cold winter times they must be closed.
If you have carefully studied this article, then you should have an excellent, high-quality and reliable wooden floor structure, which is created using joists. The tips and practical guides provided in this description will help you create your own construction project. The construction methods that you saw here are the main ways in which you can construct a floor using joists.
If you know of some other, more modified methods, this means that you have found a classic version that has been modernized and developed in a new way. All details and features can be added or removed, depending on the climatic conditions in which the flooring will be located, as well as what loads will be placed on it. Use our advice and guides, because only with the correct instructions will we lay, install and repair joist floors.
Wooden floors on joists are one of the oldest methods of flooring and the only one used in the northern regions of our country. Modern materials have only improved ancient technologies, due to which the scope of applications has significantly expanded and performance indicators have improved. Before proceeding directly to the consideration of various options, you should familiarize yourself a little with the engineering requirements for calculations.
Logs are distinguished from beams by their smaller size and mobility. If beams cannot be moved after installation, and repairs are very long and labor-intensive, then logs are a mobile architectural element. They are much easier to install and, if necessary, repairs are carried out faster.
Before you start building a floor, you need to study the requirements of regulatory documents for the size of the joists and the distance between them, taking into account the thickness of the floorboards.
Table of lag sections at a pitch of 70 cm
Table of distance between joists depending on the thickness of the board
In order to learn how to independently make calculations based on tables, it will be useful to consider a simple example. Initial data: the length of the room is 10 m, take a floorboard 30 mm thick.
Calculation method
According to the table, with such a thickness of the board, the distance between the logs is 50 cm; with a room length of 10 m, 20 logs will be needed. The distance between the logs and the walls cannot exceed 30 cm. This means that we will have to increase their number by one piece, the distance between the others will decrease to 45 centimeters.
Important note. During calculations, all roundings should be done only downwards, thus creating an additional margin of safety.
There is no need to calculate dimensions and distances accurate to the millimeter; no one takes such measurements. By the way, during construction, the vast majority of architectural elements and structures are measured in centimeters, the greatest accuracy is half a centimeter. Millimeters are almost never used during measurements.
Floor subfloor options
These types of floors can be installed on a wooden or concrete base or on the ground. Each option has its own technological features, which must be kept in mind during work. As for the specific purpose of the premises, taking this parameter into account, the base of the floor and its operational characteristics are selected. The technology of the device itself remains almost unchanged. There are, of course, options for warm and cold floors, but these features also have a common construction algorithm.
Installation of a wooden floor on joists on wooden bases
Such floors can be made in both wooden and brick buildings and can have several varieties. The features of flooring need to be considered at the building design stage. Not only the purpose of each room and its size are taken into account, but also the climatic zone of residence, microclimate requirements and the financial capabilities of the developer. Below are step-by-step recommendations for constructing this type of flooring.
Depending on specific conditions, the algorithm can be slightly modified, but all main construction operations must be completed. The base can be moisture-resistant OSB boards or sheets of plywood. The design of the floor coverings provides for the possibility of laying insulation; the use of rolled and pressed glass wool or polystyrene foam is allowed. If there are insulation materials, then you should definitely install hydro- and vapor barriers.
roll waterproofing
Step 1. Take the dimensions of the room and calculate the number of joists, taking into account the above recommendations. Prepare materials and tools, make markings. Do the work slowly; mistakes made at this stage have extremely negative consequences. Eliminating them will take a lot of time.
Step 2. Start installing the logs from the outer wall ones. If the room has subfloors, then the logs can be fixed directly to them. To make work easier, it is better to use metal squares with perforations; such elements significantly speed up work and increase the stability of the joists. Using the mark on the wall, taking into account the thickness of the floorboards, align one end of the joist and fix its position.
Practical advice. When installing the outer joists, do not fix them immediately; first, you should only tighten the screws. This will allow you to make final fine adjustments.
Do the same actions at the second end of the log, constantly monitor its level position. Once the lag lays down normally, you can firmly fasten the ends and begin installing intermediate fasteners. The distance between them depends on the thickness of the boards that are used for the logs; it is approximately 70 centimeters.
Step 3. You need to stretch the ropes between the outermost joists; place all the remaining joists along this line. Constantly check with a level; installation accuracy should be ±1–2 mm. There is no point anymore, it takes a lot of extra time. A small difference in height will be removed during finishing of the front surface of the floorboards.
Step 4. If the floors are warm, then you need to lay thermal insulation between the joists; waterproofing and vapor barriers are used to prevent moisture from entering. The distances between the logs must be adjusted taking into account the length and width of the insulation. This can be either mineral wool or polystyrene foam, or bulk types of insulation. If all the preparatory work has been completed, you can begin laying the floorboards.
There are options for installing joists on floor beams. These are so-called ventilated floors and are most often used for non-residential premises. There is no need to be particularly precise; size alignment is done using lags. The logs are attached to the beams with nails or self-tapping screws from the side. The algorithm of work is the same. First, the extreme ones are placed, a rope is pulled between them and all the others are fixed along it.
Ventilation is carried out through special vents in the foundations; the distance between the ground and the floor must be at least fifty centimeters. Otherwise, the air exchange rate does not meet the required indicators, and this causes damage to wooden structures.
Installation of floors on wooden joists on concrete
Such floors are considered more complex, labor-intensive and expensive; all wooden structures must be reliably protected from direct contact with concrete. Otherwise, the structures will quickly become unusable and will have to be replaced prematurely. There is a chemical way to protect lags from rotting processes using various impregnations. They are quite effective and actually prevent the process of wood deterioration. But unfortunately, impregnated wooden structures can no longer be considered environmentally friendly, and it is for this indicator that most developers install natural wooden floors.
If the logs are laid over the entire area on concrete, then waterproofing is required between them.
But they can also be secured using metal squares, which allows you to create a gap between the base and the joist. It must be borne in mind that in this case the load-bearing characteristics of the floor are somewhat reduced.

This fixation method has its advantages. Firstly, direct contact of wooden structures with concrete ones is completely excluded. Secondly, logs can also be installed on a black screed. Using corners, you can eliminate irregularities of several centimeters; there is no need to make a finishing screed. This saves a lot of time and money.
The second method of laying on a concrete screed is to lay the logs directly on it; a material based on modified bitumen is used for insulation.
Laying logs on the ground
The method is used for outbuildings, bathhouses, gazebos, verandas, etc. The wood must be treated with antiseptics. It is better to have a columnar foundation; if you want to make a more durable strip foundation, then it is necessary to provide vents for natural ventilation in advance.
How is this floor made?
Step 1. Remove the topsoil. You can use it to fill the beds or level the area in front of the house.
Step 2. Mark the columns. The distance between them is selected taking into account the load and size of the logs. The posts can be made of concrete, block or prefabricated. The dimensions of the supports are approximately 40x40 cm, the burial depth is within 30 cm. A layer of sand ≈ 10 cm thick should be poured onto the bottom and compacted.
Step 3. Fill the supports with concrete. To prepare concrete, you should use two parts crushed stone and three parts sand for one part of cement. Water is added as needed. There is no need to make formwork in the ground; formwork from boards or OSB scraps is installed above the ground level. During the manufacture of formwork, you need to use a level; all edges must be strictly vertical.
Practical advice. It is much easier to make columns from ready-made blocks. Horizontal alignment must be done along the rope. After the outer ones are aligned with the hydraulic level, a rope is pulled between them. Deviations should not exceed ± 1 cm. This variation is eliminated during installation of the log.
Step 4. Proceed to fixing the lags; you also need to start work from the outermost ones. For precise horizontal alignment, you can use shims. It is not advisable to take wedges made of wood; over time, they will dry out and wobble will appear: the floor will begin to creak unpleasantly when walking. Between wooden structures and concrete surfaces, it is imperative to place two layers of roofing material for reliable waterproofing.
Step 5. After the outermost logs are laid, a rope is stretched between them and all the remaining ones are laid under it. The logs are fixed with metal squares on dowels and screws. To increase stability, it is recommended to install them on both sides. Floor boards can be laid directly on the joists or a subfloor can be laid first. The final choice depends on the characteristics of the operation and purpose of the room.
Always select joists with a safety margin, especially in cases where the installation method involves bending loads. It must be remembered that correcting mistakes made during the construction of flooring always costs much more than carrying out the work with high-quality materials and in compliance with recommended technologies.
Choose your joist boards carefully. They must be absolutely healthy without signs of rot. The presence of through cracks and rotten knots is completely prohibited. If there are large healthy through knots, then you need to install the joists in such a way that there is a stop under them.
When attaching the logs, do not allow the possibility of wobbling.
Most loose joists cause very unpleasant squeaks in the flooring while walking. To eliminate such phenomena, you will have to remove floor coverings; this is time-consuming and expensive; it is not always possible to keep the dismantled materials in a condition suitable for reuse.
Video - Installation of wooden floors along joists
Despite the relatively short service life of multilayer wooden structures, their light weight, environmental priorities, and cost-effectiveness have a convincing effect on the owners. If foam concrete, brick, and gas silicate blocks can still compete with natural organic matter in the field of wall construction, then lumber is still the leader in the field of flooring. Basically, for the construction of multilayer wooden structures, floor logs made of durable polymer compounds or wood are used.
What attracts owners to a floor with unique air cushions formed by laying polymer or wooden blocks? The list of advantages includes important points, such as:
- excellent thermal insulation characteristics;
- affordability of lumber;
- formation of a minimum load on the foundation, on beams or concrete floor slabs;
- the ability to raise the floor plane to any level;
- reduction of construction materials costs;
- the speed of construction of a wooden floor structure, which does not force you to wait for the screed to harden;
- the presence of a technological space convenient for installation of communications;
- ensuring an optimal microclimate inside buildings or rooms;
- the ability to lay wooden floors on joists yourself.
Installation of floors using joists - quickly, economically, reliably
In addition, a well-executed floor arrangement using joists will eliminate the rather expensive leveling process, since it fully fulfills its function. The presence of ventilation voids in the floor structure will extend the service life of the lumber used for the arrangement, which is still recommended to be treated with antiseptics, wood aging and fire protection agents. Thrifty owners can use bitumen instead of antiseptic.
Design and technical features
Floors with joists can be laid on an earthen base and on floors constructed from powerful wooden beams or reinforced concrete slabs. Regardless of the type of base, identical materials are used to construct the floor structure.
What can joists be made of?
Lags are the transverse floor beams on top of which the finishing coating is laid. It is extremely rare to use metal and reinforced concrete beams as lags, most often wooden blocks or advanced polymer products. Wooden bars are chosen mainly because of their low cost, polymer ones because of the speed of construction and ease of installation.

Logs - transverse beams, most often made of wood or polymer
Note. Instead of timber, which for some reason could not be purchased, boards selected in accordance with the cross-sectional dimensions of the timber, sewn together in pairs, can be used. It is permissible to exceed the cross-sectional dimensions. In such cases, installation of floor joists made from sewn boards is done on edge.
Builders of log houses to this day use straight logs with a similar diameter, hewn on three sides, instead of timber. In austerity mode, logs may well replace timber. The only condition: they must lie for about a year in a dry room before installation.
Correct choice of section
The cross-section of the bars selected for constructing the floor along the joists resembles a rectangle with a height that is a multiple of 2 and a width that is a multiple of 1.5 (aspect ratio in the section is 2×1.5). If the floor is laid on wooden floor beams, then the size of the cross-section of the bars will be affected by the size of the span between the elements on which they will rest.

The cross-section of the log depends on the thickness and strength of the floor covering
Please note those who plan to equip the floor structure with a thermal insulation layer. There should be a ventilation gap of at least 2 cm (preferably 3-4 cm) between the bottom plane of the final coating and the insulation laid between the joists. This means that timber must be purchased taking into account the size of the ventilation gap. If the floor structure will rest on the ground, it will also be necessary to take into account the thickness of the bead laid on the cranial block attached to the joists.
It is recommended to purchase timber with a “margin” in cross-sectional dimensions for floors with joists. When constructing a floor over an earthen base, in order not to use too expensive timber of a large cross-section, the span is reduced by installing brick columns. The intermediate distance between the supports is 1.2 m. They are made of red brick M100, silicate is only applicable if the level of the aquifer is below two meters.

Plan for laying the floor on joists with emphasis on brick columns
Proper laying of the floor on logs with brick columns requires equal distances between the rows of supports and between the beam elements. Before constructing brick supports, a 40x40 cm foundation is poured under each of them. The foundation can also be poured in the form of a strip under a number of brick pillars. There are two bricks in each row of the support column; the height of the support depends on the level of the elements on which the beam will rest (beam of the bottom frame, concrete grillage).
Lag installation step
The pitch between the lags is an important parameter on the basis of which calculations of material consumption are made. You can draw a plan of the rooms and calculate exactly how much timber and brick with cement will be needed if the floor is not laid on the floors. This is the value between the axes of elements located parallel to each other. The size of the step is influenced by the power of the finishing coating and its strength characteristics. That is, when laying a coating that can withstand a large load, the distance between the floor joists can be increased.
Before laying thin materials, logs will have to be installed frequently (0.3-0.4 m for laying boards up to 24 mm thick). For boards with a thickness of 50 mm, the distance between the axes of the logs can be 1 m. Basically, 40 mm boards are used for home improvement; the logs are laid with a distance between the axes of 70 cm. Reducing the pitch between the elements, as well as increasing the cross-section, will increase the strength of the structure, but also increase expenses. Only the owner can decide what is more important to him.
Those who lay the floor on joists with their own hands must remember that the indentation of the element furthest from the wall should not exceed the size of the step between the joists. Usually they retreat from the wall by 20-30 cm.
Geometric guidelines for installation
Orientation in space is a significant component of the correct floor arrangement. Those who want to know how to lay joists on the floor correctly should follow the following building rules.
- The flooring of boards in rest rooms and living rooms is carried out along the direction of the flow of natural light. The logs are arranged “cross” in the direction of the boards.
- In vestibules, hallways and other rooms with heavy traffic, boards are laid according to the direction of movement, logs, naturally, in a direction perpendicular to the direction of the flooring elements.

The logs are laid “cross” to the floor boards
Note. If the floor structure is strengthened by installing two layers of timber, the top layer is laid “cross” to the previous one.
Mounting methods
Previously, logs were simply attached to a concrete slab or beams with nails. Not the best and not long-term method was replaced by fixation using galvanized metal corners. The instructions on “how to attach joists to the floor” read:
- The corners are fixed with self-tapping screws.
- One of the angle planes is attached to the beam.
- The depth of penetration of the self-tapping screw into the beam is 3-5 cm.
- The corner is attached to the bottom trim beam in the same way.
- The brick support or concrete grillage, which must be covered with a layer of waterproofing, is fastened with dowels.
Instead of a corner, a U-shaped fastening device can be used.
It often happens that the standard length of the timber is not enough. Elements can be joined in two ways:
- close to each other;
- by cutting, called “into the floor of a tree”.
Attention. The joints should be strengthened by nailing 1 m long pieces of lumber to one, or better yet, two sides of the beam.

Methods for connecting timber into a log floor
When installing the beam, the distance between the connection points of the beam should be at least 50 cm.
Sequence of work on installing a floor on the ground
A practical, democratic floor pie on wooden joists can be installed before the construction of load-bearing walls, for example, a frame house, or during the period of interior decoration. It is recommended to clean the floor after all plastering and painting operations.
When constructing a multi-layer cake above the ground, work is performed in the following sequence:
- The soil is compacted using a vibrator or the end of a simple log.
- Fill the compacted crushed stone with a layer of 5 cm; it will serve as an incompressible base.
- Cement is poured into the formwork, specially made for each support or for a number of supports.
- The supports are constructed from bricks (there must be a layer of waterproofing between the base of the supports and the brick).
- Another layer of waterproofing and a soundproofing gasket are placed above the support.
- Install and fix the logs.
- Then the skull block is laid and the boardwalk is made from cheap lumber.
- Behind the roll-up there is again another layer of waterproofing.
- The insulation is placed between the joists.
- The upper plane of the entire installed beam is leveled by trimming off the excess, and the presence of deviations is detected with a spirit level.
- Be sure to leave a ventilation gap between the floor boards and the thermal insulation layer.
- Finally, the floor boards are laid with a 2 cm indentation from all walls around the perimeter. This gap is necessary to compensate for wood movements that occur under the influence of moisture and temperature. After sanding and treatment with a finishing compound are carried out (you should read the relevant articles about performing these works), this gap is closed with a plinth.

Diagram of a floor with joists on an earthen base

Leveling the timber before laying the covering
When installing a floor over ceilings, the process is shortened, since the logs are attached directly to the beam or to the reinforced concrete slab.
Adjustable log device
A convenient innovative scheme is the installation of adjustable plastic logs that can withstand about 5 tons of load per m 2. The joists designed for operational floor installation have threaded devices for adjusting the floor level. The logs are rigidly attached to the rough concrete surface with dowels, and to the wood with self-tapping screws. Excess length is simply cut off.

Adjustable floor joists
Video example of the work
It is not very easy to construct a multi-layer floor pie on wooden joists, but it is precisely this that significantly reduces the construction or repair budget. In addition to minimizing material consumption, the pace of finishing production is also increased. Thorough adherence to the technologies for arranging this floor construction scheme and compliance with the recommendations guarantees long-term operation and aesthetic appeal.
Wood is predominantly used for laying floors. Despite the fact that wooden structures are characterized by a short service life, environmental safety, affordable cost and low weight make this material very popular among users.
Flooring with joists is one of the most popular. This floor is based on wooden blocks of a certain size.
And if the walls can still be built from brick and various blocks, then when deciding to lay the floor, the vast majority of owners will choose wooden structures. How to lay a floor with your own hands? Mostly the floor is laid on joists. This is a reliable and time-tested option. You can handle this kind of work yourself.
Laying joists on floors made of different materials
Before you decide to lay floor joists, you need to understand how this work is done in the case of different floors. So, if the floor is made of wood, then in most cases the beams will not be completely level. Before laying the joists for your floor, you need to do some preparatory work. Achieving a flat surface is quite difficult. In most cases, joists are attached to the sides of the beams.

To install logs for a DSP floor, you must use dry and antiseptic-treated beams with a cross-section of 100x50 mm or 150x100 mm.
The main advantage of the method of fixing floor joists is that installation does not require the use of a lining to change the height of the products. Installation is carried out using partial screws. When installing the floor on joists, screws with a diameter of 6 mm or more are used. The length of the products must be at least 2.5 times greater than the width of the logs.
To prevent the wood from cracking during fastening, you must first prepare a hole in the beam and the joist itself that is 2-3 mm smaller than the diameter of the screw used.
If the beams are installed with a large pitch, lay a 2nd layer of joists. It needs to be positioned perpendicular to the 1st, but with a smaller step. Another good option to correct this situation is to use thicker boards when constructing the finishing layer.
If you decide to lay the floor on joists and the floor is made of concrete, then consider the following rules:
- When installing a floor on a concrete floor, a waterproofing layer must be created. Without it, the floor will constantly get damp.
- After waterproofing, layers of heat and noise protection materials are laid.
- Next, a cement or dry screed must be made.
- After the screed has completely dried, the logs are installed. Subsequently, a finishing layer is laid on them.

Floor joists should be made from boards more than 2 m long. If you don’t have enough boards 2 m long, join them end to end. When connecting floor joists, make sure that the joints in adjacent rows are offset by no less than 50 cm in relation to each other. The lags are laid on the screed. If it is not possible to make a screed, the base must at least be waterproofed.
Professionals categorically do not recommend installing logs on soft thermal insulation material. The structure will float, causing the final finish to gradually but inevitably deteriorate. If, when installing noise and thermal insulation, materials are used that allow you to choose the desired width, the logs must be installed in such a way that the insulating materials used are between them.
If it is not possible to install floor joists along the width of the insulation, install the boards at such a distance that the outer cells can be completely filled with scraps, i.e. the amount of waste should be minimal.
Laying logs on an earthen base

When installing the log directly on the ground, the turf layer is first removed, approximately 5 cm of gravel is poured onto the surface, carefully compacted and filled with thin concrete of the same thickness. Further work is carried out in the same order as in the case of a conventional concrete base, i.e. waterproofing material is laid, thermal insulation is laid and a screed is made. In this case, instead of thermal insulation and screed, polystyrene concrete can be used if desired.
The pitch between the joists was mentioned earlier. It is important to know how to correctly calculate this value. To ensure optimal distribution of incoming loads on the logs, they must be laid at the same distance from each other.
At what step should I install the logs?
The distance between the lags is one of the most important parameters. Taking it into account, the calculation of material consumption is carried out. You can draw a floor plan and make an accurate calculation of the required amount of brick, cement and timber if the floor will not be laid on the floors. The distance between the individual elements in this case is determined taking into account the power and strength of the final coating. For example, if the finishing part is able to withstand high loads, the logs can be laid at a greater distance from each other.

When installing joists, a ventilation gap remains, which allows you to ventilate the space under the floor.
If the finishing material is quite thin, the logs are installed at a distance of 30-40 cm using boards no more than 24 mm thick. If boards 5 cm thick are used, the step between the lags can be increased to 1 m. Most often, 4 cm thick boards are laid in houses. The distance between the lags in this case should be 70 cm. By reducing the step, you can increase the strength of the structure as a whole, but this will entail incur additional costs. Only the home owner can decide what is best for him. When installing floor joists, you must remember that the distance between the wall and the element closest to it should not exceed the distance between the joists. Most often, no more than 20-30 cm are removed from the wall.
What needs to be done before installation?
Before laying floor joists, you need to thoroughly clean the surface and then prime it well. Dry all wooden products and treat them generously with an antiseptic. You can use special compounds or, for example, bitumen.
Sand, slag, fiberboard or others can be used as soundproofing material. After the logs are laid, you need to take a long building level and check the evenness of their installation. If there are no irregularities, then everything is fine. If they are present, they must be eliminated. This can be done by adding sand under the joists where there is unevenness.

While working you will need the following:
- Building level.
- A jigsaw or hacksaw with fine teeth.
- Ax and claw hammer.
- Hammer.
- Screwdriver.
- Electric drill.
- Several different wrenches.
- Thermal insulation material.
- Nails 5 and 7 cm, screws 3.5, 5 and 7.5 cm, anchor bolts with a diameter of 1 cm.
- Logs 5x5 cm.
- Floor board.
The lags are laid on soundproofing material with a previously determined step. When laying, you need to use a building level, achieving maximum evenness of the surface. The joists are fastened to the concrete base using anchor bolts. They are attached to other surfaces with dowels. Determining the required length of the anchor bolt is very simple - add 60 mm to the height of the log and you will get the desired value.
Thermal insulation and subfloor installation
The gaps between adjacent logs are filled with thermal insulation material. The most commonly used are basalt fiber, polystyrene foam and isospan. Rolled thermal insulation is most convenient to use. If desired, you can use expanded clay.

Laying the logs begins from the corner of the room. The first row of boards must be tongue-and-groove mounted to the wall. Remember to have a gap between the wall and the boards. Lay the next row offset from the previous one by approximately 2 joists. To ensure that the boards fit tightly together, take a hammer, attach a piece of wood to the end of the adjacent board and lightly tap to ensure a tight fit.
When attaching boards along walls, screws can be placed at the top. In the future, they will still hide under the baseboard. In all subsequent rows, the coating can be attached exclusively to the bottom wall of the groove. The screw heads should be driven into the board. After all the boards have been laid, it is necessary to cover the expansion joints with plinth. Additionally, this will protect the walls of the room from various types of contamination.
How to lay boards correctly?
Laying a wooden floor can only be done after the joists are completely level. Boards must be attached to each joist. Select the size of the boards so that the joints are located in the middle of the joists. In addition, they must be located perpendicular to the long side of the board.
To prevent the boards from splitting, prepare holes for fasteners in advance.
It should be 2-3 mm smaller in diameter than the fastener used.
If desired, you can use a fillet instead of a plinth. These are special profiled strips that are installed between the floor and walls.
To prepare holes for pipes, use a drill whose diameter is 8-10 mm larger than the cross-section of the pipe. To make nailing more secure, you can staple the boards together using a staple gun.
Step-by-step instructions for leveling the floor

Floors are almost never perfectly flat and smooth, especially in older homes. In some situations, differences can reach 20 cm in height. It is very difficult to bring such a surface into proper condition, and concrete screed cannot be done in all situations. Not every beam in an old house can withstand heavy loads. In such situations, adjustable logs come to the rescue. They are installed in the following sequence.
First, bolts are screwed into specially prepared holes in the joists. The optimal number of holes is at least 5 for every 2 m of beam. After this, the logs are laid out according to a predetermined step. Holes for dowel-nails are created in the ceilings. The drill must be brought to the holes for the rack bolts. The logs are leveled to the building level, after which the dowel-nails are driven in. The protruding parts of the post bolts must be cut off. The finishing coat can be applied.
Finishing the floor
The work does not end with laying the floor on the joists. It is necessary to eliminate differences in height and roughness. The most convenient way to do this is with a sanding machine or a small sander. Start sanding with coarse sandpaper, then polish the leveled surface with fine-grained sandpaper.
Finally, you need to apply a protective compound that will increase the wear resistance and service life of the floor. You can use wax mastic, parquet varnish and oil impregnation. Choose the option that suits you best. After the protective composition has dried, proceed to the installation of the desired finishing coating. Good luck!