There are several options for making this piece of furniture, including wood.
We will focus on the process of making a familiar wooden stool with our own hands. How to choose the right material, process it, correctly draw up a sample drawing - the article will offer detailed recommendations on all points.
All the stool drawings below are just examples. The process of their manufacture is not accompanied by precise calculations, as is required when designing load-bearing parts of any structure or those that are in one way or another subject to significant loads.
Therefore, below is only a recommended algorithm for making a stool yourself, that is, general instructions. Which model to make is up to you, dear reader, to decide. After all, it is clear that you can build anything with your own hands. The main thing is that the resulting sample fully corresponds to its purpose, which, again, is determined by the master.
Choosing a stool design
The given drawings and drawings clearly show which stool options are most often assembled for domestic use.


A more original option is a stool and a bedside table at the same time.

There is only one explanation - the more complex the configuration, the more time it will take to make the stool. But this is not the main thing. For various shaped elements, you will have to look for the appropriate tool, or even resort to the services of a person (or workshop) who has a machine, cutters, and the like for personal use.
A simple example: to make curly cuts, exactly along the radii, with just a hand jigsaw you can only make it out of plywood. And it is not a fact that the result will be satisfactory. If the legs are planned to be made from a solid board, then if you have only the simplest household tools, it is better not to try - this requires many years of experience in processing wooden blanks.
Selection of materials
The fact that you will have to work with wood is understandable. But what kind of products can you use?

Solid wood in the form of boards and beams is suitable for the manufacture of any parts of the stool: seat (1), fastening bars (2), crossbars (3), legs, drawers and the legs themselves (4). A more simplified version is with a cover made of multilayer plywood. By the way, this solution has the advantage that it is easier to laminate the furniture panel (another name for this structural part) and, if necessary, replace it.
Type of plywood
It must be moisture-repellent. Water will definitely get on the stool during its use. FBS products are the best in all respects, but their cost is such that not everyone will want to purchase such plywood. In everyday life, as a rule, products of the FSF and FK brands are used. To save money, you can buy cheaper sheets of these series, category Ш1.
This means that only one side of the sample was subjected to grinding. The condition of the second (wrong, back) stool seat does not matter. There is also a multilayer one with ready-made lamination on sale, but it will naturally cost more.
Wood species and material grade
Let's start with plywood. If the stool will be located indoors, then the FC brand is better suited. It is less moisture resistant, but the glue used to hold the veneer together is not so toxic. But for this reason, FSF is recommended mainly for external use. In addition, its moisture resistance is higher. So if the stool will always be in the utility room, garden or somewhere else outside the building, this is the best option.

But you can write quite a lot about the choice of wood. Without going into the specifics of the different species, the author recommends using larch for the stool. Firstly, it is easy to process it with your own hands. Secondly, the cost of the material is quite reasonable. Thirdly, unlike many other species of coniferous trees in this price range, larch becomes even stronger when wet. Therefore, if you handle the stool carefully, it will last for decades. Fourthly, you will not need to constantly treat it with preparations against decay and biological pests. Other inexpensive options are acacia and ash.
Having chosen a specific type of wood, you should study all the features of working with it. But there are nuances, and it is this approach that guarantees that problems will not arise later. For example, does everyone know that acacia can be easily processed only after it is soaked? Dry wood from this wood is not much worse than stone in terms of hardness.
Wood moisture level
Basically, all wood must be properly dried. In construction it is prohibited to use these materials with an indicator of more than 20%. As for the stool, you don’t need to be an expert to understand that if you assemble it with your own hands from raw materials, after a while everything will have to be redone. The reason is trivial - the entire structure will “lead” after the wood shrinks.
Technology selection
There is often advice not to use tongue-and-groove joints. The main argument is complicated. But if you think about it, is this so?

In order to make grooves in the legs, the author used an electric drill with a small cutter. I first drilled holes along the marked lines, which I then combined, choosing “partitions” between them. No matter what anyone claims, this type of connection is the most reliable.
It is much easier to assemble all the elements with your own hands using self-tapping screws. The heads can be made secret and disguised. But such a design will soon begin to creak - it’s been checked. It turns out that the common element connecting the 2 workpieces is just a thin and short metal “pin” - the leg of the fastener.
Hardware can only be used as an additional (to glue-on) method of fixing parts. Elements such as corners, staples, and plates are also used for reinforcement. The master himself will understand what is more convenient for one or another version of the stool. And then, this is done mainly for bulky structures. If the product is small, then one glue is enough. Although the reader may have a different opinion, the author does not insist.
Manufacturing of components
The main parts of the stool are shown in the pictures (see above). If the drawing is ready, everything else is a matter of technique.
Assembly of the structure
This is, so to speak, a preliminary installation, a kind of “browsing” of the stool. At this stage, the accuracy of all dimensions, the correct fit of parts is checked, defects are identified (if any), and so on. Here you can still redo something, improve it without unnecessary costs and loss of time.
Processing of structural elements
After checking the readiness of the entire structure for assembly, the wood is “finished” - impregnated with special compounds, dried, and so on.
Assembling the stool
- It is advisable to start work from the seat. All crossbars, support bars and the like are attached to it - depending on the model.
- Installation of legs. They can be attached directly to the lid or assembled into a separate frame, with the installation of crossbars.
- Final assembly of the entire structure.
Grinding
After the stool is mounted, it needs to be given a “marketable” appearance. How and with what to treat the surfaces is determined by the master. This is done with your own hands mainly with sandpaper or using a special attachment that is inserted into the chuck of an electric drill.
Exterior design
Here the main advisor is your own imagination. Varnish, stain, paint – there are plenty of options.
The author deliberately did not indicate what specific cross-section and length the block would be needed, did not recommend a certain thickness of plywood sheets or boards, and so on, so as not to limit the reader in any way. If the meaning of the work - where to start and how to finish - is clear, everything else is unimportant. After all, when something is done with your own hands, it is a priori implied - AS I WANT, and not someone else.
Good luck with your home building!
A stool is one of the simplest types of furniture products. No matter what changes our life undergoes, it remains unchanged. Only the materials from which it is made change. In Soviet times, making a stool with your own hands was one of the first tasks in labor lessons. Not only boys knew carpentry. Sometimes representatives of the fair sex had to comprehend the basics of adult life and learn how to make a stool with their own hands. Modern furniture bears little resemblance to its counterparts from 50 years ago. Wooden stools of that time were rough, but durable. They fit perfectly into the interior of the kitchen, as well as other rooms. Nowadays there is a rich assortment of different types of furniture in stores, but there are also amateurs who want to learn how to make a stool with their own hands. And in our time of abundance of building materials, this will not be difficult at all.

The main parts of a stool are the seat and legs. The legs are tied at the top with drawers, and at the bottom with leggings. Having become familiar with the terms, you can start drawing. First, you need to decide on the sizes. When making a stool, it is better to start from old, but reliable models that can be found in every home. Having measured the height and other parameters, you can begin to develop a diagram. If you don’t have a sample, then for an adult stool the size of the seat side will be 300-450mm, for a child’s stool - 250-280mm. Homemade stools should be even more comfortable than store-bought ones. If only because you can choose the height according to yourself. Usually the size for adults is 420-480mm, for children - 260-280mm. You must have drawings of stools with you, whether it is a diagram from the Internet or drawn up by you. After all, eliminating defects on paper is much easier than redoing the whole job.

Materials and tools
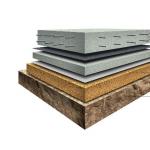
Making a stool will require high-quality materials that have stood the test of time. In the first place, of course, is wood. Wooden stools rank first in terms of convenience and second after forged ones in terms of durability. The wood should be dried in room conditions at 20-30 degrees; you should not use kiln-dried wood, as the possibility of cracking cannot be ruled out. After air drying, the material needs to be dried at home at room temperature for about a month. It is best to take hardwood: maple, birch, beech, wenge, hemlock, mahogany. Or make legs from them, which carry the main load, and the seat from pine, spruce, MDF, chipboard or plywood.

Chipboard is one of the cheapest, but unreliable materials. It has advantages, such as moisture resistance. But when making a stool, strength is much more important, and chipboard has insufficient strength, and it is also too fragile for furniture, although there are a couple of options in which the pressure on chipboard can be reduced. But the constant release of formaldehyde resins, which make this material unsafe, unfortunately, cannot be completely eliminated.
MDF is an environmentally friendly material and quite durable. However, when making kitchen furniture with your own hands, it is better to use it in combination with hardwood, especially in the supports, that is, in fact, it is used only for the seat, or lid, as it is called in some sources.
A good substitute for wood is plywood, but then you will have to do a little magic with the design. Kitchen stools made from plywood are made from 3 parts, or from 4, so-called box-shaped. This design is now very common, especially in the furniture industry. Although it is perfect for making a stool with your own hands.

Tools are selected depending on the materials. To make wooden stools, we will need:
- roulette
- self-tapping screws
- screwdriver
- square
- jigsaw
- chisel
- emery
- wood glue

How to make a classic stool yourself
In order to make a wooden stool with your own hands, we will need material (boards, bars) and tools. If you don’t have a jigsaw and there’s no way to buy one, then we do this: we buy an inexpensive frame hacksaw for metal and direct its teeth toward you when working. So, the scheme is ready, the materials have been purchased and, if necessary, dried, the tools have been prepared - you can start. Before starting work, you can make so-called “patterns” out of paper, that is, life-size parts of the future stool cut out of paper. You don’t have to do this, whatever is more convenient for you.

Click to enlarge
We start with the legs, they will have a square section of 50x50mm. Let's cut off 4 identical parts from the block, let's say 450mm long. Then assemble a seat from a single piece or from two halves, ours is 380x380, the thickness of the board is 20 mm. Next, we cut out 4 drawers to connect the legs of the stool and 4 legs. We will also need four bars for an additional connection between the drawers and the seat. The structure is assembled according to the principle: tenon and groove, tenons are cut along the edges of the drawers, and grooves are cut on the legs of the future stool. The length of the tenon and the depth of the groove are approximately 20-25mm. We do the same with the legs, which will later be attached to the legs. You can mark the details ahead of time for clarity.
We sand it before the parts are assembled; this is both convenient and safe. We assemble all the parts at the beginning without glue, adjusting and, if necessary, filing them. Then we coat the parts one by one with glue and assemble them. We fasten the bars between the drawers with self-tapping screws to the bottom of the seat “tightly”. To do this, we will take care of the length of the fasteners in advance. I would like to say a few words about the glue that we will use to coat the grooves.
It is better to take special glue, carpentry glue. This glue has proven itself for many years. If you don’t have it, then you can take PVA, but not the stationery type for paper, but the one that is suitable for wood.
Other types
There are stools that are much easier to make than classic ones. A very common option now is a stool, consisting of four parts: a seat, two wide legs and a reinforcing crossbar (or jumper). This option should not be difficult, especially in assembly. Wood, thick plywood, and laminated chipboard are suitable for it. This structure is secured with furniture screws and glue for additional fixation. This option is very simple, but there is one subtlety: the reinforcing crossbar should be in the shape of a trapezoid with a 5mm bevel. This is necessary to make the structure more stable.

You can try your hand at making a lightweight stool. In this version, there are no side drawers and the legs are attached directly to the grooves of the seat. For this purpose, the seat cover is made of thick material. The grooves are made directly into the seat or bars are attached to it. In this case, the legs are made thicker than usual. Of course, such a stool will take much less time than a regular one.

Another type of stool is a seat and two legs arranged crosswise at an angle of 90 degrees. In this version there are no additional parts, where the design itself consists of 4 parts. In this case, we can again use wood, plywood, and pressed boards. If we settle on a wooden model, then we do the final touch after final assembly. We carefully sand the stool again, and then treat it as desired with stain, varnish or paint.
Decorating your stool
Your stool can be decorated depending on the interior items where it will be located. You can apply a design on the surface of the seat with spray paint using a stencil. Then coat the surface with varnish. Or make a bold design move and decorate a retro stool using decoupage. It’s labor-intensive, but effective, and you can involve the whole family in this interesting activity. To do this, we will need PVA stationery glue, beautiful napkins and varnish, preferably acrylic. The result will tell not only about your accuracy, but also reveal your taste. In the end, you can decorate just the seat by laying thin foam for softness. Then decorate it with beautiful fabric and decorate it with accessories to your taste. As they say, everything is in your hands!
A small wooden stool will find a use in every home. Children run around with great joy in these chairs. Sitting on such a stool is convenient for peeling potatoes and performing other “sedentary” work. However, not many people decide to buy a small stool due to the fact that there is always a more important waste of financial resources. But almost everyone can make a small wooden chair with their own hands. To make it you will need a jigsaw and a little imagination.
Preparation.
Manufacturing of parts, grinding.
Painting.
Preparation.
Preparing the material and necessary tools plays an important role and saves time in the future. To make a stool we will need:
- hewn board measuring 800x200x25 mm (dimensions are approximate, you can proceed from what is available),
- 8 shiny screws (50-60 mm),
- sandpaper,
- jigsaw,
- screwdriver or screwdriver,
- paint and varnish on wood,
- tape measure, pencil and corner.
You need to start by marking the board. First of all, using a corner, a pencil and a tape measure, we mark a rectangular section without knots, 32-33 cm long. This will be the upper part of our high chair. Next, we mark two segments of 23 cm each - these will be the sides. Now it is advisable to give them some kind of curly pattern. You can use any objects that have a circle for this, simply outlining them with a pencil. But, this method involves an irrational waste of time. After all, you will have to mark the center and other dimensions in each side. Therefore, for the sides it is better to use a pattern pre-cut from thick cardboard or other material. It will allow you to easily and quickly mark a large number of sides. Just attach the pattern and trace it with a pencil.
By the way, the use of a curly pattern on the side not only gives them a beautiful look, but also allows you to trim off all unwanted knots.
And immediately mark the jumper. It should be trapezoidal in shape and have sides of 230 and 220 mm. The width of the jumper is not important - from 80 to 120 mm.

So, has a marked board.

Important! You should not draw too thick lines - this affects the evenness of the trim. And the pencil is not so easy to erase.
Using a jigsaw we cut out all our parts. Evenness is important here. To trim the cut evenly, it is better to guide the tool blade not along the line, but to the side of it.

You can learn to cut evenly using unnecessary waste. So, let's cut out all the details.


This will give the product not only a beautiful look, but will also hide all possible irregularities in the cutting.
Next, we carefully sand all these parts with fine sandpaper. It is most rational to carry out this procedure at this stage, since a number of inconveniences may arise when grinding the finished structure. It is convenient to sand smooth surfaces by putting sandpaper on a wooden block, or using a manual machine for grouting putty. The main thing is quality, since after painting all defects will appear and be visible.
This is what sanded and unpolished sides look like.

So, it has the same parts, but ready for assembly.

It is advisable to carry out the assembly in this order:
- connect the sides with the jumper (1 screw on each side);
- place this structure on a flat surface and screw on the top cover (2 screws on each side);
- We strengthen the connection of the sides with the jumper (1 more screw each).

The chair is assembled! We check it again on a flat plane. If the stool is a little wobbly, then we tighten the legs until the product is completely stable.

Painting.
Before painting, we check the product again for defects, and if necessary, erase them and pencil residues. Using a brush, we clean the stool from wood dust and begin painting.
Here “there is no comrade to taste and color”! You can leave the natural color of the wood by painting it with clear varnish. You can give the product a certain color using a variety of wood paints, which are abundant in all hardware stores. In principle, one coat is sufficient for painting. But, if, after the first layer has completely dried, the surfaces are lightly sanded again with fine sandpaper and a new layer of varnish is applied, the shine of the product will noticeably increase.
Important! Poorly sanded ends absorb more paint and become darker.

This is what the finished chair looks like, varnished.

If you decide to master the process of making home furniture, you should start with the simplest designs. First, try making a stool with your own hands. You can completely cope with this task even if you do not have any special skills in working with wood.
Drawing up a drawing
To avoid mistakes, it is worth making at least a schematic drawing of the future design. Our stool will consist of the following parts:Seats: its side can be equal to 350-430 mm;
Main details of the stool
Tsarg - bars under the seat, creating a solid foundation; it is to them that the legs are attached;
Legs (supports) with a height of 45-50 cm and a cross-section of 35-50 mm;
Legs that serve to give the structure additional stability; It is better to place them not exactly in the center of the legs, but a little closer to the bottom;
Crackers: corners made of wood or metal, mounted in the corners under the seat (we'll talk about them a little lower).
Simple DIY stool
Advice! A utility stool can be made small – up to 260-280 mm high with a seat size of 260x260 mm.
Required tools and materials
To work with wood we will need:Ready-made bars or dry board 200 mm wide (it will be more convenient to work with this size, it can be easily cut lengthwise into several 50 mm bars);
Roulette;
Square;
Fine-toothed hacksaw or power saw for cutting wood;
Rasp;
Chisel;
Drill or screwdriver: they not only fasten parts together, but also drill holes; you can replace it with a set of screwdrivers;
Self-tapping screws;
Sandpaper.
It’s great if you have a router available, with which you can quickly prepare the grooves and process the edges. Experienced craftsmen also use grinding machines - with wheels of different grain sizes. However, you can also use the usual old-fashioned method - select grooves and make tenons only with a chisel, jigsaw and rasp, and then sand the wood with sandpaper.

Grooving
Sawing and processing of parts
1. First, we need to get 4 pieces of equal size for legs, drawers and legs.2. To obtain a stable structure, the bars should be cut strictly at 90°.
3. When calculating the sizes of the drawers and legs, do not forget that you need to add the length of the tenons to their length (see the figure below).

Marking the legs
4. Our design should not have chips or tears, otherwise during use it will be easy to catch a hangnail. Therefore, after cutting the parts, carefully process with sandpaper No. 40-60, wound for convenience on the block, edges and cuts of workpieces. It is also necessary to clean out obvious irregularities.
5. Using sandpaper with a finer abrasive No. 80-120, and then No. 160-320, we again go through the entire plane of each part twice.
How to choose a groove and make tenons?
1. Connection using self-tapping screws is very unreliable - the stool will become loose very quickly. Therefore, to attach the legs and drawers, we will use a tongue-and-groove connection.2. The simplest option is rectangular studs. Their width should be 1/3 of the thickness of the part, and their length should be about 80% of its thickness. That is, if the thickness of our leg is 20 mm, then we must make spike 16 mm long and 7 mm wide(multiply 20 by 1/3 and get 6.67 mm, round the figure to 7).

Rectangular tenon for connecting legs
3. So, we mark the location of the tenons on the drawers and legs.

Tongue-groove connection
4. Since it is much easier to fit a tenon than a groove, we start working with making grooves.
5. To drill them out, it is more convenient to use a drill or screwdriver. After making several holes (see photo), we select the excess wood between them with a very sharp chisel(with a blunt instrument you can only hurt yourself).

6. To make the walls even, you can attach a small block to the groove line - in this case, you can easily select a groove at 90°.
7. Of course, it is much easier to make tenons on a milling machine. But you can cut them out using the old-fashioned method of marking using the usual jigsaw and rasp, and if there is a jigsaw in the house, then things will go even faster.
8. Check the connection. It should be tight enough, and the tenon should fit into the groove tightly to the very end.
Assembling the stool
1. We assemble the legs in pairs, fastening them with drawers and legs. To check, first assemble the stool dry, without using glue. We check the accuracy of the dimensions of the parts and the correctness of their fit. We eliminate the identified shortcomings.
Checking the evenness of the parts in pairs
2. If there are no errors, disassemble the structure and drop a few drops into the holes of the grooves drops of glue, and then spread it on the walls with thin wood chips. After drying, you can additionally secure the connections with self-tapping screws.
3. To sitting It doesn’t warp quickly, it’s better to assemble it from several (5-7) boards up to 80 cm wide.
4. Glue the seat boards, coat them with glue on the sides, and tighten them clamps(tools for tightening and pressing parts tightly together).

We tighten the glued seat with clamps
5. Wait for the glue to dry completely.
6. Apply glue again, but on the back side of the seat, attach the seat to our stool, align the structure and press it tightly. We immediately remove excess glue.
7. In principle, the seat can be screwed or secured using wooden dowels (chops) 3 cm long.
8. To strengthen the back side of the seat, we attach small corners to the legs and drawers (they are called breadcrumbs) or use a furniture corner tie.

We attach corners (crackers) in the corners

Furniture tie for drawers

The structure can also be strengthened using ordinary bars attached to the inside of the stool in the drawer area
Plywood stool
You can make the simplest design from scraps of 3mm plywood for a summer house or garage in a couple of hours. Thinner sheets will quickly break under the weight of the human body. It is better to use birch plywood. It is easier to process, and products made from it are painted more evenly.There is no point in explaining the manufacturing process in detail - the figure below shows in detail the order of cutting and assembly. All workpieces are cut with a saw by hand or with a jigsaw and thoroughly cleaned. The finished product can be varnished after assembly.

The simplest plywood stool

Children's stool made of plywood
Video: How to make a folding stool
To make a stool with your own hands, no special skills required. This type can be carried out by a person who has no experience. In addition, this is a creative process that will require minimal costs and will bring a lot of positive emotions. You can show your imagination and make a unique stool that will delight the owners of the apartment with its appearance. You can also give it to someone as a gift. Beautiful wooden stool combines individual style and functionality.
Stages
First of all, you should prepare for the work ahead. To do this, it is necessary to highlight the main stages. First, you need to determine what material the stool will be made of. Secondly, you need to make a drawing. Next, prepare all the necessary tools that will be needed during works, and purchase material.
Material for production
The stool can be made of different materials, such as glass, metal, plastic and others. You can also combine metal and wood or metal and glass. There are many options for making stools. But at the initial stage it is recommended to start with wood. 
Stool drawing

For clarity and to simplify the work, you should make a drawing. On it you need to draw all the details from which it will be made. wooden stool, and indicate their sizes. In the drawing, all details must be indicated proportionally and a certain scale must be used. It is recommended to start with a simple stool with rectangular legs. But if you have confidence in your abilities, then, as an option, you can do DIY wooden stool using carved legs. Now in stores there are ready-made blanks for carpentry work. Therefore, it is worth taking a closer look at this assortment of products; perhaps you will find ready-made carved legs in order to use them to make DIY wooden stool. Blueprints should be supplemented with such details.
The drawing is a kind of design project for a stool. Therefore, you should draw the finished product on it, and also place separately all the details that will be needed to create this piece of furniture. Next to each part you must indicate its size and quantity. Dimensions are usually indicated in millimeters.

Tools
In order for the process of making a stool to be a pleasure and without anything distracting from the work, it is necessary to prepare the tools.
1. You will need a saw. Since the parts of the stool are small, a small tool will do. You can also use a miter saw.
2. A screwdriver is a necessary tool for assembling the stool.
3. Drill and drill bit of the right size.
4. Planer.
5. Jigsaw.
6. Self-tapping screws.
7. Ruler for measuring sizes.
8. Pencil.
9. Corner.
10. Brush for coloring.
Step-by-step instructions: how to make a stool from wood
Once the workplace and all the necessary materials and tools for future work have been prepared, you can proceed to the process of creating a stool. In order to understand how to make a stool out of wood with your own hands , at the initial stage you should follow the step-by-step instructions.
1. You should start working with the legs. You need to take and measure the length of each leg on it; it is 430 millimeters. You need to draw lines on the block using a ruler and pencil. Next, cut the block into 4 parts.
2. The next stage of work is preparing the seat of the future stool. To do this, take 2 boards 145 millimeters wide and 300 millimeters long. You can also make the seat from one piece, then you should take a wide board so that it matches its width. It is better if the seat is solid. This option will simplify the assembly process and provide the stool with greater strength.
3. Next you need to make the parts for the frame. They are made from plywood. It is necessary to cut blanks for the frame measuring 100 millimeters by 270 millimeters. We make a stool frame from plywood blanks. The plates are folded into a square, and the legs are placed in the corners of the square.
4. Then we assemble the stool. To do this, lubricate the pre-prepared holes with glue and tighten the screws.
5. Ready-made solid wood stool must be sanded using sandpaper.
6. The final stage of work is varnishing. It is better to do this in several layers. Each layer must be given time to dry and only then apply the next one.
Stool with spread legs
Those who already have some experience in carpentry can be offered to make a stool with spread legs.

1. First we make the bars. In order to avoid unevenness, you need to take 4 identical bars, set the miter saw to 5 degrees and cut them all at once.
3. Then you need to take small bars for spacers. To attach them, you need to make holes on the inside of the legs. When attaching the spacers, you should first apply glue and then screw in the bolts.
4. In the upper part of the stool you need to make holes for attaching the legs, lubricate them with glue, and then attach the legs.
6. The final stage of the work is the manufacture of the lid, it is better if it is made of a solid board.

This stool will look good with a soft seat. The process of its manufacture is also not at all complicated. Foam rubber is cut to the size of the seat and covered with fabric on top. It can be any material, for example leather, fur, velvet, etc. The color scheme can also be varied. The seat can be patterned or plain. It all depends on taste preferences and interior style. The fabric is attached to the chair using a special furniture stapler.

You can also leave the seat just wooden. In this case, it must be sanded and covered with stain and varnish or use paints for woodwork. Perhaps someone would like to paint a stool, apply a floral design or some kind of ornament. Since the manufacturing process is creative, you can use colored enamel instead of varnish or come up with other design options.
Manufacturing options
You can make the process of making a stool easier by ordering all the parts from a carpentry workshop. All you have to do on your own is to assemble everything into a single structure and start decorating. This option is more suitable for women, as it does not require much effort. Also, finished parts can be sold in specialized construction stores. At home, all that remains is to assemble the stool like a construction set and start decorating.

Decoration options
First of all, you need to know for which room the stool is being made. Depending on the stylistic orientation, you should choose its appearance. Perhaps at the carpentry stage it will be necessary to make carved legs or include some non-standard element in the design; it can also be made of wood. Much depends on the style of the interior in which this piece of furniture is supposed to be placed. For example, you can make a model with a colored fur seat for a girl’s nursery. And for a boy, a stool in a nautical or military style is suitable. There are a lot of execution options. If you don’t have enough imagination, you can look at special design publications that specialize in this area and make original chairs and stools from wood.