When it comes to painting, we involuntarily imagine canvas or paper, brushes, paints. This is understandable, because all classical works are made in this way, and we are used to seeing paintings in a baguette. But in our time there are many other bases for painting, and even the most unexpected ones!
"Standard" painting surfaces
1. Metal
Such bases are more intended for painting with acrylic, oil. Often artists use sheets of copper, stainless steel, and aluminum.

The most "fat" plus of these bases is impeccable strength. But over time, any metal oxidizes, and when exposed to temperature, it tends to shrink or expand, which leads to cracks (craquelure). Therefore, the safety of the canvas on the metal is low. An exception is gold leaf, which, unlike ordinary metal, does not need to be additionally primed. And when painting with translucent paints, a bewitching warm tone and golden shimmer come out.
Due to their heavy weight, all paintings made on metal bases are small. However, artists are now presented with an amazing opportunity to write on such a building metal material as “honeycomb aluminum”. It is light, smooth as glass, not subject to bending and deformation from drying paints. Aluminum honeycombs are similar in structure to corrugated cardboard. You can buy such material in art salons or metal equipment stores.
How to write on metal? The best paints for metal bases are acrylic. You can also work with oil. The base must first be cleaned of rust and etched with a primer for metal.
2. Plywood
This material is made from poplar, birch and mahogany. The result is a multi-layered board, one side of which is rough and the other is smooth. The thickness varies from 0.6 to 1.3 cm. Before work, the plywood is cleaned with sandpaper and primed with an adhesive solution.

How to write on plywood? Here the choice is almost unlimited: you can paint in oils, acrylics, inks, pencils, gouache and watercolors. Even coal fits perfectly on plywood. Most importantly, the thickness of plywood for painting should not be less than 6 mm.
As a primer, you can purchase a special primer for plywood, or an acrylic primer will do.
If you are going to work with oil, it would be ideal to soak the plywood with drying oil. Instead of a primer, you can use an inexpensive option - PVA glue - the paint fits perfectly!
Note! If the size of the canvas exceeds 45 cm, regardless of its thickness, it should be reinforced with a wooden frame.
3. Hardboard
The material is a mixture of wood fibers crushed into sawdust and glue. From all this, a hardboard hardboard is obtained, which is distinguished by durability, durability and strength. The shelf life of hardboard is comparable to the shelf life of solid wood.

Of the shortcomings it is worth noting the large weight and the tendency to bend towards the center of gravity. Therefore, hardboard sheets are reinforced from the back with wooden connecting brackets.
Hardboard is sold almost everywhere and inexpensively. It is better to take hardboard smooth on both sides.
How to write on hardboard? Oil is the best paint for this base.
Non-standard bases for painting
1. Asphalt
Asphalt painting has been around since the 16th century, when Italian street artists depicted biblical scenes on city streets. For this, coal, chalk, flowers and sand were used.


Today there is even a tradition in this direction - on the streets of Santa Barbara and Grazie de Cournanone, large festivals of street painting on asphalt are held.
To date, the popularity of this direction does not fade away. In addition to crayons and charcoal, special weather-resistant paints are used in spray cans. Especially often graffiti is painted on asphalt with spray paints. And recently, drawing three-dimensional images on asphalt has become popular.
2. Fabric
This creation has its own name - “ batik". Experienced batikists say: drawing on fabric is like painting on canvas. Only paint can be applied not only with a brush, but also with a sponge, palm or fingers.

3. Porcelain and faience dishes
This trend has existed since ancient times. You can do it at home by painting plates or cups. For this, stained glass paints are used, which first create the outline of the picture, and only then it is filled with color.

4. Windows or glass panels
For painting on windows, it is better to take easily washable stained glass paints. It is more fun to do this kind of work with the whole family.

And recently, a new direction in painting on glass panels was discovered by Mark Heisman. He writes his paintings with ordinary brown packing tape. But what comes out of it in the end, does not fit in the head. How can you correctly convey the entire depth, atmosphere, shadows and mood of each plot? Simply amazing!


5. Shaving foam
And this seemingly strange way of drawing is very interesting for children. Drawing on shaving foam is not only a very fun and interesting activity, but also useful. It develops your child's creative thinking and creativity, and trains his imagination.

On this basis, they draw with the principle of monotype - prints. For work you will need the following materials:
- Shaving foam;
- Lid, plate or flat tray;
- Paints. The best option is liquid gouache or acrylic;
- Matches, toothpicks or a thin brush;
- Flat cardboard or ruler;
- Whatman paper or landscape sheets, but you can also use plain office paper.
How to draw on shaving foam?
Drawing on foam is very easy:
1. First you need to apply the foam on a plate or tray, then smooth it with a ruler;
2. Then drip paint onto the shaving foam;
3. With the help of brushes or toothpicks, stains with paints can be diluted in a chaotic manner, or creating a specific pattern;
4. When the image is finished, you need to put a blank sheet of paper on it and press it a little;
5. After that, the paper should be removed very carefully so as not to spoil the work;
6. The resulting drawing should be set aside for a while to allow the paint to soak;
7. Using cardboard or a ruler, remove the remaining foam from the paper. After that, the drawing is simply debugged to the side so that it dries.
Summarizing
In general, the term “non-standard” is not entirely correct, because you can draw on anything. I think the selection "what else you can draw on" will only confirm these words:
- on furniture;
- on nails;
- for coffee;
- on the trees;
- on laptops;
- on the body;
- on ivory;
- on parchment;
- on the sand, etc.


What unusual surfaces do you know?) Please share;)
In this tutorial, I will show you 5 different ways to print on wood. These are great methods to allow you to create custom designs such as signs, plaques, gifts, or simply brand your creations.
Step 1: Collect materials
Materials:
- pine board
- Liquitex gel medium
Step 2: Setting up
I tested 4 methods for transferring a drawing from paper to wood and one method using a technique. I used the same image on each board, which had my logo with a large block of text, an image, and normal sized text, so for each application you can see how well the wood responds to different applications.
All pictures were printed on my laser printer (not inkjet). I also mirrored the image so that it displays correctly on the tree.
Step 3: Method 1 - Acetone


The first method is to use acetone to transfer the toner to the wood. All you need is acetone, paper tissue, nitrile gloves to protect your hands, you can also use an old plastic card. When working with acetone, be careful and read the safety instructions.
I put the mirrored picture on the plywood and wrapped it around for a more secure fit. Then I dipped a tissue paper in acetone and applied it to the picture, pressing it firmly on top.
After several repetitions, the toner was transferred to the wood, and the paper lagged behind the wood.
Pros: very fast, decent image quality, clean process
Cons: Image quality is average, acetone is a strong chemical
Step 4: Method 2 - ironing


The next method is to use a regular iron. All you need to do is iron the paper. As in the previous step, I wrapped the paper around the piece of wood, and then ironed it, being careful not to move the sheet relative to the wood. I tried to press hard on the iron, and the iron itself was set to a high temperature, but it seems to me that the temperature was not high enough.
The picture came out so-so, and it seems to me that this was due to the fact that the iron did not heat the paper to a sufficient temperature. I have heard that using wax paper can improve the situation, and some craftsmen transfer the image using a soldering iron with a special tip for branding.
Pros: the cheapest method, done fairly quickly
Cons: poor image quality, the possibility of burning yourself, charring wood or paper
Step 5: Method 3 - Polyurethane Lacquer


The third method is based on the use of water-based polyurethane. I used Polycrylic (this is just the name of the manufacturing company, so you can buy any analogue). You need varnish, an acid brush, a hard toothbrush, and water.
I applied the polycrylic with a small brush, trying to create a thin film that was wet but not puddle. I then pressed the paper directly onto the wet polycril and pressed the paper from the center outwards, removing any air trapped under the paper, and then moved the piece of wood to the side, where it dried for about an hour.
After the blank was dry, I moistened it with water, and then peeled as much paper as I could remove with my hands. Next, I took a toothbrush and brushed it gently over the surface until all the remaining paper was scraped off.
The quality turned out to be excellent! Everything except a small defect on the letter "F" looked very good. I was really surprised by this way of printing on wood.
Pros: excellent image quality, safe water-based coating
Cons: Removing paper is messy, takes an hour to dry
Step 6: Method 4 - Liquitex Gel Thinner


The fourth method was the gel solvent. I used Liquitex gloss, a foam brush, an old plastic card, a toothbrush and water.
The process is similar to the one that used varnish, the only difference is that we have a gel in our hands, not a liquid. It is better to work with the gel with foam, because the brush leaves a lot of tubercles and stripes.
I pressed the picture into the gel and removed the air that got under the paper, first with my fingers, and then with a plastic card. Then I left the blank to dry for 90 minutes, and then scraped off the paper with a toothbrush.
This option also looked great, but there were a few pieces of paper left on the tree that could not be scraped off with a brush.
Pros: excellent image quality, safe water-based gel
Cons: harder to remove than polycryl, the surface becomes rough, takes a long time to dry
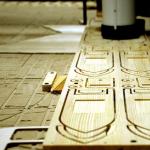
Step 7: Method 5 - CNC Laser


So, now let's try the technological method. I had access to a Full Spectrum Laser Hobby 20x12 device and used it to render the same image. Setting up the device is very simple.
Image quality, as expected, was good. The only problem area was the photograph, which proved difficult for the laser to copy. But the text and logo, completely black in the photo, look great.
Pros: excellent text and logo detail, set up and the machine will do everything for you
Cons: Expensive to buy, hard to find to rent, doesn't do well with photography
Step 8: Applying the Finish Coat and Final Opinion


I decided to apply a lacquer finish to the finished work to see how the appearance of the products would change, and this procedure slightly changed my opinion about each of the methods I tested.
The acetone got very dark after polishing and I liked the final look much more, so I place this result higher than the gel sample.
The option with an iron ... remained of poor quality.
Polycrilic darkened even more and began to look even better. This is a definite favorite in my ranking.
The gel also darkened, but the surface of the wood did not even out, and the pieces of paper that I could not remove were sticking out noticeably. To achieve a result similar to polycrylic, I had to spend a lot more time.
The version on the laser CNC almost did not darken, but became a little more like a scorched tree, the detailing was still excellent.
What materials are best for painting on plywood? How to prepare plywood?
On plywood, you can paint with oil paints, acrylics, even gouache and watercolors, pencil and ink, in your student years they even painted on plywood with charcoal. Take plywood with a thickness of at least 6 mm, it must be primed, you can use a deep penetration acrylic primer or buy a special primer in an art store. If you apply the drawing with oil paint, then under it it is better to soak the plywood with drying oil. Instead of primer, you can use PVA glue, it's cheap and the paint fits better.
And if the plywood is waterproof, then the primer does not have to be applied, the paint is easily applied to it and does not warp over time. Art stores sell sheets of plywood already impregnated, which preserves the texture of the material.
Varnish the finished drawing.
The work of the Japanese artist Audrey Kawasaki (Audrey Kawasaki): oil, pencil, ink:
On plywood, it is best to paint with oil paints. And plywood needs to be properly prepared for this. First of all, it must be very dry. Remember that plywood is several layers. You need to stop on six- or ten-layer plywood. Plywood must be smeared 2-3 times with drying oil cooked from linseed oil or plywood should be immersed in hot drying oil for a day. Then dry the plywood for 12-15 days. The plywood impregnated in this way must be primed in 2-4 thin layers of glue-chalk primer. (I heard that some primed with PVA).

Lesson #39
If you aspiring artist perhaps these advice will be useful to you.
How can you make the basis for your future painting yourself?
The very first question is “why?”.
If you are just learning to draw, then you are most likely working at a rather slow pace. After finishing work on the first painting, you can go to any art store and simply buy the base you need for the next painting.
But if you draw constantly, then buying the basics can result in a fairly large amount.
Paintings are sold slowly, therefore, it is impossible to calculate this way: I will sell a painting, take money for it and immediately buy materials in advance.
The artist has to spend some time just investing money to be creative, creating his masterpieces. Therefore, the question of saving is not in last place. Today I will tell you how you can make the basis for drawing yourself.
One of the advantages of homemade foundations is the ability to choose the sizes yourself. Purchased basics for drawing are always made according to the standard. And you can first come up with a size that is suitable for your picture, and then make exactly what you need.
What is the base made from?
The first thing you can pay attention to is what is stored in your home. For example, thick cardboard.
Of course, the cardboard is quite thin, it can warp if paint is applied directly to it, so the cardboard must be glued. For this, ordinary PVA glue is well suited.
The disadvantage of cardboard is that a picture drawn on such a basis can deteriorate over time, because you do not know what exactly the cardboard is made of. (Sometimes it may contain acid, which will affect the quality of the picture).
To prevent this from happening, a special material is glued onto the cardboard.
If you are working with acrylic, then the base can not even be primed, because this paint will not damage the base.
In addition to solid cardboard, plywood or fiberboard is well suited for the base.

What are the advantages of these materials? Of course it's pretty cheap. Suppose you bought a whole sheet of plywood. The most important thing is to somehow bring or bring it home. Then you can calculate how many pictures will fit on this sheet. You get quite a lot.
You will just need to draw on a piece of paper so that you can cut it correctly later, or right on this plywood the right sizes, and then carefully cut everything.
It is easier to cut fiberboard into small pieces, because chipping is always obtained on plywood. Then they will not be visible, because a fabric is glued over the plywood.
You can not even stick the fabric on the fiberboard base, the pictures are painted not on the rough, but on the smooth side. Alcohol is used for degreasing. But it is best to apply PVA glue or acrylic emulsion to a smooth surface. Then the natural color will be preserved. If you need a white base, then use acrylic primer.
For a sheet of plywood, you need fabric.
Where can I get this kind of fabric? Stores that sell fabrics. Any fabric will not work. You need to find a natural base, not synthetics, because the paints will begin to interact with synthetic materials, which will ruin your picture.
Linen, linen, coarse canvas or muslin are well suited for these purposes. Muslin is cotton. The most important thing is that the fabric is of natural origin. Now we have to look for such a fabric, because only synthetics are sold.
The fabric can be white or gray, it doesn't matter.

How to prepare our basis for drawing?
Let's assume that you have already prepared a sheet of plywood. Choose the thickness of such a sheet at your discretion. The thinner the sheet, the more likely it is to warp. To prevent this from happening, you can then nail small slats on the reverse side.
If you choose a thick sheet of plywood, then the picture will turn out to be heavy. If it is inserted into the frame, then the weight will be added. And the picture usually hangs on the wall, we must also take this into account.
You need to first cut out one piece of the right size and start working with it. What will we do next?
It is necessary to cut exactly the same size from a piece of fabric, only make it a few centimeters larger, because the fabric will have to be folded to the back.
When you're done with that, prepare the table you'll be working on. Put down newspapers or paper because everything around can get dirty.
We put plywood on the table, carefully place a piece of fabric on the plywood, taking into account the size of the fold.
At this stage, you will need PVA glue and a regular brush.
Not a paint brush, but a flat paint brush.

The fabric must be laid so that there are no distortions in the thread pattern. If from below the threads are directed parallel to the edge, then from above they should also be parallel to the edge of the plywood sheet.
We take a paint brush, lower it into a jar of glue and begin to apply glue. We do this from the middle to the edges, and not vice versa. You can first pour a little glue into a smaller base for ease of use.
This way we get a primed base. When you glue the fabric on one side, turn the base over, you can put it on some box without a lid, then carefully glue the fabric that remains on the hem. Particular attention should be paid to the corners.
Then the base should dry well.
If you don't like the color of the plywood on the back, you can cover it with white paper.
Try not to spread too much glue so that the plywood does not warp after drying.
In this way, you can make as many bases for drawing as you like, it will be much cheaper than buying a ready-made base each time in a store.
If you draw a lot, then these basics can save you money. If you don't paint often, just go to an artist store and buy ready-made canvases.
If you need a stretched canvas on a stretcher, it's easier to buy it at an artist's store.
For acrylic, liquid paint for tinting can be applied to such a canvas and not glued.
Decide for yourself whether to buy or make your own basics for drawing. It depends not only on your financial capabilities, but also on the technique in which you work.
Today I wrote some useful tips for budding artists. I hope that they will definitely be useful to you at a certain stage of your work.
Having decided on the style, you can begin to select materials for the future work:
- Paint and canvas.
- Cardboard, designer paper, magazine clippings, old photos.
- Textile, leather, ribbons, braid.
- Glass or crystals.
- Buttons.
- Dried flowers, shells.
Advice! Do not throw away old children's drawings, shreds of fabric, magazines, decorations– all this can become part of the picture. Keep them in a separate box, periodically reviewing and arranging among themselves.
We draw with paints
The easiest way to create an original painting for the interior with your own hands is to paint it. The theme is limited only by the imagination of the creator. Even in the absence of artistic skills, a masterpiece can turn out: use abstract techniques, study master classes and photos of finished works.
Oil, watercolor, acrylic paints will become faithful assistants in creating a picture for the interior. As a basis, you can use both a professional canvas and plain thick paper or a primed board.
Advice! Inspiration can be drawn from nature if there are picturesque places near the house. If you are not lucky with the place or the weather, feel free to draw your household, pets, fruit compositions - whatever. The accuracy of reproducing reality does not play any role, the main thing is to approach the process with a soul.
Modular paintings are suitable for almost any room: from cuisine before living room, but it is important to select appropriate images. If you don’t have time at all to create a masterpiece with your own hands, then we have good news for you - today you can buy them in any specialized store!
Photo printing
The technical side of the issue is taken over by a photo workshop, which can print a suitable image on almost any basis: canvas, paper, ceramics, etc. These can be ordinary posters with the image of interesting places, people, ornaments.
Advice! The poster is not just a picture, it must carry a certain idea, match the interior, the theme of the room and the character of the owners of the house. Recently, pin-up and retro posters have gained particular popularity.
If the poster is large, you can divide the image into several segments and, when combined into a single canvas, beat the joints, making it look like a modular picture.
If there is a child in the house, then you can scan his drawings and, choosing the right ones in color, shape,. A photo of the artist himself can complement such a poster. It remains only to print the poster and place it in a frame that matches the color and style.
Collage of old and new family photos can be hung as a picture in the bedroom or living room, and posters with the image of the relevant paraphernalia, fruits, are suitable for the kitchen. Finally, it is worth noting that it is recommended to choose posters and panels for the kitchen in rich and bright colors, however, no one forbids you to go against the rules and create stylish ones.
Textile
From all kinds of shreds, fabrics with a beautiful ornament, ribbons, braid or lace, you can create real masterpieces in patchwork style with your own hands. Fabric paintings are most often made using the appliqué technique. Dense textiles with a discreet and inconspicuous ornament (stripes, polka dots, etc.) are taken as the basis, and the main elements are cut out of bright shreds.
Most often, kitchens and nurseries are decorated with textile works, since these rooms are characterized by a certain simplicity that is present in the application.
Advice! From felt, flannel and other fabrics that hold their shape well, you can cut fruits, animals, cars, houses. You can safely combine various textures and patterns on fabrics, use braid, decorative cord, buttons for decoration. For the living room, you can make a textile picture of wrinkled silk with abstract patterns.
From buttons
With their help, you can create original things by sewing or appliqué. Often this type of fittings is used to depict leaves on trees. Buttons can be originally glued inside any contour, for example, a silhouette butterflies or cats. In sewing stores, you can pick up details of various shapes, colors and materials and lay them out like a mosaic, according to a pre-prepared pattern. Such works of buttons will fit perfectly into the kitchen, however, they can be used for the living room and bedroom.
Advice! Buttons can be glued around the perimeter of the picture frame, giving it a personality.
Wallpaper and panels
Often, after repairs, large pieces of beautiful wallpaper remain, which will be useful for making unusual interior paintings.
- Framed wallpaper is the easiest option to create something like this. panel. A piece of the desired shape is cut out of the roll and placed in the frame. Moreover, the ornament may coincide with the pattern on the walls or differ from it. Such elements can go in a row of 2-3 pieces.
- Golden paint and a stencil or small black-and-white photos stylized antique will help to revive a boring canvas in a frame. Such pictures from the wallpaper will fit perfectly into