The strength of the load-bearing roof systems must be given special attention, since the protection of the building from the weather depends on it. Mistakes made when attaching rafters to beams are fraught with big troubles, up to repairing the roof or even dismantling it and creating a new frame. Rafter beams are an indispensable part of the entire roof structure. They are made of wood and metal; a reinforced concrete rafter beam is also on sale.
When developing a roofing project and during its creation, many factors that create loads on truss structures are taken into account, among them:
- the weight of the coating and other elements of the roofing "pie";
- wind power;
- the greatest possible thickness of snow on the roof;
- the presence of equipment and other loads on the frame.
The main elements of the roof structure, which bear the most loads, include:
- rafter system or farm;
- composite beams.
Of course, the quality of the material from which the above materials are made is of great importance, but no less important is the strength and reliability of the connection of the roof elements to each other.
I-beams
I-beams are a structural material that is used for the construction of buildings using frame technology, as well as for flooring. They do not have the disadvantages inherent in wood, and due to the presence of an I-section, high strength characteristics are achieved. Docking of I-beams is carried out using a carpentry tool.
Methods for attaching rafters to walls
To date, the main options for installing rafters and attaching them to the walls of houses are as follows:

Fasteners for rafters
To assemble the rafter structure, wooden elements and metal products are used. Wooden fasteners include: bars; triangles; pins, etc.
Metal fasteners are nails, bolts, steel angles, screws, studs, clamps, staples, special devices for rafters called skids or sliders, and much more.
WB beam fasteners are used when mounting load-bearing beams for wooden structures in the construction of wooden houses. Its advantage is that it does not require cutting into the beam, and fastening is carried out using nails, screws or anchor bolts.
Methods for attaching rafters to the Mauerlat
The most common way to attach the rafters in the lower part is their connection to the Mauerlat (read: ""). Despite its popularity, not every builder will be able to perform such work with high quality, and this cannot but affect the strength and reliability of the roof.
Before attaching the rafters to the Mauerlat beams, a special cut is made at the bottom of the rafter leg. It is impossible to install the rafters without this, because at the slightest load the flat edge of the beam will slide off the surface of the beam. As for the notch in the Mauerlat, whether to do it or not depends on the material of its manufacture.

In the case of using hardwood, experts recommend making an incision in the beam - it, together with the slot made in the rafter leg, will create a persistent lock. When the Mauerlat is made of coniferous wood, it is undesirable to make slots, as they will lead to a weakening of the structure. The condition of the roof in different weather conditions depends on the way in which the beams are fastened to the Mauerlat (read also: "").
Connecting a beam to a rafter leg
The roof of the house under the influence of loads on it tends to disperse to the sides and down. To prevent this, various design solutions are used that prevent the elements of the roof frame from shifting.
This is how the cutting of notches in the leg of the rafters was invented, which can be done using such connections as:
- tooth with one stop;
- tooth with a spike and an emphasis;
Fastening the rafters to the Mauerlat, look at the video:
A notch with one tooth is used when the roof has a large slope angle. This means that the rafters are attached to the floor beams at an angle of more than 35 degrees. A tooth with a spike is cut out in the leg, and a nest is created in the beam for the entrance of the spike. In this case, the recess depth cannot be more than 1/3 or 1/4 of the beam thickness, otherwise the element is weakened. The cut is made by stepping back from the edge of the beam 25 - 40 centimeters, then it will be possible to avoid the likelihood of chips. To prevent the connection from shifting to the side, a single tooth must be created together with the tenon.
A cut with a double tooth is performed for flat roofs, when the angle between the connection elements does not exceed 35 degrees, it is performed in one of the following ways:
- two spikes;
- emphasis without a spike;
- emphasis, supplemented with a spike;
- connection like a lock with two spikes and other options.
For both teeth, the incision depth is usually the same. But in some cases, the first tooth supplemented with a spike is cut into 1/3 of the thickness of the beam, and the second - by 1/2.
When creating roofs, there is such a method of arranging rafters when connecting rafter legs and wooden ceiling beams, but it is rarely used. In this case, a stop tooth is cut out in the leg so that one of its planes rests on the flat edge of the beam, and the other plane rests against a cut made with a depth of 1/3 of the beam thickness. For reliability, in addition to cutting, an additional connection is made using clamps, bolts, wire loops or strips of metal.
Joining rafters on a roof ridge
Currently, in the field of construction, when creating a rafter system, 3 methods of connecting rafters on a ridge are used:
- butt joint;
- installation on a ridge run;
- fastening with an overlap on the ridge run.

To understand which option is preferable, you need to understand how they are performed.
Butt joint . The upper part of the rafter leg is cut at an angle that is equal to the angle of inclination of the roof and abuts it against another rafter leg, which is also trimmed only in the opposite direction. Such work is performed according to a pre-made template. In some cases, to ensure greater stress at the stop, trimming is performed during installation, while the cut is made through both bars, as a result of which the two planes fit snugly against each other. Then the rafters are connected to each other with long nails.
When this method is used, a metal or wooden lining is used for additional fastening - it is installed with bolts or nails are driven in at the junction.
Installation on a ridge run . This method is similar in many ways to the previous method. The difference lies in the installation of the ridge beam. This one is reliable, but it is not always possible to use it, since additional installation of support beams is required here and then it is not very convenient to use the attic.
This option allows you to work on the installation of each pair of rafter legs directly on site without preliminary work and the use of templates. The upper edge of the leg in this case rests on the ridge beam, and the lower edge on the Mauerlat.
Overlap fastening on the ridge run . The work is carried out similarly to the previous option, only the upper joint of the rafters is overlapped. They touch at the top not with their ends, but with their sides. Fasteners are bolts or studs.
Roof structure repair
A private house can be operated for more than a dozen years, and often a situation arises when it is necessary to repair the elements of the roof structure. The condition of the roof frame and roofing must be constantly monitored, since their destruction leads to great trouble. If defects are found, immediate action must be taken.
Problem: the end of the rafter leg began to rot based on Mauerlat. In such a situation, a log is placed on the floor of the attic, it must be supported by several beams (the installation of floor beams must be reliable). Braces are placed under the repaired rafter leg - it is necessary that they rest against the log. Between the extreme brace and the place of decay, the distance should exceed 20 centimeters. After the damaged segment is removed by sawing out, a pre-prepared liner is mounted in its place.
Problem: wood rot found in the middle of the rafter leg . In order to strengthen the rafter structure, wooden linings from boards 50-60 millimeters thick are nailed on both sides of the damaged element. Nails for fastening are hammered along their edges into the undamaged part of the rafter.

Problem: Mauerlat damaged . When this is an insignificant area, experts advise installing struts with a rafter leg attached to them with brackets. The struts are mounted with support on the intact part of the Mauerlat. In the event that the area of \u200b\u200bdamage to the Mauerlat is significant, then an overlay of boards is nailed to the rafter leg, they, in turn, are attached to a new Mauerlat, which is installed slightly lower than the damaged one. An additional Mauerlat is mounted in the wall using pins, while performing in accordance with the project.
Problem: A crack has appeared in the rafter leg , resulting in a deflection of the roof. To carry out repairs, it is necessary to prepare 2 boards, one of them will become a squeeze rack, and the second will be a support for it. The support board is fixed perpendicular to the load-bearing beams of the attic floor. The push-up stand is installed on a previously fixed support and brought under the deflection of the leg. Between the end of the squeezing rack and the support board, 2 wedges are driven in one towards the other. They continue to be hammered until the deflection is eliminated. In the place where the crack is located, two boards are placed, the length of which is not less than a meter greater than the size of the damaged area. They are fixed with bolts. Then the wedges are knocked out, the support board and the temporary stand are removed.
Problem: reinforcement of the truss system is required because the new roofing material is heavier than the old one. To do this, increase the main section of the rafters, increasing it with boards. What value needs to be increased (but not more than 5 centimeters) is determined using calculations (read also: ""). The gasket and the rafter are connected using nails.
Steel beams, having an I-beam shape in cross section, are designed for universal use in mechanical engineering and construction. When studying the nature of stresses arising in loaded products with a solid section, the uneven distribution of them was revealed.
Sections of the section of parts with the highest stress values were determined. As a result of this, the idea arose to create a product with such a cross-sectional shape, where the mass of metal is concentrated in the most loaded areas. So there was an I-section.
Due to the ability to withstand heavy bending loads in different planes, shear and torsion, steel I-beams form the basis of the load-bearing structures of prefabricated frame buildings and ceilings.
Intra-workshop hoisting mechanisms (beam cranes and overhead cranes) move along guides made of I-beams.
The manufacture of I-beams is carried out in two ways:
- by the method of rolling one-piece castings. Such I-beams are called hot-rolled;
- electric arc welding of pre-cut sheet blanks, resulting in a welded prefabricated I-beam.
Hot-rolled I-beams are produced at rolling mills of metallurgical enterprises. This technology makes it possible to obtain a one-piece product that does not contain seams and has high strength.
The assembly and welding of the I-beam is carried out on automatic lines. Such a beam is slightly inferior to the solid-rolled one in terms of strength, but can be made on special order, taking into account the requirements of a particular project.
The production of a hot-rolled I-beam is carried out in accordance with GOST 26020-83, manufacturers produce a welded I-beam according to their own specifications (TU).
Production technology
In a typical variant, an I-beam is obtained from three sheet blanks: a wall and two shelves welded to its ends at a right angle. Production is carried out on specialized assembly lines configured to produce beams of a certain size.

Workpieces are moved on special rollers and pre-fixed in the desired position by clamping devices equipped with a hydraulic or pneumatic drive.
On the section of the assembled beam fixed by the clamping device, tacks are made by welding along the waist seam. After that, the beam moves along the rollers, is fixed again, and its next section is tacked by welding.
The waist seam is finally welded after the entire structure is pre-fastened with welded tacks.
Welding of tee joints of the wall with shelves is carried out automatically under a flux layer. The automatic welding process can be performed by different devices. These can be welding manipulators, the torches of which are welded, moving along predetermined trajectories by means of articulated joints with several degrees of freedom.
Simpler devices such as self-propelled welding tractors can also be used, much more suitable for making straight joints.
Another class of devices capable of automatically welding waist seams of I-beams is cantilever or portal installations. In addition to the actual welding equipment, they include equipment for monitoring and controlling the quality of the weld, as well as devices for supplying flux and subsequent cleaning of the weld from its residues.
Such installations carry out welding at an optimal angle of 45 °, which ensures the most favorable location of the weld pool, and, accordingly, high quality of the weld.
Intense heating of the workpieces during the welding process leads to warping of the shelves. For this reason, the process of assembling I-beams includes a leveling procedure carried out on special machines to correct the mushroom shape.
At the final stage of manufacturing, milling of the ends of the product is performed.
Replacement with channels
 In practice, in the construction of building structures, welding of channels together is sometimes used to obtain an I-section. If channels are used instead of the I-beams provided for by the project, such a replacement must be agreed.
The agreement on the use of alternative material is reflected in the changes made to the relevant sections of the working draft. The possibility of replacement is determined by the results of verification calculations for strength performed by designers.
The method of applied welding of channels between themselves is also determined by the calculation. This can be welding with a continuous or intermittent seam, or with the use of connecting plates.
When welding channels with a continuous seam, as a result of temperature deformations of the metal, twisting of the profile may occur. This phenomenon can be avoided by using special clamps, as well as by applying welding seams in small areas, while alternating the sides of the profiles to be connected.
If it is necessary to lengthen such a structure, butt welding of the channels is carried out. The places of butt welds of channels forming an I-beam should not coincide with each other. To strengthen the structure, the weld can be strengthened with an overlay.
Ways to connect I-beams
During the installation of beam structures, welded joints of elements in various combinations are performed. Among them, typical methods for connecting I-beams can be distinguished.
butt
 For butt jointing, the fragments to be welded are butted with pre-treated ends. Processing consists in the fact that angular bevels are performed on the end sections for deeper welding of the joint.
Given the load-bearing functions of I-beams, their connection is not limited to the execution of end seams. To reinforce the docking area, four overlays are usually used - one for each of the shelves, and one for each side of the wall.
The overlays are rectangles made of sheet metal. They are superimposed over the connecting seam, then welded around the perimeter. Linings on the shelves are made for the entire width of the I-beam shelf, linings on the wall - for the entire height of the wall.
Right angle
Such a connection is carried out between the main and secondary load-bearing I-beams of the frame structure, which are on the same level. In this connection, the main beam serves as a support for the secondary.
Welding work is performed in the following sequence. In the upper flange of the main I-beam, a cutout is made in the form of an isosceles triangle with an angle close to a right one.
 The upper flange of the secondary I-beam is cut out for insertion into the triangular cutout of the main I-beam, and its lower flange is cut off by half the width.
The result should be the following. Tight alignment of the cutouts of the upper flanges of the I-beams, joining the end of the wall of the secondary I-beam with the side surface of the wall of the main I-beam and adjoining the cut of the lower flange of the secondary I-beam to the flange of the main I-beam.
The joint flush fastening of two perpendicular I-beams obtained in this way is reinforced by a sheet overlay welded from below.
Welding an I-beam with a channel at a right angle
 This connection is made if the secondary I-beam is a channel. If the walls of the I-beam and the channel are the same in height, you can proceed as follows.
The upper flange of the channel is cut off at an angle of 45 °, a cutout similar in shape is made on the upper flange of the I-beam. The lower flange of the channel is cut off in such a way that, when joined, the cut is aligned with the lower flange of the I-beam, and the wall of the channel abuts against the wall of the I-beam. Just as in the previous case, the connection is reinforced with an overlay from below.
Engineering thought does not stand still. In addition to the described welding technologies, newly created ones can be used; obsolete welding equipment is replaced by updated, modernized or fundamentally new ones. It is possible that traditional welding will someday give way to another technology of permanent joints.
In individual buildings, the most popular wooden truss system - the supporting base of the vast majority of roofs in the private sector is made of wood.
Each roof has individual dimensions and configuration, and it is often necessary to use support beams with non-standard parameters.
Rafters are:
- from a bar;
- from the board.
Factors affecting lumber parameters
Wood for the truss system is chosen well-dried, with a small number of knots and other defects. As a rule, conifers are used, which are easy to process and additionally impregnated with antiseptics and flame retardants.

For each element of the system - a strut, a rack or a rafter - the section and length are calculated.
The parameters of the support beams are affected by the angle of the roof, the geometry of the slope, the distance between the ridge and the Mauerlat, the distance between the rafter legs and the calculated load on the rafters, which includes the weight of the roofing, the weight of the batten, wind and snow loads.
Competent calculation without fail must take into account all these indicators.
Connection methods for increasing the length
 Rafters, the length of which is more than the usual six meters, are made to order in a production way.
However, in this case, along with the length, the thickness of the beam also increases, which is not always justified: after all, the appearance of excess weight in the roof structure is undesirable, and the price of such rafters will be twice as high.
Therefore, most often builders resort to splicing rafters.
The joining of the beams does not provide sufficient bending rigidity, and therefore the junction of the two elements should be located as close as possible to the support - at a distance not exceeding 15 percent of the length of the entire main run.
The lengthening of the rafter legs from the timber is carried out in three main ways.
The ends of the spliced beams must be cut strictly at an angle of 90 degrees to prevent deflection at the junction.
 On both sides, the joining point is fixed with lumber overlays. The linings, in turn, are fixed with nails.
The connection with a steel toothed plate is also widespread.
In the case of the use of metal elements, one should not forget about the anti-corrosion coating - in order to prevent the wood from rotting and not to reduce the reliability of the entire truss system.
Connection by the method of oblique cutting
The ends of the elements that will be joined are sawn in a special way - at an angle of 45 degrees.
The joining bars should be tightly fitted, it is necessary to achieve the most even joining surfaces by sanding.
In the middle of the connection, a through hole is made for a 12 or 14 mm bolt, which fixes the docking.
 This is the easiest way to perform, the connection comes out tough, reliable. One rafter is superimposed on another so that the overlap is at least
100 cm.
How the edges of the rafters are cut off at the same time does not matter.
The connection is fixed in two ways:
- with nails. In order not to split the rafters, the nails are driven in alternately - in a checkerboard pattern;
- using pins. Studs are inserted into pre-prepared holes, fixed with washers and nuts. This option is considered more reliable.
Composite and paired boards, reinforcement of rafters
 If the attic is planned to be made cold, it is more expedient to use a rafter system from boards.
Their advantages are lightness in comparison with bars and a lower price with no less strength.
To get a composite rafter, two identical boards are placed on the edge, and a third is inserted between them.
All wooden elements must be equal in width, the length of the third board varies depending on the required size of the rafter.
The resulting gap is filled with scraps, and the entire structure is fixed with nails, driving them in a checkerboard pattern.
The rafters connected in this way must not be used as diagonal ones.
Paired rafters are more reliable: the boards are connected immediately and end-to-end and overlap.
To increase the width, strengthen the rafters, additional boards are used, achieving the optimal ratio of length and width in accordance with the calculated load.
 The roof overhang protects the walls from rain and snow and drains water away from the roof. Its standard size is 40 cm.
If the rafter leg does not protrude beyond the wall of the building to the required length, it is increased by nailing a board - the so-called "filly".
"Fire" can be lighter and narrower than the main beam.
Fasteners and prefabricated rafters
Additionally, each connection is reinforced with metal plates, brackets or corners.
Holes for fasteners are made following this rule: the diameter of the drill should be 1 mm smaller than the diameter of the bolt.
Metal needle plates make it possible to significantly facilitate the construction of the roof, they are simply mounted and securely fasten the elements of the truss system.
 Recently, prefabricated rafters prepared for installation have been produced in a factory way. The transportation of such items is very convenient.
Already at the construction site, with the help of needle plates, rafter legs of the required parameters are obtained from several parts.
Prefabricated elements can be made not only of wood, but also of metal.
All work on the construction of the rafter system, the formation of nodes and the extension of rafters must be carried out carefully, since the repair and replacement of rafters is a complex process that requires serious labor and material investments.
If you strictly adhere to the technology, all the rules and recommendations, then the roof will turn out to be reliable and durable.
Rafter legs can be fixed to the Mauerlat or ceiling beams.
A specific decision is made taking into account the individual architectural features of the structure. What are the differences between both methods of attaching rafters?
| Rafter attachment type | Performance characteristics |
|---|---|
| This method is most often used on buildings made of masonry materials and with concrete attic floors. Mauerlats are installed on the load-bearing facade walls of houses, if necessary, a special reinforcing belt is made to strengthen the supporting platform of the truss system. Advantages: the ability to increase the height of the attic by lifting the reinforced belt along the perimeter of the building. Disadvantages - a large bursting load on the facade walls. |
| It is recommended to use in cases where load-bearing walls do not differ in high stability indicators. Rafters are attached only to beams in light frame houses made of OSB boards. Fastening to floor beams allows not only to remove bursting loads from the facade walls, but also to distribute them more evenly around the perimeter of the building. Another advantage is that due to several additional stops of the truss system, the structure can be lightened and made more stable. This reduces the estimated cost of building a house. Floor beams can be taken out of the perimeter of the house by a significant amount, and the emphasis of the rafter legs on these structures increases the area of \u200b\u200bthe attic space. |


There is one very important point to consider when designing this type of truss system. The distance between the floor beams and the rafter legs should be the same, and this parameter depends on several factors.

The decision on the type of fixation of the rafter legs should be made by professionals at the design stage of the house. It should be remembered that the truss system is considered not only one of the most important architectural elements, but also one of the most complex. Non-professionals should not undertake the installation of the roof; only experienced builders can perform such work.
We will consider all possible methods of fixing elements, some of them are used extremely rarely and only during the construction of authentic houses using old technologies. Such work is performed by carpenters of the highest class, who know how to work with an ax, chisel, chisel and other traditional carpentry tools.
Special metal mounting plates
Builders use two types of plates. The connection is strong, done quickly and without manual labor. In developed countries, roof trusses of houses are assembled on production lines, while all processes are almost completely automated. The assembly technology makes it possible to increase the productivity of equipment and reduce the cost of production. The elements of houses on the construction site are quickly assembled, the amount of manual labor is reduced to a minimum. A turnkey wooden house is put up in just two to three weeks, depending on the number of storeys and size.

What plates are used to fasten rafters to beams?
jagged
In our country, unfortunately, they are little known, in developed countries they have been used for a long time. Gear fastening - metal plates with different linear dimensions. Throughout the area there are teeth that are driven into wooden structures. The length and distance between the teeth is selected taking into account the dimensions of the rafter legs and floor beams. Such a connection makes it possible to automate the production process of truss truss systems. Toothed plates are installed on both sides of the unit to be connected.

Important. It is possible to use such connections on both sides only on lumber with the same thickness. Maximum deviation ±1 mm. It is this condition that does not allow the widespread use of gear joints in our country, most domestic lumber does not withstand the required tolerance fields.
The toothed plates can also be hammered in by hand, but care must be taken to ensure that they are correctly positioned.
perforated
Well-known fasteners, universal use. They can fix all elements of the truss system, have different sizes and thicknesses. The plates are superimposed on the knot, tightening is performed with self-tapping screws, bolts or ordinary smooth nails. Can be mounted on one or both sides of the connection. Advantages - there are no strict requirements for the quality of lumber, a large number of holes allows you to choose the most successful places for screwing screws. Disadvantages - require quite a lot of manual labor. Working with them is harder than with gear ones. In addition, the installation time of the truss system increases.


Practical advice. The strength of fastening with plates largely depends on the exact observance of the recommended technology, even minor violations can significantly reduce the stability of the truss system. In order to exclude the possibility of unpleasant situations during the operation of buildings, practitioners recommend tightening the rafter legs and floor beams with crossbars, using vertical racks. These elements compensate for errors in the installation of the truss system, increase the time and increase the safety of home operation.

Bolt
The roofs of small outbuildings and outbuildings do not have significant loads; during their manufacture, simplified methods for connecting rafters and floor beams are used. The most common option is bolts. Holes are made in the floor beams and rafters, the elements are located side by side, bolts are inserted into the holes, the assembly is firmly tightened.

Mortise connection
More complex connection, requires practical building experience. The tie-in completely eliminates the possibility of movement of the rafters at the junctions with the ceiling beams, the assembly is more durable and static. A recess is cut out on the beam, and a protrusion on the rafter, the parts must fit tightly into each other.
This method of fixation is done only on the house, which complicates the construction process. In addition, each connection is prepared individually, which further increases the construction time and increases its cost. Another disadvantage of the tie-in is that each connection reduces the thickness of the boards, rafters and beams, this causes a decrease in their bearing performance. As a result, designers must take into account the increased dimensions of lumber during calculations, taking into account the reduction in their width as a result of sawing. And this negatively affects the cost of the building.

notch connection
An ancient method, now rarely used. The work is done by carpenters who know how to handle hand tools and an axe. Cutting is done only on thick rafters and beams. With an ax, a chisel and a chisel, a spike / groove connection is made at the required angle. The work is physically difficult; home-made metal staples can be used as an additional connection. The length of the staples and the diameter of the bar are selected according to the specific installation location and the expected maximum load.

Important. Inset and cutting is most often used for a hanging truss system. Due to additional fixation, the structure can withstand significant expansion forces.
Practical tips for attaching rafters to floor beams
For example, let's take the most common method of fixing elements, it is suitable for all types of roofs, meets modern requirements for the strength and stability of the assembly. Another advantage is that some work can be done on the ground, and on the building you can only assemble ready-made structures. This method of performing construction work significantly simplifies and speeds them up, the estimated cost of the roof is reduced.
Rafters and floor beams are made of boards 150×50 mm. The rafter system is the most complex - hip multi-pitched. Connecting elements - metal perforated plates. To speed up and simplify the work, it is recommended to prepare a simple, but very functional template from pieces of boards. How to make a fixture?
- Prepare four pieces of boards with a thickness of 25–30 mm. Two pieces about 20 cm long and two 40 cm long.
- Screw two short boards with corners to two long ones, while leaving a gap between them equal to the thickness of the floor board. During the connection, do not join them exactly at the ends, but lift them 2-3 cm from the edge of the long ones. This protrusion serves as an emphasis on the Mauerlat while using the template.
- At a distance of about 30 cm from the bottom, fasten the long boards together with perforated metal plates; to increase strength, pull them together with boards or pieces of plywood on the opposite side. Ensure that the prepared template is rigid and does not wobble during use.
Such a simple device greatly facilitates the execution of sawing rafters for their connection with floor beams.

How to quickly and efficiently make cuts for joining
During measurements, we will use a homemade device.
Step 1. Place the device with short boards on the Mauerlat, the ceiling beam should be located between them. Small protrusions in the lower part abut against the Mauerlat from the outside. Long boards are strictly vertical and are located on the same line with the plane of the front wall of the house.

Step 2 Screw the fixtures to the Mauerlat a little, this will facilitate further work. For screwing, it is better to use long and thin screws, you do not need to tighten them to the end.

Step 3 Place the rafter cut along the length with an edge on the upper plane of the floor beam. The corner of the board should rest on the metal plates of the fixture.

The upper part of the rafter should lie in its place, in our case on the diagonal (hip) rafter leg.

After sawing, the angle of the rafter leg should lie exactly along the edge of the Mauerlat. It is desirable that the floor beams also occupy the same position, but some builders cannot accurately measure their dimensions. Beams are obtained in various lengths and are rarely located in the desired position.

Step 4 Measure the horizontal cutting line of the abutment. You can do this in two ways.
- Using the building level. You can use a small tool. Draw a horizontal line from the corner of the rafter leg. Everything is simple, fast and accurate.
- With the help of a construction square. Measure the distance from the floor beam to the top corner of the rafter leg. Place the square on the plane of the beam and drive it until the gap between the beam and the rafter is equal to the same value, in our case 13 cm. Put a mark in the right place. Connect this mark to the corner of the rafter leg. You should get a line parallel to the plane of the floor beam. Remove the board and cut off the excess piece.


The connection will turn out to be even, there will be no protrusions of the rafter legs. Next, you need to take measurements of cutting off the upper part of the rafter leg. To do this, the lower section is put in place and held by an assistant. At the junction of the upper part of the ordinary and hip rafters, use a ruler to draw cutting lines. In turn, firmly press the ruler against the side edges of the hip rafter and mark vertical lines on both sides.
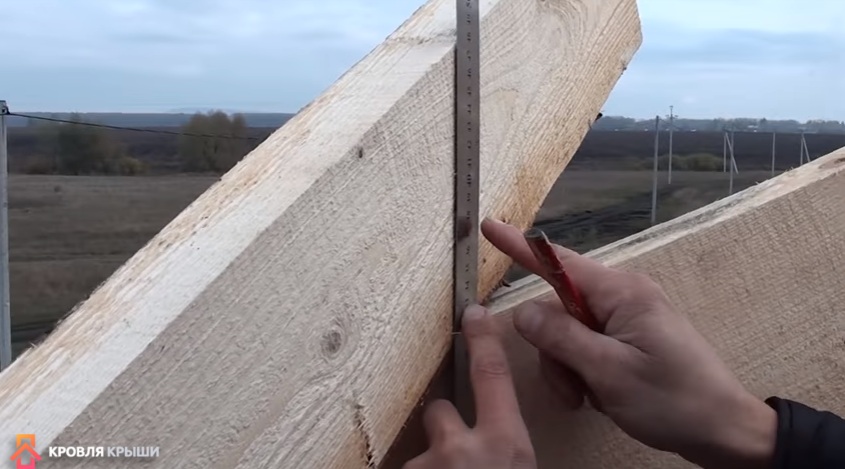 Apply a ruler and draw a line on the board


Important. Never mark the top junction without sawing the bottom one. Some inexperienced builders simultaneously mark the lower and upper parts of the rafters, and then cut them off. With this algorithm of work, there will always be gaps; to eliminate them, the rafter will have to be shifted to the side. And this changes the step between them. The fact is that after cutting the lower joint, the angle of contact of the upper node changes.
How to prepare rafters for fastening to the ground
Real professional builders prepare almost all elements of the truss system on the ground according to drawings or templates, number them and lift them onto the building in this form. This method of work not only speeds up the construction process at times, but also significantly increases labor safety. Carpenters no longer need to go over the temporary deck many times to take measurements and cut boards, the joining of the elements is done the first time. But in order to prepare the elements on the ground, you need to have a lot of experience, to perform the work carefully and responsibly. According to this algorithm, houses are built abroad, the high labor productivity of workers explains their high, in comparison with domestic, earnings. Consider the process of manufacturing on the ground the simplest roof trusses for connection with floor beams.
Step 1. If there are no exact working drawings of roof trusses, then a template should be made. It is made from ordinary boards with a thickness of about 25 mm. You need to prepare the template at home, check the correctness in several places. The fact is that masons sometimes make mistakes, due to which the facade walls are not parallel, the spread in the corners can reach several centimeters. This marriage does not affect the fastening of the rafters to the floor beams individually, but in the case of finished trusses, problems may arise.

Step 2 Lay the template on a flat area near the house. Bring the first rafter leg and lay it on one side of the truss template, level the position.

Step 3 In the same way, place the second leg on the free side of the template. With a pencil, draw lines for joining the rafter legs at the top of the truss. Pay attention that the elements do not move during the markup.


Step 4 Cut off the excess pieces of boards with a gas or electric saw.

Important. In the upper part of the trusses, the rafter legs will be connected into half a tree, for this you need to make special cuts. You can work with a petrol saw.
How to cut the connection correctly?

Practical advice. Such precise sawing can only be done with a fully functional gasoline saw with a perfectly sharpened chain. If the sharpening angle is incorrect, then the saw blade is led to the side, it is impossible to hold the tool evenly with your hands. This saw can only be used when harvesting firewood.
Step 5 Do the same operations with the second rafter. Lay the cut legs on the template, check for proper cutting, adjust the position of the boards along the entire length of the template. Everything is normal - connect the legs of the farm in the upper node. You can use ordinary nails, it's fast, cheap and reliable.


Step 6 To increase the strength and stability of the truss at the top, fix the legs with a horizontal tie. For these purposes, it is allowed to use thin boards, the element works to break, a thickness of 20-25 mm is enough to resist loads. Tensile lumber has high strength indicators, problems arise when they are compressed. The boards bend, the structure completely loses its stability and its original geometric shapes.


Step 7 Cut off the lower ends of the rafter legs with a saw.

The angle on the template should be such that the connection of the elements is as tight as possible.
It is important to know that with the correct connection of the nodes of the truss system, the strength of the structure must also be maintained due to the forces of friction between the elements. The boards must be pressed against each other with such force that friction does not allow them to move. What conditions must be met for this?
- First. The abutment plane should be as flat as possible, the area as large as possible.
- Second. The pressing force of the elements should be such that the friction forces reach large values.
In no case should the elements of the truss system in the attachment points be held only on hardware. You must always remember that they are designed to attract the boards, and not to hold them. All bolts are rated for tear, not shear.

Bend nails with a hammer (truss truss turned upside down)

Turned the truss and template over, made markings for trimming the bottom edges
As practice shows, the manufacture of roof trusses and the preparation of connection points with floor beams on the ground speeds up the process of building a roof several times. The assembly itself can be fixed with metal plates on the sides, nails or bolts at the end, brackets, etc. As already mentioned, to increase the stability of this type of truss system, it is recommended to install vertical stops between the rafters and beams.
Video - How to cut rafters at the right angle and the right size
When the main construction of houses - the construction of capital walls - is almost completed, you need to think about organizing floors, as well as interior and exterior decoration of a private house. Often, by this time, the main material resources of the site owners have been exhausted or are coming to an end. And sometimes it also happens that there is a lot of building material that would be good to use in construction. Then splicing floor beams can be a real salvation.
Beams are most often rectangular wooden beams.
This means that in order to obtain one full-fledged beam, it is necessary to connect several pieces of the same section. Of course, this connection must be strong so that the resulting element can be used to implement the floors of private houses. Of course, building a house is a difficult long-term job. Some owners who cannot afford the construction of solid walls use frame wall construction options. What does it mean? Frame walls are built from thick load-bearing beams, both wooden and metal. They are fastened along the edges, as well as in places where the ceilings will be mounted. Frame walls definitely need to be filled. For this, as a rule, bulk materials or mineral wool are used.
What are overlays really?
Overlappings are of several types; For example, according to their location, they are divided into:

Before installing a wooden beam, it must be treated with an antiseptic solution.
- basement - they are usually located between the first floor and the basement of a private house;
- interfloor - these types of floors are located between floors;
- attic - they separate the residential floors from the attic.
In addition, floors can be divided according to the type of building materials from which they are made: beam or slab. Any floors, regardless of what they are and what materials they are made of, must provide thermal insulation, as well as sound and waterproofing. They can and should have increased strength, rigidity and fire safety. In addition, if the floors are wooden, they must be protected from rotting or mold. It is necessary to decide on the type of floors that will be made in a frame house long before construction, since the structures of beam or slab floors are completely different from each other.
Back to index
Basic requirements for floors
1. Of course, strength comes first.
Overlappings not only have to withstand their own weight, they also need to carry certain loads. And if frame walls are the supports for the ceilings, this is of great importance.
So, according to all the rules, any organized in residential buildings are required to withstand a total, but uniform load of about 200 kg / m² over the entire area; in practice, floors are usually built that are ready for higher loads. But less durable. Whether to reinforce the ceilings or not - it depends on what exactly will be in the room - a piano, a wardrobe, exercise equipment, etc.

When installing the ceiling, a sufficient degree of its sound insulation should be provided, the value of which is established by the norms or special recommendations for the design of buildings for one purpose or another.
2.Rigidity. In addition to the fact that the floor must withstand loads, it should not sag under them. If the floors sag, sooner or later they may undergo deformation, which will lead to destruction.
3. Heat and sound insulation. Mounted ceilings should also provide protection for the premises from the penetration of both airborne and impact noise from the rooms below. To do this, when organizing the overlap, a special mineral or any other insulation is used, which ensures the repayment of noise of any kind, and also retains heat in the room. The standard size of the insulation layer is 150 mm. When constructing such structures, various tools are also used. This:
- chainsaw;
- square;
- axe;
- hammer;
- electric drill;
- construction knife;
- chisel.
Back to index
Beam ceilings. Peculiarities

Wooden flooring is made of wooden beams of coniferous and hardwood.
Used beams for floors can be made of various materials: wood, metal, reinforced concrete. The design when using any of the above building materials is the same. in most cases, they are made with the help of load-bearing beams, the floor itself, the obligatory inter-beam filling and the necessary finishing layer of the ceiling. Sound and heat insulation can be provided with flooring, the so-called reel. The overlap resembles a kind of "sandwich", where all the layers must be present in the required size in order to get the desired result. Basically, beam ceilings, both interfloor, and basement and attic, are very similar to each other. They separate the living quarters of the house from the non-residential ones. Even their installation is carried out in the same way, with the exception of some nuances.
They should be mounted somewhat differently, since they have rooms on both sides, and not utility space. Wooden ones should be laid, as a rule, parallel to each other along the short side of the span. If the beams are not close to each other, the distance between them should be the same. When installing beam interfloor ceilings, first of all, you need to fix the beams. Depending on which walls are implemented during the construction of houses - frame or capital - special gaps are left to fix the beams.

Table of the ratio of the width of the span and the width of the laying of beams.
- If the walls of the houses are capital and made of wood, then it is not necessary to prepare “nests” for the beams in advance - it will be enough to cut out suitable gaps for laying the floors during the installation of the beam ceilings. However, frame walls need specially prepared "nests".
- If wooden beams are used for floors, then it is necessary to pre-treat the ends of the beams to prevent them from rotting or premature destruction.
- For the width of the span, you need to take the appropriate section of the beams: the greater the width, the thicker the beam (see Table 21). If the span is large enough, and there is no beam of a suitable size, then the existing beams can be spliced to achieve the desired thickness. This, of course, can lead to an overall lack of structural strength.
- To ensure rigidity, the resulting composite beam must be securely fixed at the joints. It is advisable to use such building elements separately - that is, so that the joints in these beams are not opposite each other. Thus, the pressure on the places where the beams are spliced is minimized and additional strength is achieved due to this.

So that the beams do not bend under the weight of the floor, they must be laid at a certain distance.
In addition, when organizing floors, you can use not only wooden beams. For this, logs of the desired diameter are also suitable. Of course, they need to be trimmed from all sides. It will undoubtedly be cheaper, too, because lumber is worth much more than roundwood on the construction market. However, you can not use "fresh" logs. In order to use them at, you need to withstand the round wood for at least six months - a year in a dry place, otherwise the overlap will "lead" and this will cause the deformation of the whole house.
After laying a wooden beam or hewn logs, it is necessary to make a rolling floor. To do this, special cranial bars with a section of 5x5 cm are attached to the beams with the help of nails, and the selected roll boards are already placed on them; often craftsmen make it so that the lower part of the beam used for overlapping is equal to the reel. This contributes to further trouble-free finishing of the ceiling.
When laying the reel, it is not necessary to use full-fledged wooden boards - the “croaker” will do just fine. After rolling comes the heat insulator. It can be completely different - from mineral wool to sawdust. Just like with beams, the reel must dry out. In addition, before laying the insulation, you need to roll up with paper. If it is decided to use sawdust or other bulk materials, then their amount should not exceed three quarters of the height of the beam.
After laying the insulation on top of the beams, roofing felt or roofing material is laid, and only then - logs. However, in most cases, the logs are not laid if the floor beams are next to each other. If the beams are located far from each other, then the logs are necessary to create a continuous floor. When installing basement and attic floors, elements such as insulation and rolling may not be used. For backfilling, it would be logical to fill up with gravel and cover with roofing material.