Artists at all times loved to depict flowers. We will try to write a beautiful potted geranium acrylic paints .
For a novice artist, this still life may seem very difficult, in fact, flowers and leaves are painted here with light strokes.
Earthy colors - raw and burnt sienna - best suited for painting pottery, including a clay pot. Geranium leaves can be rendered in various shades of green using either pure green paint or mixed in various proportions with yellow paint or whitewash. The green in this painting should be very intense to enhance the contrast of the greens with the red geranium petals. Red and green, as you know, are complementary colors, their combination will help create the focal point of our picture.
Benefits of acrylic paints
Acrylic paints are ideal for floral still lifes. They, as we have already said, dry quickly, so they are easy to apply to the canvas in thick layers. In today's lesson, you will learn how to use various strokes to emphasize the texture of a particular surface.
For a drawing lesson you will need
Stretched over a 40 × 30 cm tablet
Not a very rough canvas
Pencil 2B
Brushes: flat # 12, flat with rounded tip # 4, round # 8
11 acrylic paints: cadmium red, cadmium yellow, dark green, light olive, cobalt blue, ultramarine, burnt sienna, raw sienna, burnt umber, yellow ocher, titanium white
1. Preparing the canvas for work and making a sketch
Lesson in drawing flowers with acrylic paints, step 1
Draw some raw sienna on a flat brush, dip the tip of the brush in water to dilute the paint, and cover the stretched canvas with a layer of pale brown primer. When the primer is dry, draw a sketch of the future still life with a pencil. Flowers should be outlined in a simplified manner, in the form of a stalk with a circle at the end.
Color selection
Before making a stroke on the canvas, you should first apply to the palette all the paints that you intend to use during your work. Thanks to this, you will be able to imagine how the adjacent colors will be combined in the picture. Try to place the ink squeezed out in a specific order: for example, the horizontal row is warm colors, the vertical row is cold. But remember, acrylic paints dry quickly. Therefore, use a special palette, the surface of which is covered with a layer of blotting paper. When you're done, you simply remove the blotter paper from the palette and discard it, and next time cover the palette with new blotter paper.
2. Lighten the background

Lesson in drawing flowers with acrylic paints, step 2
Add some white to the raw sienna and paint the brightest part of the wall to the right of the geranium pot with this light paint. Rinse the brush and apply a spot of yellow ocher to the part of the painting where the flowers will be located. Apply paint with smooth strokes.
3. Writing a shaded section of the wall

Lesson in drawing flowers with acrylic paints, step 3
Without rinsing your brush, dip it in burnt umber. Paint with this mixture a shadow in the upper left corner of the picture. Now dip the tip of the brush into ultramarine. Write in this dark tone on the left side of the pot.
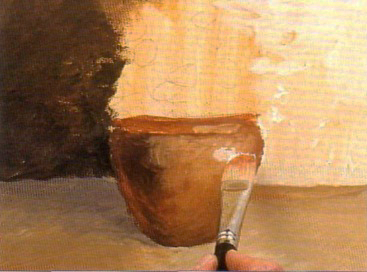
4. Making a lens flare

Lesson in drawing flowers with acrylic paints, step 4
Rinse the brush. Mix raw sienna with titanium white. Use this mixture to mark a light spot - a highlight - on the earthen pot.
5. Writing the background

Lesson in drawing flowers with acrylic paints, step 5
Mix more raw sienna, titanium white on a palette and add a drop of cobalt blue and cadmium red. In this brownish-gray tone, paint the bottom of the background (table surface) to the left of the pot, gradually mixing in white as you move to the bottom of the canvas. Draw a line with the same paint that separates the table from the wall. Mix ultramarine with red cadmium and paint the shadow from the pot.
6. Moving on to the clay pot

Lesson in drawing flowers with acrylic paints, step 6
Rinse the brush. Mix burnt sienna with a little yellow ocher and a drop of titanium white. Write in the center and top rim of the clay pot.
7. We continue to write the pot
Lesson in drawing flowers with acrylic paints, step 7
Dip your brush in burnt sienna and burnt umber. With this mixture, paint on the left side of the pot and subtle shadows along the rim and bottom edge of the pot. Make a smooth transition of colors. Dip the brush in white and lighten the right side of the pot.
In the next stage of the work, we will write the leaves. We'll use an intense green as the backdrop for the rest of the shades. Try to keep the leaves in the shade not too dark.
Self-expression
In the depicted still life, the same pot of geraniums is painted much softer, although the color of the picture is saturated. The artist applied acrylics to the stretched canvas using a regular sponge, which can be purchased at any hardware store. If you want to repeat after him. pick up a sponge and tear it to pieces - with it you will apply paints to the canvas. You can use a sharp sponge to paint the flower stems.
If you mix acrylic paints on a special palette that is covered with a layer of blotting paper, remember that sooner or later they will dry out anyway.
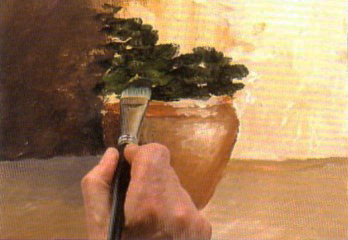
8. We write the leaves

Lesson in drawing flowers with acrylic paints, step 8
Mix a dark green paint with a drop of ultramarine and a drop of burnt umber. Brush this mixture over and around the pot. Without rinsing the brush, dip the tip in yellow paint for a lighter green tone. Carefully cover the dark green paint stains with broad strokes of a light green tone. Let the paints dry.
9. Underline the details

Lesson in drawing flowers with acrylic paints, step 9
Now take the # 4 brush. Dip it in dark green paint and then in titanium white and cadmium yellow. Apply specks of the resulting mixture to the center of the individual leaves. Write some new leaves. Dip the brush again in titanium white and paint on the newly added leaves.
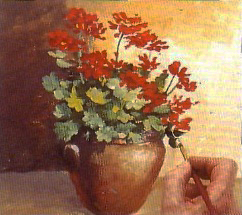
10. Writing flower stems

Lesson in drawing flowers with acrylic paints, step 10
Rinse the brush No. 4. Draw dark green paint directly from the tube and draw thin lines with the tip of the brush - geranium stalks.
11. Finish writing the pot

Lesson in drawing flowers with acrylic paints, step 11
Add a couple more green leaves around the pot. Rinse the brush. Now with a mixture of red cadmium, burnt sienna and ultramarine, deepen the shadow to the left of it. Rinse the brush again. Mix burnt sienna with titanium white and write a curved flower pot handle.
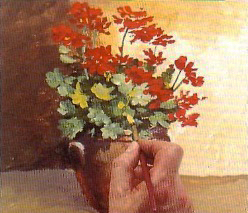
12. We write flowers

Lesson in drawing flowers with acrylic paints, step 12
Rinse brush # 4, Mix red cadmium with burnt umber, Transfer each petal with a separate light stroke. Rinse the brush. Mix red cadmium with a drop of yellow cadmium. Paint brightly lit petals with this mixture. Just don't get carried away. It will be enough to make a few strokes.
How to keep your brushes in good condition
When you rinse your brush in a jar of water, you will want to wipe off the hairs on the edge. But from this your brush will soon become unusable - the hairs will come out.To avoid this, try to take a bigger jar and change the water in it as often as possible. When it's time to rinse your brush, dip it in water, chat well, and then just shake off any excess water.
13. Highlighting the details

Lesson in drawing flowers with acrylic paints, step 13
Take a # 8 round brush. Apply small strokes of red cadmium to the petals. Rinse the brush, mix titanium white with a drop of burnt sienna. Accentuate the curved handle of the pot with this mixture.
If you wish, you can continue to work on the painting. Try to apply strokes of different thickness that will help you highlight the texture of the flower pot, leaves, petals.
14. Marking the highlights on the leaves
Lesson in drawing flowers with acrylic paints, step 14
Rinse the brush. Mix cobalt blue, dark green paint and titanium white, paint highlights on the leaves.
15. Making the final touches
Lesson in drawing flowers with acrylic paints, step 15
Rinse the brush, mix titanium white, cadmium yellow and light olive paint. Mark small specks of light on the greenery, which will give your painting an impressionistic touch. Write a dark green leaf on the right side of the pot.
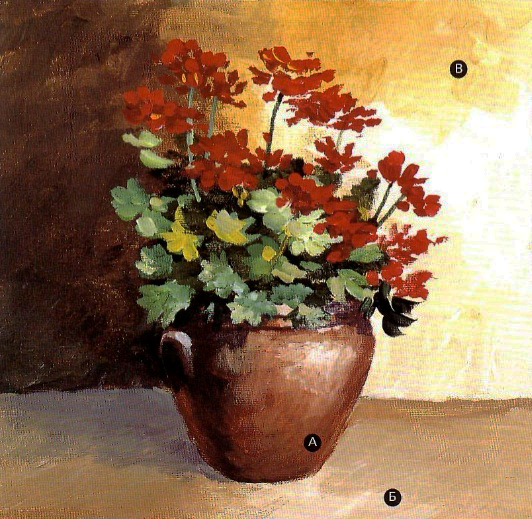
A step-by-step lesson with step-by-step acrylic paints - the result:

A. Optimal size
The flowerpot is shown large enough to impress the viewer, but at the same time it does not fill the entire space of the painting.
B. Spotted surface
V. Neutral background
The neutral background emphasizes the bright colors with which the flowers and greenery are painted.
Artists at all times loved to depict flowers. We will try to write this beautiful potted geranium acrylic paints.
For a novice artist, this still life may seem very difficult, in fact, flowers and leaves are painted here with light strokes.
Earthy colors- raw and burnt sienna - best suited for writing ceramics, including a clay pot. Geranium leaves can be rendered in various shades of green using either pure green paint or mixed in various proportions with yellow paint or whitewash. The green in this painting should be very intense to enhance the contrast of the greens with the red geranium petals. Red and green, as you already know, are complementary colors, their combination will help create the focal point of our picture.
Benefits of acrylic paints
Acrylic paints are ideal for floral still lifes. They, as we have already said, dry quickly, so they are easy to apply to the canvas in thick layers. In today's lesson, you will learn how to use various strokes to emphasize the texture of a particular surface.
For a drawing lesson you will need
Stretched over a tablet
40 × 30 cm not very rough canvas
2B
Brushes: flat # 12, flat with rounded tip # 4, round # 8
11 acrylic paints: cadmium red, cadmium yellow, dark green, light olive, cobalt blue, ultramarine, burnt sienna, raw sienna, burnt umber, yellow ocher, titanium white
1 Preparing the canvas for work and making a sketch
Draw some raw sienna on a flat brush, dip the tip of the brush in water to dilute the paint, and cover the stretched canvas with a layer of pale brown primer. When the primer is dry, draw a sketch of the future still life with a pencil. Flowers should be outlined in a simplified manner, in the form of a stalk with a circle at the end.
Color selection
Before making a stroke on the canvas, you should first apply to the palette all the paints that you intend to use during your work. Thanks to this, you will be able to imagine how the adjacent colors will be combined in the picture. Try to place the ink squeezed out in a specific order: for example, the horizontal row is warm colors, the vertical row is cold. But remember, acrylic paints dry quickly. Therefore, use a special palette, the surface of which is covered with a layer of blotting paper. When you're done, you simply remove the blotter paper from the palette and discard it, and next time cover the palette with new blotter paper.
2 Lighten the background

Add some white to the raw sienna and paint the brightest part of the wall to the right of the geranium pot with this light paint. Rinse the brush and apply a spot of yellow ocher to the part of the painting where the flowers will be located. Apply paint in smooth strokes.
3 Writing a shaded section of the wall

Without rinsing your brush, dip it in burnt umber. Paint with this mixture a shadow in the upper left corner of the picture. Now dip the tip of the brush into ultramarine. Write in this dark tone on the left side of the pot.
4 Making a lens flare

Rinse the brush. Mix raw sienna with titanium white. Use this mixture to mark a light spot - a highlight - on the earthen pot.
5 Writing the background

Mix more raw sienna, titanium white on a palette and add a drop of cobalt blue and cadmium red. In this brownish-gray tone, paint the bottom of the background (table surface) to the left of the pot, gradually mixing in white as you move to the bottom of the canvas. Draw a line with the same paint that separates the table from the wall. Mix ultramarine with red cadmium and paint the shadow from the pot.
6 Moving on to the clay pot

Rinse the brush. Mix burnt sienna with a little yellow ocher and a drop of titanium white. Write in the center and top rim of the clay pot.
7 We continue to write the pot

Dip your brush in burnt sienna and burnt umber. With this mixture, paint on the left side of the pot and subtle shadows along the rim and bottom edge of the pot. Make a smooth transition of colors. Dip the brush in white and lighten the right side of the pot.
In the next stage of work, we will paint the leaves. We'll use an intense green as the backdrop for the rest of the shades. Try to keep the leaves in the shade not too dark.
Self-expression
In the depicted still life, the same pot of geraniums is painted much softer, although the color of the picture is saturated. The artist applied acrylics to the stretched canvas using a regular sponge, which can be purchased at any hardware store. If you want to repeat after him. pick up a sponge and tear it to pieces - with it you will apply paints to the canvas. You can use a sharp sponge to paint the flower stems.
If you mix acrylic paints on a special palette that is covered with a layer of blotting paper, remember that sooner or later they will dry out anyway.
8 We write the leaves
Mix a dark green paint with a drop of ultramarine and a drop of burnt umber. Brush this mixture over and around the pot. Without rinsing the brush, dip the tip in yellow paint for a lighter green tone. Gently cover the dark green paint spots with broad strokes of a light green tone. Let the paints dry.
9 Underline the details

Now take the # 4 brush. Dip it in dark green paint and then in titanium white and cadmium yellow. Apply specks of the resulting mixture to the center of the individual leaves. Write some new leaves. Dip the brush again in titanium white and paint on the newly added leaves.
10 Writing flower stems

Rinse the brush No. 4. Draw dark green paint directly from the tube and draw thin lines with the tip of the brush - geranium stalks.
11 Finish writing the pot

Add a couple more green leaves around the pot. Rinse the brush. Now with a mixture of red cadmium, burnt sienna and ultramarine, deepen the shadow to the left of it. Rinse the brush again. Mix burnt sienna with titanium white and write a curved flower pot handle.
12 We write flowers
![]()
Rinse brush # 4, Mix red cadmium with burnt umber, Transfer each petal with a separate light stroke. Rinse the brush. Mix red cadmium with a drop of yellow cadmium. Paint brightly lit petals with this mixture. Just don't get carried away. It will be enough to make a few strokes.
How to keep your brushes in good condition
When you rinse your brush in a jar of water, you will want to wipe off the hairs on the edge. But from this your brush will soon become unusable - the hairs will come out.To avoid this, try to take a bigger jar and change the water in it as often as possible. When it's time to rinse your brush, dip it in water, chat well, and then just shake off any excess water.
13 Highlighting the details

Take a # 8 round brush. Apply small strokes of red cadmium to the petals. Rinse the brush, mix titanium white with a drop of burnt sienna. Accentuate the curved handle of the pot with this mixture.
If you wish, you can continue to work on the painting. Try to apply strokes of different thickness that will help you highlight the texture of the flower pot, leaves, petals.
14 Marking the highlights on the leaves

Rinse the brush. Mix cobalt blue, dark green paint and titanium white, paint highlights on the leaves.
15 Making the final touches

Rinse the brush, mix titanium white, cadmium yellow and light olive paint. Mark small specks of light on the greenery, which will give your painting an impressionistic touch. Write a dark green leaf on the right side of the pot.
Step by step lesson step by step with acrylic paints - result
A Optimal size
The flowerpot is shown large enough to impress the viewer, but at the same time it does not fill the entire space of the painting.
B Spotted surface
In a neutral background
The neutral background emphasizes the bright colors with which the flowers and greenery are painted.
Hello dear friends!
Now is a great time for everyone who loves to paint flowers - after all, everything is in bloom!
Last week I brought a beautiful bouquet from my mother's flower garden, which you can see at the beginning of the video tutorial.
Irises become simple when you carefully study them up close and understand how these amazing flowers are arranged.
So that everyone would be good at painting a picture according to this painting lesson - it is worth highlighting one branch, and on it one main flower . Big bouquet irises with their different types will be difficult to write.
I love yellow very much - and of course for this reason I chose a branch of yellow irises. Still, I think it will be easier for many to write classic purple or two-tone irises.
If you still have irises in your garden, cut one branch and get to work on a new painting with flowers.
If you find it difficult to immediately draw irises on canvas, first practice a little, on paper, make a few sketches.
List of materials
For work we need acrylic paints (I want to draw your attention to the fact that this painting lesson is designed specifically for acrylic).
Let's prepare a set of paints:
- whitewash;
- yellow neapolitan;
- yellow cadmium;
- red cochineal;
- brown van dik;
- green bilious;
- blue Prussian;
decorative paints:
- bamboo sprout;
- gold;
instruments:
- spray;
- masking tape;
- a piece of cellophane;
- simple pencil;
- brushes.
The process of writing a decorative painting
Sketch
Apply to the canvas with a pencil sketch. Arrange the flowers so that they look harmonious. Highlight one big flower by placing it in the center. In the background, add two smaller and more expressionless flowers.
Decorative painting "Irises"
Background
Filling in the background canvas with liquid paint "bamboo sprout". If you were unable to buy this paint, you can prepare a similar color yourself. Mix decorative paint "Chameleon" or "Pearl" with whitewash and a little greenery.
To make the background look more interesting, cover it with a liquid mixture of gold + brown + white. We dip a piece of crumpled cellophane into the paint and spread such strokes across the background of the canvas (this stage of the work, if desired, can be ignored).
Irises
Mix different shades of yellow in order to write irises:
- cadmium yellow + white;
- cadmium yellow + white + brown;
- cadmium yellow + white + red;
- cadmium yellow + whitewash + greens;
- we make approximately the same combinations with Neapolitan yellow.
The purpose of this procedure is to obtain a large number of different shades yellow (shady, bright, rich and pale ...) for writing yellow flowers.
We write flowers. First paint them with a large brush (# 10 flat) and mark the shadow and light on the petals. Further, we will refine it with a thinner brush.
Leaves
Green leaves and the stems are marked with greens mixed with yellow, or more shaded areas, greens mixed with blue.
Decorative frame
Create a translucent decorative frame ... In order to outline it exactly, we need masking tape (we will do this when the background paint has already dried).
We retreat from the edge of the canvas about 3 cm and glue the entire canvas with masking tape around the perimeter. Next, whitewash thoroughly diluted with water, cover the canvas from the edge to the masking tape. Remove the tape.
We do decorative volumetric brush strokes ... To do this, wrap a small amount of paint in a square piece from an ordinary transparent thin plastic bag. Next, in this tightly wrapped polyethylene, make a small hole with a pin. The next stage: through this peculiar device, we apply (squeeze) convex and clear strokes on the canvas. I saw this technique from the artist Oleg Buyko who also shoots very interesting videos for those who are fond of painting.
Painting video tutorial
So we examined the main stages of creating a decorative painting with irises.
I wish you all creative success!
Write comments and send photos of your work.