Instruction
To create point access, it is necessary, first of all, to do the settings. Temporarily disable your anti-virus protection system. Disable Windows too. Check all settings.
For example, you can use D-Link DSL-G604T devices. Connect it to the network card. D-Link DSL-G604T has an IP address of “192.168.1.1”. Open your computer's network connection properties and set the I-address, which is different from the IP address “192.168.1.1”. Open Internet Explorer. Enter "http://192.168.1.1". Enter a username and do not enter a password. Now set up your wireless network. Make sure the DHCP server is enabled. IP-addresses all fit those that are in the program by default. Set the address of the domain name server - DNS. Set the primary DNS address of your ISP. Click "Apply" to save the settings. Select "Wireless Setting".
Now you can set point parameters access. It is necessary to tick the "Enable AP" item. Assign a non-obvious network SSID. Turn off the SSID on the radio. Select an encryption method, such as “WPA”. Click to save "Apply". Insert the driver disk for wireless network. Install it on your computer. Insert the DWL-G650+ adapter into the “CardBus” slot. Complete the installation. Go to properties. Check "Obtain an IP address automatically" and "Obtain DNS server address automatically".
Click the "Wireless Networks" tab. Uncheck the "Use for wireless network" option. Set up the wireless adapter. To do this, you need the "D-Link AirPlus G+ Wireless Adapter Utility". Enter the same SSID. Set "Wireless Mode" to "Infrastructure". Press the "Apply" key. Adjust the security and encryption setting. Save your settings back.
note
Many people want to make their laptop or PC a Wi-Fi hotspot to connect other devices to it. With the help of this article, you can set up your laptop on Windows XP, Windows Vista, Windows 7. Below you can download files describing how to set up and a video on setting up for Windows 7. To create an access point, you need to: 1. Disable your antivirus.
Useful advice
WiFi or Wireless Fidelity (wireless accuracy) is a technology for wireless data transmission over a special Wireless LAN channel. Would you like to learn how to set up WiFi on a laptop or PC in Windows? Read about setting up WiFi in our article - we will talk about the features of installation and connection, as well as about setting up a WiFi network setup. The WiFi network is half duplex, due to the technology itself. This feature means that only one device operating as an access point can operate on one frequency.
Wi Fi is used to transfer data between devices and the advantage of this method is precisely the ability to wirelessly transmit information over radio channels. Wi-Fi is used to spread the Internet, especially in places where people use portable devices (smartphones, tablets, laptops, netbooks, etc.). Also today, everyone can arrange a Wi-Fi network at home to connect all devices that have a Wi-Fi module to the Internet, and this requires only one incoming cable from the provider. And, already using a router, you can connect any number of devices.
When connecting only to the wired Internet, you can connect only one device with a network card at a time, while for others you will have to do cable wiring around the apartment for an additional fee. But tablets and smartphones can only be connected via Wi Fi, so if you have these devices in your house, and laptops too, then it’s better to make a Wi-Fi access point at home. The great advantage of such a network is a wireless connection, which allows you not to tie the device to only one point where there is an Ethernet connector (RJ-45). And Wi-Fi connection points are limited only by the range of the router. Also, the advantages of this network include a set of common standards for all manufacturers. That is, all equipment is able to connect to the network if it has the Wi-Fi logo. In addition, several devices can simultaneously connect to the router at the same time.
Router for Wi-Fi hotspot
To organize a Wi-Fi hotspot at home, you will need a router. A router is a device that will match signals on the wired Internet and wireless signals on radio channels that come from or to our devices. When buying, you need a Wi-Fi router, not a router router, which can be used to branch out a wired Ethernet network.
Wired Internet can provide faster speeds than a Wi-Fi network, so when buying a router, you need to look at the speed that it can support (in the passport it may be called “routing speed”). There are several Wi-Fi network standards, they differ in data transfer speeds. Real speeds are always lower than the maximum possible for each standard by about 2 times. But even with such a decrease, the real speed can reach tens of Mbps, which is quite enough for the normal operation of several connected consumers. A USB connector will also be useful in the router, which can be used to connect printers, scanners, etc. to your home network. Printers that support Wi Fi can be connected like other devices over a wireless network. But if there is no such support, then here is a USB connection and will help you organize a home network with a printer and other devices.
Many companies today produce network equipment, including routers. Therefore, you will have plenty to choose from. Any Wi-Fi router will have several connectors. One of them is WAN, this input is used to connect the incoming Internet cable. There may also be several LAN connectors for connecting other devices via cable. This is when the router can also act as a router. Maybe a USB port. And a connector for connecting the power supply. There should also be power on/off buttons and a reset button to return to factory settings.
Setting up a router
After purchasing and unpacking the router, you need to connect it for configuration. We connect the Internet input to the WAN connector, and a cable to connect the computer to the LAN output.
After that, turn on the router, and insert the disk that comes with the router into the computer, and install all the necessary drivers and programs. The disk may also contain a program with which you can perform all the settings of the router. And you can do these settings through the browser.
In order to enter the settings of the router through the browser, you must enter in the address bar the address that is written on the sticker on the bottom of the router. There must be an IP address from 4 groups of numbers (for example, this form: 192.168.1.1). There is also a username and password for accessing the admin part of the router settings.

IP address, login and password to enter the settings
If this information is not indicated on the router and it is not in the instructions, then you can follow the path in the computer "Start > Control Panel > Network and Internet > Network and Sharing Center" and in the window that opens, select "Change adapter settings". And already here you should see the item "Local Area Connection".

By clicking on it 2 times, you will be taken to the network status menu.

By clicking on "Details" you will open a window with different information, but you need two lines.

This will be the IP address of the router and its value and enter it into the address bar of the browser. You will be asked to enter your username and password. The default username is "admin" and the password is "admin". If everything is correct, a window with information about the network will open in the browser.

router settings window
To set up you need:
- create internet connection
- create local network access
- configure security (change the password for entering the admin part)
We connect the router to the Internet
First, we enter the WAN section, where you will set up an Internet connection.

There you can configure several types of connection depending on the conditions of the provider. Set "dynamic IP address". Most providers give users a dynamic address.

After that, click "apply", the page with the settings should reload (this router is rebooting). After that, the computer should already be connected to the Internet.
If you choose PPPoE, also a common option, in this option the provider gives you a login and password, it can also give you DNS server addresses and other additional settings. Additional settings depend on the provider. Basically it's just a username and password. That is, select the PPPoE item, enter the login and password from the provider, click "apply" and the computer from which the settings are made will be connected to the Internet.
If you need to select L2TP connections as WAN (all these items depend on the provider), then in addition to the login and password, you also need to enter the server name. In addition, additional information may be required. All this information is issued by the provider and does not depend on the brand of the router.
There may also be a "static IP" for the WAN connection. In this case, you need to enter the IP address, subnet mask, gateway, and possibly DNS addresses.

additional data when choosing "static IP"
All the options considered are possible if you have all the necessary information from the providers. What if you don't know this information? Then they can be viewed on a computer. How to do it .
After entering all the data in the WAN settings window, you click "apply", the router reboots.
Additional router settings
After that, you enter the "Wireless Network" section.

In the "SSID" item, you specify the name of your network, which will be displayed in the list of wireless networks available for connection.
WPA encryption select “TKIP”.
Install "WPA preshared key", which will be the password to enter the network. This password is needed to protect your Wi-Fi connection from strangers. After all, the Wi-Fi network can also extend to other apartments within the coverage radius indicated in the passport.
After that click "apply".
After these settings, the router should already be distributing Wi-Fi Internet.
If you need to change your login and password to enter the admin part, then you need to enter the "additional settings". Further in the "Administration" section, look for the "System" item.

After entering the system section, you will be able to change your login and password.

After that, click "apply" again and the router will reboot.
You also need to set up network connection security and your router is ready to work on distributing Wi-Fi in your home.
Routers are combined into networks of any coverage area with an unlimited number of devices, and on any of them they can have a common high-speed Internet, which is distributed by the previous model. Thus, we can easily connect and configure one of them through the other or even others.
Essence of the question
It often happens that in an apartment and in a country house one router is not able to confidently cover the entire territory. The issue becomes even more relevant in private companies, where the office, store and warehouse are located in the same building, and wireless Internet is needed throughout the company. It will help to combine Wi-Fi routers into a single network with the only Internet access on one of them.
How to connect and combine routers into a common network
There are several of them - different methods by cable and by Wi-Fi. The latter method is the most popular and has varieties: bridge mode, repeater mode, client mode (as a simple Wi-Fi module) without distribution (distribution only through LAN cables), etc.
Some commands of step-by-step instructions are translated into Russian.
Building a bridge based on WDS
WDS technology allows you to deploy local networks of any coverage area without a LAN cable, consisting exclusively of routers with Wi-Fi. Such a device simultaneously receives data and distributes it further to other routers. You can create a wireless line or a "tree" of routers of any length, allowing you to enter the settings of any of the previous routers by connecting to any of the following ones.
As an example - TP-Link routers. This is one of the most popular brands. Almost every second user has D-Link routers and distribution points. Free data exchange between routers and network clients
For example, the IP address 192.168.1.1 is taken from the TP-Link 11n device, and 192.168.1.2 from the access point (Root AP). Each device in the wireless network is assigned its own address - otherwise there will be a conflict of IP addresses, the connection will be broken. The IP is changed by going into the router settings and entering the desired IP address.
Change IP on the router
To change the IP address, do the following.
 If there is no connection to the local network of the router, the TP-Link stub page will be displayed
 Upon successful login to tplinkwifi.net or via local IP, the router will ask for a username and password
 Go to LAN settings
 Enter the desired address and click the save button
Connected devices must be reconnected. The connection settings on the PC or gadget from which the IP changed on the router also need to be changed.
Setting up a WDS network on a TP-Link router
Depending on the firmware version of the router, the options and lists in the settings are arranged in a different order. The functionality remains the same, not taking into account innovations when updating the firmware of the device or replacing it with another model.
 Recommended Wi-Fi settings on TP-Link routers
 Enable WDS for Wi-Fi Bridged Networking
 Choice of channel number, technology and connection speed
 Find the SSID from the second router and connect to it
 Protection Recommended
 Automatic IP selection (DHCP) often prevents you from connecting
 Click Reboot to restart
The creation of the WDS network bridge is finished! To test the network, do the following.
 Run the command line under an administrator account
 If the instructions are followed to the smallest detail, the network bridge should work
You can use your network bridge. Routers from other manufacturers are configured in the same way - they all support WDS, and the menus and submenus in the settings are not much different.
How to connect an access point to a router
In the 2000s Wi-Fi routers were mainly produced that worked only in hotspot mode (access points). In recent years, hundreds of models have been released that combine all modes - in fact, these are universal Wi-Fi network devices.
Any router is put into access point mode. If you do not intend to connect a powerful hotspot, designed for hundreds of subscribers and serving the whole village or holiday village, to your wired line, then the role of such an access point is played by the usual model that distributes the Internet to 8–12 devices, has three antennas and works with any neighbor in entrance, in a hostel or in an office "high-rise building".
Connecting an AP to a router is much easier to do via cable. It is also possible to operate modern devices in AP mode - when using hybrid bridge mode in Wi-Fi.
Connecting APs to each other without wires
Due to the increased popularity of the WDS Bridge (bridge) and Repeater modes implemented purely over Wi-Fi, conventional access points continued to be replaced by routers until the hybrid access point mode was implemented in the former.
To take advantage of the AP's Wi-Fi connectivity without the need for a cable, the wireless setup must be different from the wired one. Two identical ASUS WL-500gP V2 routers are taken as an example.  It differs sharply from connecting routers via a LAN cable.
Do the following.
 Enter the name and password to enter the router settings
 They start the AP settings for connecting to another AP
 Set Wi-Fi network name and AP encryption
 AP needs to assign addresses
 Check subnet mask: 255.255.255.0
 Bridge mode must be configured to connect to another AP
 Without hybrid AP mode, it is unlikely that you will be able to connect via Wi-Fi in AP mode
 Click the "Continue" button to proceed to the configuration of the communication channel between APs
 Both APs must operate on the same channel
 This is necessary for the connection to another AP to work correctly.
 This is the second device that the first one will connect to.
 Press the button to write the settings to the router and restart it
Setting up a second access point
Setting up the second AP is carried out similarly to the first AP. Menu navigation is the same. Do the following.
 It must be different from the address in the first AP
 Go to DHCP Server Options
 The DHCP server will slow down the connection, disable it
You can try these steps with ZyXEL, TP-Link, and other brands. Navigating through the menus in the settings will be different, and the instructions will be similar. To connect two access points, routers must support hybrid bridging, Wi-Fi channel forced selection, manual MAC entry, and DHCP control. It will not work to connect classic APs with each other - they only support the distribution of the network from the cable. Using the same model of routers as a bridge connection in AP mode will speed up the setup - the menu for all devices in this bundle is the same.
Communication between routers via cable
A LAN cable is needed only at protected facilities (hospitals or clinics, military factories, special services, banks, research institutes, etc.) - Wi-Fi networks are prohibited on their territory according to the regulations. A serious organization uses wired routers, server stations and LAN-Hub devices, not routers and access points. In other cases, the use of Wi-Fi networks in conjunction with cable lines will suit you perfectly.
There are two schemes of local networks: cascading (can be used as part of a tree) and a network with equivalent devices.
Network of routers cascaded
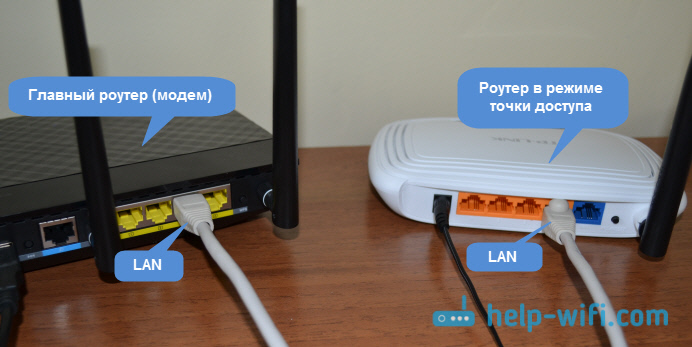
The scheme is as follows: each next router is connected via the WAN socket to the LAN socket of each previous one. This is necessary to facilitate the setup of the Internet, which is on the main router. Setting up such a "router" network does not carry any difficulties.  Each WAN of the next one is in the LAN of the previous one
So you can build a network of routers with a tree topology of any length. This is a kind of pyramid of devices. From any subsequent one, you can enter the settings of any previous one, overlying in this pyramid. Each previous one will be the main one for those standing directly behind it. On any of them, the Internet will work from the very “upper” main router. However, it will not be easy to view the settings of subsequent routers in such a chain from the previous one - for this, use the network mode without WAN.
Do the following.
 The first router is ready to distribute IP and route the network and the Internet
 This will allow the second router to receive resources from the network of the first and Internet traffic
Be sure to set up Wi-Fi security on each device. After saving the settings and restarting the routers, the network will work.
Communication between routers according to an equivalent scheme
In this case, communication between routers via LAN is used. It's like a peer-to-peer network. The main condition in such a network is IP settings from the same subnet.
For example, TP-Link models are taken, previously configured for a different network. Do the following.
 Give the command: DHCP Settings - Disable - Save
 Give the command: Network - LAN, enter the desired IP and click the save button
How to fully configure one router through another
So, you connected the routers to each other and set up the network. The last task is to make sure that the settings of any of the routers are available through any other on your network. As an example, the same network of two TP-Link routers with an equivalent (not cascaded!) Scheme. For different brands and models, the menu may differ, but many of the steps are already familiar to you. Do the following.
 Go to Wi-Fi settings and change the SSID broadcast for other devices
 Change the WPA2 mode and encryption algorithm
Attention! If you try to change the IP settings of the main gateway, DHCP server and others responsible for the operation of the LAN / WAN, the connection between the routers will be broken! Do not change these settings.
Pairing the router with routers and access points
The main router can be a router - modern routers contain up to 5 LAN sockets and, as a rule, one WAN socket, into which a 100-megabit line enters from the provider's optical terminal. You can also use a classic router (without Wi-Fi distribution) - these are in the computer labs of schools and universities or in the server rooms of enterprises and institutions. Each LAN line of the router has a router or access point that distributes the Internet and local network resources via Wi-Fi and / or other LAN cables.
This network is based on a tree structure, already familiar to you from the settings of the main routers in networks that combine the same routers. The operation of the router is configured in the same way - use the instructions above.
With the use of industrial and home-made highly directional antennas (frequency 2.4 / 5.5 GHz), it is interesting to organize access to the Internet, say, in a holiday village overlooking the "high-rise buildings" of the nearest city, without the need to drag optical fiber from the nearest communication center. In general, there is a limitless field for experiments.
Both on routers and on PCs, setting up subsequent devices is manually entering IP addresses or assigning them to be automatically received from the previous device, based on the network topology.  Both routers and computers can be used as terminal devices.
A PC network card with two LAN connectors works like a simple router.
Setting up the router with other devices
For example, a TP-Link router with an access point is taken - a regular router with several LAN outputs, one WAN input and a Wi-Fi access point temporarily disabled to simplify setup. There is a tariff with a speed of 100 Mbps, without the "Static IP" service.
Do the following.
 Assign auto IP acquisition
 IP addresses are registered, there is an Internet connection
Everything! The network works, the Internet is. The settings of routers without Wi-Fi, with dozens of LAN outputs and several WAN inputs are similar.
How to configure TP-Link and D-Link routers in bridge mode
Pairing two or more routers is a task that anyone who has at least some idea of local networks and the Internet can do. If direct access to the requested router is difficult, setting it up through another router will help.
To begin with, the router itself, which you want to make an access point, is the access point, only more functional. It has a DHCP server that distributes IP, there is most likely a firewall, and roughly speaking it builds routes between connected devices, which is why it is a router. So, in order to turn the router into an access point, it is enough to disable some functions in it and connect it via cable to another router, or to a modem.
In a hotel article, I already wrote. You can read if interested. There I promised in detail, using the example of different routers, to show the settings that need to be made to use the router as a Wi-Fi access point.
Let's use an example to find out for what purposes this mode of operation can be suitable. Let's say you have a modem or router installed on the first floor, or at one end of the house. Which may distribute Wi-Fi, or maybe not, it does not matter. So, at the other end of the house, or on another floor, we need to set up an access point to distribute Wi-Fi. In this case, the connection between the router and the access point will be via a network cable.
If we put an access point at the second end, then the main router will distribute IP addresses, and the devices will be on the same network, which is often very important. Also, the access point mode can be useful for distributing Wi-Fi from a modem that does not have such an option. In fact, there are many applications. Otherwise, access points would simply not be sold as separate devices. Because they wouldn't make sense.
Please note that most routers can work in other modes that may suit you better:
- Repeater mode- suitable if your goal is simply to expand an existing Wi-Fi network with another router. We have instructions on the site for, as well, and. After setting up, there will be one Wi-Fi network, just reinforced. Internet via cable from the "repeater" will also be.
- WDS Wireless Bridge Mode- this is almost the same as the access point mode, but here the connection between routers is not via cable, but via a Wi-Fi network. In more detail, on setting up such a connection, I wrote in the article:. It shows in detail on the example of popular routers: ASUS, TP-LINK, D-Link, Zyxel. There is more detailed.
Sorry that so much information and links are already at the beginning of the article, but these issues needed to be sorted out.
As for the "access point" operating mode, it is also AP (Access Point), then on routers from different manufacturers, this mode is configured differently. For example, on routers from ASUS and Zyxel, it is enough to enable the Access Point mode in the control panel, connect the devices with a network cable, and you're done. But on devices from TP-LINK, you need to manually change the IP address of the router and disable the DHCP server.
Connecting an access point to a router (modem):
We connect both devices with a network cable. On the main router (modem), we connect the cable to the LAN port (Home network), and on the access point router, also to the LAN port.
From the access point, the Internet via a network cable also works. For many, this is important.
Configuring ASUS Router in Access Point (AP) Mode
On ASUS routers, as a rule, the AP operation mode is enabled in the control panel. After that, just connect it to a router or modem and you're done. On some models, for example, on the old RT-N13U, the modes are switched by a special switch on the device case. I will show you how to set up an access point using the Asus RT-N12 router as an example.
We connect to the router, and at the address 192.168.1.1, we go into its settings. In the settings, go to the "Administration" tab. And on top of the tab "Operating Mode". Put the switch next to "Access Point (AP) Mode". We read the description of the mode, and click "Save".

In the next window, we need to set the IP settings. You can not change anything, but just click "Next". But, in this case, to determine the IP address of the access point, you will need to use the special "Discovery" utility. And you can, where "Obtain IP automatically" put no, and change the last digit. For example, on 192.168.1.2. Now, the settings will be available at this address. DNS, if necessary, can be specified as in the screenshot below. Or, leave automatic receipt.

In the next window, if necessary, change the Wi-Fi network settings of our ASUS access point, and click "Apply".

The router will reboot and enter AP mode. If you go to its settings, at the address that you may have specified yourself, or that can be determined by the "Discovery" utility (you can download it from the link), then you will see a truncated control panel. Where you can change the necessary settings, or, for example, return the device to the "Wireless router" operating mode.
After configuration, connect the Access Point to the router or modem via cable (diagram above), and it will distribute Wi-Fi.
Access point from a Zyxel Keenetic router
If I'm not mistaken, then only the Keenetic Lite III model has a mechanical mode switch on the case. In all other cases, . I immediately advise you to set up a Wi-Fi network (set network name and password if needed), so that later you don’t have to deal with entering the AP settings.
To activate access point mode on the Zyxel, go to the "System" tab, and at the top open the "Mode" tab. Highlight the item "Access Point - Wi-Fi Zone Extension with Ethernet Connection", and click the "Apply" button.

Allow the router to reboot. After that, you can connect it to another router, and it will already work in "Access Point" mode.
To enter its settings, you can first go to the settings of the main router (modem), go to the list of clients, and see the IP address of our Zyxel there. And already on it go to the web interface. Or you can simply reset the settings, and the router will work in the normal "Internet Center" mode.
TP-LINK Router as Wi-Fi Access Point
If you have a device from TP-LINK, then you will need to manually change several parameters. Since there is no mode switch. Now I will show you step by step what to do. I will show on the example of a router.
1 First, go to, which we want to configure in wireless access point mode. And change the IP address of the router. To do this, open the "Network" - "LAN" tab. We need to set the IP address the same as the main router (can be viewed on the device itself), only with a different number at the end. For example: if the IP address of the main modem (router) is 192.168.1.1, then you need to set 192.168.1.2 in the TP-LINK settings and save the settings. The router will reboot.

Go back to the settings, but at a new address. In my case, it's 192.168.1.2.
2 Set up a Wi-Fi network. If necessary, on the "Wireless" tab, set the Wi-Fi settings for our access point. Enter the network name and password.
3 Last step. Disable DHCP server. To do this, go to the "DHCP" tab. We put the switch near "Disable" (disable), and save the settings.

And reboot the router. It is possible through the control panel. Tab "System Tools" - "Reboot", button "Reboot".
We connect it to the main router (LAN - LAN), and we get a Wi-Fi access point.
Configuring Access Point on Netis Routers
On my Netis router, I just changed the IP address, disabled DHCP, and everything worked. Go to settings at netis.cc.
Open the "Network" - "LAN" tab. We change the IP address. If the main router or modem has 192.168.1.1, then we write 192.168.1.2. What would differ only the last digit. In the same place, disable the DHCP server. And save the settings.

If necessary, go back to settings. (already at the new address that was set), and on the "Wireless" tab, set the Wi-Fi settings.
We connect our Netis access point to the main device with a network cable (LAN - LAN), and you're done.
To deploy a wireless network, you first need to set up an access point (wireless router). It is assumed that all computers on the wireless network are running Windows XP Professional SP2 (English version).
Setting (changing) the computer's IP address
In order to deploy a local network, it is necessary that all computers on the network have the same IP address on the same subnet. Since the access point is also part of the local network, it is necessary that its IP address be included in the same subnet as all other network clients.
As a rule, the sequence of actions in this case is as follows: first of all, you need to find out the IP address of the access point and the default password. Any access point or router, being a network device, has its own network address (IP address). In order to find out the IP address and password, you will have to scroll through the user manual. Let's assume that the default IP address of the access point is 192.168.1.254.
Next, you need to connect the access point to the computer using a traditional Ethernet network interface (for this, an Ethernet network controller must be installed on the computer). When using a wireless router, the computer is connected via the LAN port of the router.
To set up an access point, the computer to which the access point connects must have an IP address on the same subnet as the access point. Since in our case the access point has an IP address of 192.168.1.254, the computer must be assigned a static IP address of 192.168.1.x (for example, 192.168.1.100) with a subnet mask of 255.255.255.0.
To assign a static IP address to the computer, right-click the My Network Places icon and select Properties from the list that appears. In the Network Connection window that opens, select the Local Area Connection icon and right-click on it to go back to Properties. After that, the Local Area Connection Properties dialog box should open, allowing you to configure the network adapter (Figure 1).
Rice. 1. Local Area Connection Properties Dialog Box
On the General tab, highlight Internet Protocol (TCP/IP) and click the Properties button. You will see a dialog box that allows you to set the computer's IP address and subnet mask. Check the box Use the following IP address: in this dialog box and enter the IP address and subnet mask in the appropriate text fields (Fig. 2).

Rice. 2. Setting a static IP address and subnet mask
Setting up a wireless connection
Once the static IP address of the computer is set, you can directly access the settings of the access point itself. To do this, enter the IP address of the access point (192.168.1.254) in the address field of the Web browser. If everything is done correctly, then the access point (router) settings dialog box will open in front of you. You may first need to enter a username and password (they are available in the documentation).
Using the access point settings dialog box, you can set a new IP address for the access point (if necessary), but remember that after the session with the access point is over, you must also change the IP address of the computer (otherwise, a new connection with access point becomes impossible).
If the access point is used only for organizing a local wireless network without access to the Internet, then there is no need to change the IP address of the access point. It may be easier to change (or set) the IP addresses of all wireless clients. However, in some cases, changing the IP address of the access point is necessary. For example, to implement shared Internet access using an analog modem, the computer to which the modem is connected is assigned a static IP address of 192.168.0.1 with a subnet mask of 255.255.255.0. In this case, you have to set the IP address of the access point from the same subnet (192.168.0.x). An example of organizing shared wireless Internet access using an analog modem will be discussed later.
In addition to changing the access point's IP address using the access point's settings dialog box, setting up the wireless network requires the following settings:
Type of wireless network. If the access point supports multiple wireless standards, you must explicitly specify the wireless network standard (for example, 802.11g+). However, it should be noted that the hard specification of the standard cuts off clients that do not support this standard. Therefore, in some cases it is advisable to specify a mixed type of protocols, for example, 802.11b/g.
Channel number. For wireless connection of the access point with network clients, different frequency channels can be used. For example, in the case of the 802.11g protocol, you can use channels one through thirteen. You can explicitly specify which channel will be used to establish a connection, or you can set automatic channel selection (Enable auto channel select), and automatic channel selection is preferable.
SSID. Each wireless network has its own unique SSID, which is the conventional name for the wireless network. For the wireless network to function, the SSID of the access point and the SSID of the wireless connection profile on the network clients must be the same.
rate. The access point allows you to explicitly specify the speed (Rate) of the connection being established. However, it is not recommended to do this, and it is best to set automatic detection of the connection speed (auto / best).
So, after all the basic settings of the access point are made, you can start creating a wireless connection profile on network clients.
Create a wireless connection profile
The configuration of a specific wireless adapter, of course, depends on the version of the driver used and the management utility. However, the tuning principles themselves remain the same for all types of adapters. In addition, there is a general method that is independent of the type of management utility for a specific adapter - use the Microsoft client's wireless adapter configuration utility (the wireless adapter configuration utility built into the Windows XP operating system) to configure the wireless adapter. Let's take a closer look at both configuration methods. In addition, given the popularity of laptops based on Intel Centrino mobile technology, an integral part of which is the presence of a wireless module, we will describe the wireless connection setup using the Intel PROSet/Wireless driver (version 9.0.1.9) used in laptops based on Intel Centrino technology.

So, first of all, you need to install the wireless adapter driver. In the case of a laptop based on Intel Centrino mobile technology, open the Intel PROSet / Wireless dialog box (the icon of this window is in the system tray), which will create a new wireless connection profile (Fig. Fig. 3. Wireless connection settings dialog box
Click the Add button to create a new wireless connection profile. In the "Create wireless network profile" dialog box that opens (Fig. 8), enter the profile name (for example, HOME) and the wireless network name (SSID) that was specified when setting up the access point.

Setup using the Microsoft client
When using the Microsoft client to configure your wireless adapter (a generic method that works for all wireless adapters), the first thing to check is that you are not using another adapter management utility.
Right-click the My Network Places icon and select Properties from the list that appears. In the Network Connection window that opens, select the Wireless Network Connection icon and right-click on it to go back to Properties. This should open the Wireless Network Connection Properties dialog box, allowing you to configure your wireless network adapter (Figure 5).

Going to the “Wireless Networks” tab (wireless networks), click on the “Add ...” button (add) and in the opened dialog box “Wireless network properties” (properties of the wireless connection), enter the name of the wireless network (SSID) (Fig. 6). Leave the rest of the fields (protection settings) unchanged for now.

Regardless of which of the listed methods is used to create a wireless connection profile, after creating it, the wireless adapter should automatically establish a connection with the access point.