Today, almost all SLR and mirrorless cameras with interchangeable lenses, as well as some "soap dishes" can shoot in RAW format. This is a digital format with minimal processing by the camera processor, which allows the photographer to get more options when post-processing the captured photos. Although JPEG is still the most popular image format, it is still a compressed format, so every save of a file inevitably affects its quality. The RAW format is more in demand by professionals, because it allows you to pull out as much information as possible from the saved file. To work with files recorded in RAW format, various software tools are used today.
Programs for converting RAW files may be produced by camera manufacturers, in which case they are "native" for specific photographic equipment. Or such programs are developed by third-party companies as a universal tool that supports various models of digital cameras and is able to solve a wide variety of tasks when processing RAW files.
Universal converters are characterized by wider functionality and good processing speed. Each such program for converting RAW files has its own characteristics. For example, it saves its settings, temporary files and user files in its own way. Converters differ from each other in terms of the quality of settings when processing RAW files, and in terms of functional richness, and, of course, in terms of ease of use. We bring to your attention an acquaintance with the most popular RAW converters.
The first on this list is a program designed specifically for the purpose of processing RAW files and cataloging photographs. In addition to full support for RAW, the program also works with other common formats - JPEG, TIFF, PSD, DNG. Adobe Lightroom is a powerful “full-cycle” tool, meaning that once RAW photos have been processed, they can be immediately cataloged, prepared for web publishing, or printed.
The software engine used in Adobe Lightroom to process RAW files is exactly the same as that used in the Adobe Camera RAW plugin for Photoshop. With this tool, you can perform the usual color correction of an image, remove digital noise that is present in photographs, or sharpen an image.
It is important that here, as in many other advanced RAW converters, the principle of non-destructive editing applies: information about all operations performed by the user is written to a service file. The original image is saved unchanged, so you can always return to the original when processing files. After processing the RAW file, you can simply save its modified version as a separate graphic file.
Of course, Adobe Lightroom is attractive not only for its fairly wide tools for processing RAW files, but also for its powerful photo cataloging system with separate tools for creating slideshows and web pages. Plus, the program has a well-thought-out integration with Photoshop, so after processing the RAW file, the image can be immediately, almost in one click, transferred to Photoshop for further work with it.
The program is one of the main competitors of Adobe Lightroom. It is also a "full cycle" program, offering the user not only an advanced RAW converter, but also tools for organizing and storing images, tools for processing and printing photos, creating photo albums and publishing pictures on the Internet. The program saves all images in one place (Vault), which makes the process of backing up to external drives more convenient and opens up the possibility of transferring all file organizing operations to Apple Aperture.

The processing of RAW files is built on its own engine, which often surpasses the capabilities of Adobe Lightroom in terms of the quality of recognizing colors and other information from the original digital image. Also, Apple Aperture is more efficient in terms of the algorithms used to sharpen the image and combat digital noise.
This RAW converter boasts a very thoughtful and user-friendly interface, which makes working with the program comfortable even for beginners. Work with multiple files is well organized: images can be displayed simultaneously for comparison, moved and scaled within the workspace. At the same time, if Adobe Lightroom has the ability to create presets (working program settings that can be applied to all images in the future), then Apple Aperture does not provide this option. In addition, here, of course, there is no such convenient integration with Adobe Photoshop tools.
(Corel AfterShot Pro) can be called one of the "oldest" converters, because its first version appeared back in 2000. A feature of this program is that it can work not only under the operating system Windows and Mac, but also under Linux. The current version of Bibble Labs Pro supports a large number of professional digital cameras and, along with RAW files, allows processing of images saved in JPEG. The advantage of this program is batch conversion - Bibble Labs Pro allows you to quickly process large volumes of RAW files with a fairly high-quality end result.

As for the functionality of the program, they are pretty standard. In particular, there are curves, the ability to adjust sharpness, exposure, white balance, tools for eliminating unwanted shades and adjusting contrast. To correct optical distortions, a special BPTLens Correction tab is provided, and the Noise Ninja filter is offered to effectively combat noise in a photograph. The program fully supports color management with the ability to create separate profiles for each digital camera. Compared to many of its competitors, Bibble Labs Pro has a relatively low license cost.
PhaseOnecaptureOne
Professional photographers will definitely like a powerful and functional RAW converter supporting a wide range of modern cameras. It is called . This program provides all the features for single and batch processing of RAW files, white balance adjustment, image sharpness and color temperature adjustment, as well as tools for effectively eliminating digital noise. Phase One Capture One supports a wide range of modern cameras and even provides a choice of scene programs that are traditional for many digital cameras.

Each camera model has its own ICC profile designed to greatly enhance the processing of RAW files with the highest possible color reproduction. Phase One Capture One is a dedicated professional RAW converter that is designed exclusively for working with RAW and is not replace a graphic editor or a program for creating photo galleries.
Since we are talking about a full-fledged professional tool, the program interface, as a result, is more complex and, in general, Phase One Capture One will require the user to have appropriate knowledge about the specifics of color processing. To work with this program, you need to have an idea of what the final result of processing should be and what tools should be used to achieve it.
Phase One Capture One allows you to optimize the dynamic range by correcting too dark or too light parts of an image. With this program, you can correct chromatic aberration, distortion, vignetting and other optical image defects. Those users who deal with large volumes of still images will certainly appreciate the batch conversion feature in Phase One Capture One.
In terms of processing quality, work with noise and sharpness, this program surpasses many of its competitors. It should be noted that the best results of processing RAW files are achieved in Phase One Capture One only with serious individual work with images, which requires certain experience and knowledge.
Lightcraftlightzone
Another "full cycle" program. When processing RAW files, you can correct white balance errors, blur an area of an image or sharpen an entire image, remove dust marks, or digital noise that often occurs when shooting at a high ISO setting. Also, this software tool provides options for adjusting exposure, saturation, color reproduction and white balance. All operations performed in the program are reversible, which always allows you to return to the original image.

Despite the fact that Light Zone is positioned by the developer as a professional tool, the program has a pleasant user interface. Thanks to this, it is not difficult even for a beginner to understand the settings and functions.
A feature of Lightcrafts Light Zone is the use of so-called "styles" of processing, each of which is not just a set of preset parameters, but a full-fledged automatic processing algorithm that takes into account the properties of the source file. In particular, there are such "styles" as High Dynamic Range (HDR processing) or Lomo Look (lomography). The program also contains unique tools Zone Mapper and Tone Mapper, developed on the basis of the zone system of the famous American photographer Ansel Adams.
In addition to universal programs for processing RAW files, one can also note the popular "native" converter, which is designed to work with the NEF (RAW) image format created by Nikon digital cameras. This program allows you to carry out the entire process of processing images in NEF format step by step and undo the changes made at any time while saving intermediate results.

The interface of the program is based on "control points" (U-point). At each such “point”, the settings selected for this area related to color correction are stored. The degree of parameter change is regulated by sliders located at the same “points”. These sliders allow you to make changes and immediately track them to the appropriate area in the image. "Checkpoints" make it possible to repeatedly change certain parameters without affecting the original data.
Nikon Capture NX has software tools for optical distortion correction (aberration, vignetting, barrel effect) and noise reduction. The functionality of the program can be extended using the Colore Fex Pro filter plug-in from Nik Multimedia.
Shooting in RAW is one of the best ways to have complete control over your images in post-production.
A RAW file is an image seen through the eyes of a camera sensor. Think of it like raw film. Instead of letting the camera convert the image for you, turning it into a JPEG image, shooting in RAW lets you process the image to your liking.
Applying adjustments in RAW is a non-destructive photo editing method, unlike JPEG editing.
Want the best of both formats? Some digital cameras allow you to shoot in RAW+JPEG mode, capturing the raw image at the same time as converting the image to JPEG for easy use.
What is needed for this.
- A digital camera that can shoot RAW.
- Image processing software such as Adobe Lightroom, Photoshop, or the software that came with the camera.
If you don't have access to RAW editing software, there are also several web-based tools that can help you, such as WebRaw and Pics.io.
For the purposes of this article, we'll be using Adobe Camera Raw and Photoshop CC, but the principles should be very similar no matter which version of the program you're using.
Major adjustments.
When you open a RAW image in Photoshop, Adobe Camera Raw will launch automatically. The window will look something like this:
From here, you can adjust values such as exposure and temperature. Move the exposure slider to simulate the effect of adjusting exposure in a camera. The results will be automatically reflected on the image.
Note that when you adjust most of these settings, the histogram also changes.
Restoration of details.
One of the most important reasons for shooting in RAW is the ability to restore image detail in case something goes wrong. Has the exposure deteriorated in such a way that certain parts of the image are lit up? You will most likely be able to get some of these details back thanks to the RAW file.In the example below, you can see from the histogram that there are highlights in the sky. If you need help reading your histogram, a little will help you.

The recovery slider is key here; moving it to the left will bring back details that were lost due to highlights and blowouts. Additional image details can also be restored using the exposure slider.
This same process can be used to bring back shadow detail in underexposed areas.

To restore details in the shadows, use the same technique as for restoring the highlights. Just move the slider until you see the detail again.

White balance.
Instead of setting the white balance value in the camera when you shoot RAW, you can set the white balance to any value and then adjust it in post-processing. From the Camera Raw interface, select the option from the drop-down menu that best suits your needs.There is another tool available in Camera Raw that provides white balance adjustment - the white balance eyedropper. At the top of the window, simply select the white balance tool and click on the part of the image that needs to be perfectly white. Then, Camera Raw will automatically adjust the color temperature to make that component true white. This is exactly the same as when manually reading the white balance in the camera.
Focusing on the image.
The situations above were mostly examples of image manipulation with fairly obvious errors. Sometimes, there may not be anything wrong with your entire image, but sometimes it looks a bit dull. Here's how to make it stand out with a few simple adjustments in RAW.Below is an image taken with the camera's exposure metered. It looks ok, but you can use a little effort to make it look a little better.

First, let's brighten up the details a bit by increasing the exposure. Also, I increased the contrast a bit.

The image still looks a bit cool, so I'm going to change the white balance option to "warm up" the image a bit. For outdoor situations, a muddy white balance preset adds more warmth to the scene. You can also achieve the same effect by moving the temperature adjustment slider. I also took this opportunity to increase the amount of white and restore some of the highlights on the wall by lowering the highlight slider.
Finally, to really focus on the details, move the clarity slider (clarity) a little to the right. The Clarity tool looks for edges and determines the contrast in the midtones. Use it carefully for best results.

Here's a before and after image comparison to give you an idea of how you can bring out the details in a RAW image:

Once you've applied some basic adjustments, click Open Image, enter Photoshop, and continue editing as much as you like.
If your camera shoots in RAW, congratulations. You can get much more out of your shots than owners of compact cameras that can shoot only in JPEG.
This article does not pretend to be a complete guide to RAW processing, however, in our opinion, it will be useful for those who have not yet attached importance to the potential of working with RAW.
RAW and JPEG, which is better?
Of course, it is important to understand that RAW and JPEG were originally created to solve different problems, so it is impossible to argue that RAW is better than JPEG.
The JPEG image format was created in order to display the highest quality image with minimal memory consumption. When shooting in JPEG, you immediately get a finished picture, which you can immediately send to a forum, website, social network, or maybe even print. JPEG files take up relatively little space and are the unspoken standard for storing images in user albums.
The colors in your photos will be exactly as your camera's imaging system sees them. In the case of RAW, you will either have to resort to using a native RAW converter, or use the correct profiles in a software specially designed for this. If there are no profiles (this is possible in the short term, for example, if your camera is new, and the software company has not yet had time to prepare the correct profiles), you will need to configure the image parameters yourself.
It is important to know that absolutely all cameras shoot in RAW. It's just that saving in RAW is blocked for them, and the camera independently converts the signal to JPEG using its own algorithm known only to developers. Thus, JPEG is the final result of image processing by a camera, this process proceeds in several successive stages. This is done by the image processing system - this is how manufacturers now call a bunch of a special processor, additional microcircuits and software algorithms.
Knowing photographers love to shoot in JPEG, developers equip almost all modern cameras, including SLR and hybrid models, with advanced JPEG processing options. In Canon DSLRs, this is the Picture Style function, in Nikon DSLRs - Picture Control, in Sony DSLRs - image styles. In addition to several frequently used presets, it is possible to configure all the parameters yourself.
Of course, the processing power and intelligence of processing systems is constantly evolving. For example, the new processing system in Lumix cameras, called the Venus Engine VHD, and the image processing system in Casio cameras are equipped with three-core processors; Canon's DIGIC IV integrated circuit is equipped with fast memory and provides multi-channel reading from the sensor. The installation of these two processors in the Canon EOS 7D camera made it possible to achieve a data readout speed of 144 Mp / s.
Venus Engine FHD Tri-Core Processor
The software part is also important, and it is often based on an extensive database of typical shooting scenes. The camera compares the brightness composition of the shot against a database that already contains several thousand typical scenes and uses the optimal shooting settings. When recognizing a certain color in the frame, such as a blue sky, cameras increase the saturation of that particular blue color. It comes to the fact that cameras take into account the time zone, as well as the date and time of shooting. Thus, your camera can, for example, when shooting sunsets, automatically increase the saturation of reds and yellows, making the frame more “tasty” and the owner of the camera more joyful.
Unfortunately, often automatic programs fail or provide undesirable effects, greatly overestimating / underestimating the contrast or saturation of the image.
There are many situations in which shooting in JPEG is more appropriate. It makes sense to shoot in this format if you are sure that the photos do not need significant processing, when shooting large series (not the cheapest SLR models usually have a large RAW buffer, but compact cameras and budget SLR cameras traditionally have a RAW buffer). no more than 10 frames per burst), and also when the memory card is close to full.
What is the path from the moment of shooting to saving the image to the memory card?
The signal received from the sensor is interpolated to RGB, the processor performs color correction in accordance with the white balance settings, and then applies color correction based on the saturation, contrast and other color settings.
After that, the image processing system applies one of the special effects, if they have been selected by the user, for example, miniature effect, tilt-shift optics simulation, fisheye lens distortion. If special effects are not involved, then, on the contrary, software correction of vignetting, chromatic aberrations and optical distortions is carried out.
By the way, it was these software methods that made it possible to reduce the cost and size of such popular cameras as the Canon S90 and Lumix LX-3. In order to reduce the price of devices and their dimensions, manufacturing companies decided to abandon the complex optical design of lenses, which minimizes unwanted distortion.

Small dimensions and high image quality in the Canon S90
made possible by software correction of lens distortions
Finally, the camera applies the user-specified sharpening (sharpening) or blur settings, noise reduction settings at slow shutter speeds or high ISO, and only after that it converts the result into an 8-bit image, i.e. JPEG.
The saddest moment is that each stage of transformation leads to an irreversible loss of information in the photo. And if the pictures are of some value to you, then it is very stupid to give all these stages for processing by the camera.
Shooting in RAW format allows you to edit the image beyond the limits of the JPEG format. You can correct the exposure, white balance settings, sharpen and remove noise in the image after. Roughly speaking, all you need when shooting in RAW is to get a technically satisfactory shot. The rest can be improved.
RAW is a specific format that stores information about the signal taken directly from the light sensor without further processing by the camera. Data in a RAW container can be either uncompressed or compressed, with or without loss. However, even in the worst case of lossy compression, a RAW file contains significantly more information than a maximum quality JPEG image: 12- or 14-bit RAW files are much more tolerant of user processing than highly compressed 8-bit JPEGs.
Almost all manufacturers have their own RAW formats: Canon has *.acr and *.cr2, Sony - *.arw, *.srf, *.sr2, Nikon - *.nef, *.nrw, Pentax - *. ptx and *.pef, while Samsung has *.srw. Many of the new models use Adobe's open DNG (Digital Negative) format.
RAW is a kind of undeveloped digital image. Although it is recognized by many modern viewers (with or without special plug-ins), it is unsuitable for printing, and the file itself can be interpreted differently by different editors. For example, the same RAW when viewed in ACDSee and Picasa is significantly different.
The RAW format provides extensive post-processing capabilities within some limits without loss of quality. All those operations that the camera's processor does on its own will need to be done manually. There is only one reward here - much better and more effective photos.
However, RAW files take up significantly more space, they are 3-6 times larger than similar JPEG files, and some knowledge and processing time are required for conversion. Fortunately, the process is quite fun, and if you have a good RAW source, you will definitely be happy with the final result.
RAW conversion using the example of Adobe Lightroom
We will look at RAW conversion using Adobe Lightroom version 3.2 as an example. This program deserves attention for several reasons: it is quite easy to use, it is regularly updated and it supports almost all released cameras capable of outputting RAW files. The application is well integrated with the Photoshop family and is very functional, it is equally convenient when working with individual photos or with a large number of images.

Of the disadvantages of Lightroom, it is worth noting the exactingness of computer computing resources and the need to purchase it. The lack of a Russian-language interface also often scares off novice photographers. You can download the program on the official website of Adobe.
Despite a fairly large number of programs of this type, of which we would note the free RawTherapee, Apple Aperture, Phase One Capture One and Bibble Pro, the Lightroom application, in our opinion, is the golden mean.
All of these programs deserve attention, as they are stronger at certain points. For example, Aperture is very easy to use, while Capture One gives you the best color control.
In a loose translation, the word lightroom is interpreted as a place for developing pictures. In principle, the way it is - it is a convenient and powerful interface for developing RAW images and even working with JPEGs. Lightroom is a non-destructive image processing algorithm. Until the moment of conversion, the pictures entered into the program remain untouched, and a preview of the effects and settings is available from the application cache. Each file is assigned a document with detailed user edits, which are written in instructions and then executed when converting images from RAW.
This approach is quite convenient, and thanks to it, an infinite history of actions with a snapshot or snapshots is implemented.
The Lightroom program allows you to synchronize the selected settings for a group of photos, which is very convenient, for example, if you have taken many shots of the same type and want to transfer editing to several pictures at once.

The Library module contains a feature of the program for cataloging images. We will not focus on it. We only note that frames can be sorted by creation time, title, shooting coordinates, lens, focal length, etc. It is possible to create dynamic collections that are automatically replenished according to selected criteria, and much more.

The Library module is very powerful and convenient, as are the modules for preparing for printing (Print), creating a slide show (Slide-show) and publishing on the Internet (Web). Their description would be enough for another article, so we will pay attention to the most important module - the processing module (Develop).
At the very top is an image histogram by color and shooting information. The histogram can be moved with the mouse, its certain areas are responsible for controlling the exposure, dark and light areas of the frame. The histogram is quite clear and allows you to quickly correct frames that were initially not very successful.

It should be noted that all settings follow in a logical order, and if you do not quite understand what you want to improve in the picture, you can move through the settings from top to bottom.

Basic panel
White balance (white balance). In this window, the user can choose one of the white balance presets available in your camera, or entrust the choice of optimal settings to automation, which provides a surprisingly high-quality result. If you are not satisfied with the above settings, you can use the sliders Temperature (color temperature) and Tint.
The easiest and most convenient way to correctly set the white balance is to use the White Balance Selector tool (eyedropper), which can be used to specify a neutral tone in the image, such as a white or gray area. This shows a greatly enlarged area under the pipette so that you can more accurately select the correct neutral area on inhomogeneous textures.
exposure- one of the most important tools in the conversion. It is with its help that the primary “pulling” of details from incorrectly exposed photographs is performed.
The parameter sets the overall brightness of the image and its white point. If you hold Alt while working, the areas of the frame that are knocked out into the light will be highlighted, i.e. they will not contain any information other than pure or almost pure white. If there is no artistic idea in this, the details lost in the lights should be tried to be returned. This applies to the bright white wedding dress as well as the texture of the clouds in the sky.

Tool Recovery called upon to help us. It removes overexposure exactly in the right places, almost without affecting the rest of the photo. If you have previously performed color correction, after applying Recovery, a light gray veil may appear in the picture or the colors may change slightly.
Tool fill light(fill light), on the contrary, increases the brightness of dark areas, while not affecting the light areas.
If Recovery can almost always be turned up to the maximum, then with Fill Light you should be careful - the unnatural brightness of dark areas can give even a good picture a flat and unnatural look. Both tools help to get into the histogram, and their judicious use can be considered a light variation of HDR, high dynamic range images.
Parameter Blacks sets the black point of the image.
Parameter brightness Many consider it a clone of the Fill Light tool, but this is not the case - it changes the brightness for the entire tonal range of your image.
Parameter contrast responsible for the contrast of the photo. Decreasing contrast makes tonal transitions softer, while increasing contrast makes them sharper.
Three interesting tools are in the subblock Presence(appearance), and changing them greatly changes the photo itself.
Tool Clarity affects the micro-contrast of the image, namely, the smoothness of contrast transitions, such as edges, contours of objects. Increasing the value of this setting creates the feeling of a sharp frame, while decreasing it creates the effect of a soft, almost out-of-focus image.
Tool Vibrance- this is perhaps one of the most effective, simple and beloved Lightroom tools. Following its success, Adobe implemented a similar tool in Photoshop CS4. Vibrance is a smart saturation enhancement feature. It does not affect already saturated colors, but selectively and non-linearly increases the saturation of dull shades. This approach avoids oversaturation, loss of shades and various artifacts in the image. In addition, Vibrance selectively enhances the saturation of skin tones and prevents people's skin from turning into a yellow-beige substance.

Tool Saturation increases the saturation of all colors at once. A slight increase in saturation along with the use of Vibrance will allow you to get even more juicy and vibrant colors. However, you should use Saturation carefully, you should not twist the parameter value to the maximum.

The next block is curves. The tone curve in Lightroom is used to adjust the contrast within a certain range of tones. Although it is a very powerful tool in terms of image enhancement, we won't go into it just yet because it's quite complex for beginners and the best way to learn it is just to experiment.
Color correction block
This block is designed to correct the hue, saturation and brightness (luminosity) of individual colors. Colors are initially divided into several shades: red, orange, yellow, green, aqua, cyan, violet, magenta.

On each options tab Hue(tone), Saturation(saturation), Luminance(brightness) there is a list with sliders to control each color. However, the most convenient way to selectively color correct is to use the dot tool. All you need is to move it to the desired color in the frame, for example, to the sky, and move it up and down with the mouse button held down. The result of the application is immediately displayed on the photo, and this approach makes the method of working by eye very convenient.

In mode grayscale all colors in the picture can also be varied and use the dot tool.
Split Toning Block
This block will be of interest to people who want to achieve creative processing comparable to effects such as sepia or film color simulation. Here, separate toning with a certain color of light and dark areas of the image is available. We invite you to experiment with the block yourself.

Block Details(detail) includes two very important items - Sharpening and Noise Reduction.

Tool sharpening responsible for sharpening the image. It works on the same principle as the Unsharp Mask tool in Adobe Photoshop. This tab contains a 1:1 scale image fragment and algorithm settings - Amount, Radius, Detail, Masking.
Parameter Amount is responsible for the intensity of the sharpening algorithm.
Parameter Radius is responsible for the thickness of the area on the boundaries of objects in which the algorithm will work. For modern SLR cameras with resolutions above 10 megapixels, the recommended values are 0.8-1.
In the days of independent development of films, it was necessary to use more than one developer. Someone had several favorite recipes, most managed with one or two, changing the development modes and achieving the desired results. Digital cameras of a sufficiently high level do not limit the photographer to “built-in development” in JPEG or TIFF, but provide him with the opportunity to convert “raw” RAW files to the required format himself. Experience shows that the situation with several "developers" is repeated here. (The author has to use at least two different programs constantly, depending on the plot and the task at hand.)
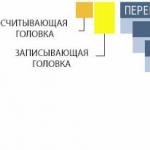
What is a RAW file? This is a set of numbers obtained by "digitizing" electrical signals from the sensitive cells of the matrix. The cell registers only light, and if it is covered by a color filter, then only the light transmitted by it. The tasks of software that converts RAW into a familiar graphic file:
1) match a specific number of the file in accordance with its place and, consequently, the place of the cell on the matrix and the filter installed on it, one of "colors";
2) produce interpolation color components so that each cell is represented not by one number of its actual "color", but by three that make up the usual color representation format, such as RGB;
3) according to the metadata of the shooting settings of the camera, correct the image for the correct representation of the color ( white balance), brightness/contrast ( exposure), local contrast ( sharpness);
4) in accordance with the standard for representing a generally accepted graphic file, recode the data, taking into account: the nonlinearity of the signal transmission in the output file - gamma, color space output file, bit depth representation of data in the output file, compression according to the output file compression algorithm.
RAW file is hardware dependent. The conversion program must have information on how to convert the brightness of the cell into the color of the output color space and must know under what conditions the shooting was made (metadata about the shooting settings of the camera). In fact, you need to have either “prescribed” filter characteristics on the matrix, or camera profiles. Without this information, you can only get a very conditional color rendering.
Canon EOS digital cameras are now equipped with two tools for working with RAW files: the module RAW Image Task for the program ZoomBrowser EX and a separate program. As the name suggests, the second program is more "professional". As an "update" (Digital Photo Professional 1.6.1 Updater, 11.7 MB), you can freely take it on and if you do not have it in the kit. Next, we will talk about the Digital Photo Professional 1.6.1 version from the Canon EOS 350D camera kit (we wrote about it, so the article can be considered a continuation). As stated on the site, the program is installed over any of the programs: File Viewer Utility 1.1 - 1.3, EOS Viewer Utility 1.0 - 1.2, Digital Photo Professional 1.0/1.1/1.5/1.6.0, RAW Image Task 1.2/2.0. So it can be considered freely distributed.
Functions:
Main window

The main program window contains a file selection window, a menu bar and a toolbar, a window that displays files with information about them or image thumbnails (depending on the “View” menu setting). The program displays EXIF data not only for Canon cameras, but also for others (with some limitations). So, for example, for a JPEG file from a Nikon D70 camera, information about the ISO setting is not displayed. The program does not support and does not display in the preview window not only other people's RAW, but some "own" CRW files (Canon S70, for example).

In the thumbnail view mode, the main information about the file is displayed in the form of icons in the thumbnail margins and in the information fields of the program. In this case, you can find out the following from the icons: the RAW file has already been processed (setting the “cloud” white balance, cropped and retouched with the “stamp” tool) and has a “recipe” (information line “Recipe data: Yes”).
Main window toolbar buttons:
Menu bar:

The menu bar contains the usual commands for working with files, taking into account the peculiarities of RAW - working with recipes. The "Adjustment" and "Tools" sub-items repeat the correction and cropping functions available through the toolbar buttons. The "Bookmark" menu item allows you to specify folders that you often have to work with in order to quickly switch to them.
The concept of a RAW file does not provide for changing the data (the actual image). The correction made is described as a limited set of parameters that can be applied to this or even another file. Set of settings made - the recipe can be stored separately and transferred to another machine as a separate file (".xmp" Adobe or ".vrd" Canon). "RAW settings" of files can still be stored in the database of the program itself (and then they are lost when transferring the RAW file to another computer) or written to the header of the RAW itself. DPP, if a recipe is not explicitly created, writes the recipe to a RAW file. And on the computer on which the editing was performed and on another computer, the file can be "restored" to the "shooting settings":

But in Adobe Photoshop - no, and the processed RAW file with a built-in DPP recipe is displayed in this program (Adobe RAW) as if it had not been corrected at all.
Working with the program
Before you start working with RAW or JPEG / TIFF files, you need to configure the program in the "Tools-Preferences" menu section. In the General Settings submenu, it is important to select the level of file processing quality - from "quality priority" to "speed priority". “Quality Priority” also requires significantly more processing time. The program manual states that in this case the file is processed by special filters. In the "Tool palette" section, it is important to select the initial file processing mode ("RGB RGB" mode is effective for those cases when you need a "strong" correction and you prefer to work with individual channels, "Luminance RGB" is preferable if you need only a slight correction of the RAW file ) and the type of RGB correction curve (curve or polyline). For some of the settings to become active, a restart of the program is required. In the "color management" submenu, you need to select the file conversion workspace (the widest Wide Gamut RGB allows you to cover a larger range of colors than sRGB or AdobeRGB), rendering methods (Rendering intents) and color management settings to match the display and printer (for printing from Canon DPP software). In order for the color profile of the workspace to be written to the file during conversion, you need to enable the "Embed ICC profile in image" recording option when saving the file.

Convert RAW file to JPEG/TIFF without editing and batch conversion
If you do not need very fine file processing or you need to quickly convert RAW files to JPEG / TIFF with only a slight or rough adjustment of the white balance or brightness, then this can be done right in the main program window. First, using the “white balance” and “white eyedropper”, “brightness” tools, you need to adjust the images by miniature (!) Then select them and either select the "convert" option from the "File" submenu, or press the "Batch process" button. The selected files will be listed in the batch processing window. Having made the necessary conversion settings (format, quality for JPEG, sharpening degree, profile, resizing, naming, the application in which you should open the file after it has been created or the folder in which to save it) click on the “execute” button and wait for the folder the required images will appear or the files will be opened with the selected graphical editor.

Correction and retouching of RAW files
Fine tuning and retouching of RAW files is performed in the Edit Image Window. It is called either by double-clicking on the selected file, or using the "Edit Image Window" button. The image can be edited with both the RAW image adjustment tools and the RGB image adjustment tools.

RAW image adjustment window adjustment tools: Adjust brightness, white balance, tone curve, and color interpolation. For example, the image is rendered with a linear tone curve. Such "blacks" are in fact the original files of digital cameras without gamma correction.

White balance adjustment tools: standard settings, color temperature, fine adjustment of the hue using the eyedropper and color wheel. The white balance setting can be "registered" (there are three registers for storing settings) and applied to other files.

The tone transfer curve is adjusted either by the midpoint using the “Tone curve - custom” slider, or by the edges of the range (as in the illustration). The editing window can display both the file “before/after” editing and both views at the same time.

The display of the image before and after processing can be combined on the same image.
"RGB image adjustment" tools: "per-channel correction" using curves and a "neutral" color eyedropper, "brightness", "contrast", "hue" and "saturation". Curve correction can be smooth or broken.

Image editing tools, cropping and stamping, allow you to get a “finished” product without additional graphic editors. In this case, the “stamp” tool was used to “remove” a speck of dust from the matrix. The place where the instance for retouching is taken from can move synchronously with the cursor or be fixed. For completeness, only tools for correcting geometric distortions (perspective, distortion) and chromatic aberrations are missing.
Influence of the parameters "quality-conversion speed", "color reproduction" and "sharpening" on the result
Color reproduction shot settings and "faithfull settings":
Sharpening. When converting a RAW file to TIFF or JPEG, sharpness can be increased (6 levels - "0" - "5"). Unfortunately, the effect can be visually assessed only after the conversion. You may have to make several attempts before you get a satisfactory result.
Fragments of 1:1 files with different levels of sharpening when converting RAW to TIFF:
It is not difficult to notice that the “high quality” of the conversion (recall that this parameter is configured in the “Tools-Preferences” submenu), along with smoother and clearer (“not velvety”) contours (small letters), is also characterized by the appearance of a colored border around contrasting details. (blue border around the white letters "hart" on a black background). For some tasks, the “speed” setting is not only faster, but also better. Why is one editor not enough?
One editor, as well as one developer for all cases, probably does not exist. Something is more convenient to do in one, something in another. It is possible (but not necessary) to achieve an almost perfect result in any, but at the cost of great effort and time. It is better to choose another editor in which a specific task is easier to solve.
As noted, DPP enhancement filters can result in color halos around contrasting details. Prioritizing speed and turning these filters off (at the cost of reducing edge sharpness and smoothness) corrects the situation. This is perhaps the only serious drawback of the program.
Usually the "problem" for any conversion, including RAW, is the zone of overexposed image details, glare, light sources in the frame. Where the signal from each cell is maximum, everything turns out white. But on the "border" of the highlight, some cells are already beginning to "see" the details, and some are still overexposed. Depending on the selected algorithm for "restoring" details in highlights, different results are obtained. Moreover, it is impossible to say in advance what is better for a particular plot - to leave the image as it is (which leads to the appearance of one-color streaks around the highlight) or to “zero out” the color and make the highlights and halos monochrome. Both methods can in a particular situation give a more naturally perceived result. Usually, the method of rendering highlights in the editor is not explicitly configured (as, for example, the method of rendering color "shot settings" or "faithfull settings"). You can read about programs with an explicit setting of the Clip Saturated pixels parameter.
Using the example of “restoring” an overexposed photo, let's see how different editors cope with this task. Let's convert the same RAW file with RAW converter Adobe Photoshop CS2, RAW Image Task programs Canon ZoomBrowser EX and Canon DPP. All conversions were made from RAW to a 16-bit TIFF file, the quality setting was “best”, the white balance was adjusted using an eyedropper on the third (left) gray field of the Macbeth scale. The images were then scaled and converted to JPEG (sRGB, for WEB) in Adobe Photoshop.
| Original overexposed frame |
|
 |  | |
|
||


It could be said that the more complex the program, the worse the result is. DPP without additional sharpening and with quality enhancement filters, and Adobe RAW "strives" to find color in highlights (resulting in Macbeth target's lightest field turning yellow) lose out to a quick and easy RAW Image Task. There is nothing strange in this and the situation with developing is repeated - for a “standard” frame, a “standard” developer is better (in the sense of faster and more efficient), but if you need something special, you can’t do without alternative recipes. And there are their own subtleties of the temperature regime, and their own mixing features. And all this needs to be mastered.
If your camera allows you to take photos in RAW format, and almost all modern cameras allow you to do this, it’s a sin not to take advantage of these opportunities. In macro photography, processing RAW photos can significantly improve the result. Processing allows you to remove highlights, increase the saturation of the picture, increase sharpness, even out colors and much more. Read the basics of processing RAW photos in this article.
Before I get down to business and talk about working with the converter Adobe Camera Raw, I would like to make a short introduction and explain what exactly I am pursuing in creating this article and who it is aimed at.
First of all, I want to note that I have no goal to tell absolutely everything that I know about working with this converter (hereinafter - ACR). This would take too much time and effort. In addition, although I know a lot, but obviously not everything. Yes, and there are enough sources to get thorough and guaranteed correct information about working with this program without me. For example, a very good textbook Adobe Photoshop CS3 for Photographers who wrote Martin Evening.
My goal is to give the most necessary basics and reveal the work with the most demanded (from my point of view) ACR tools, so that any beginner who has not yet decided to shoot in RAW and work with him, after reading this article, understands that this is the case, in fact, quite simple, and most importantly - extremely convenient and useful.
RAW- (c English - “raw”) data format containing raw information and avoiding its loss. Such files contain complete information about the stored signal. In digital photography, the RAW format is understood as data obtained without processing directly from the camera's matrix. .
Almost any modern digital camera has the ability to shoot (or rather, record the information received) in JPG and RAW format. The main difference between these two formats is that JPG is the result of processing the received data by the camera itself and, as a result, a compressed image with a lot of lost information, while RAW is all the information that was received on the camera's matrix during the shooting process. Usually, smart modern cameras do a pretty decent job of processing information and produce quite acceptable results in JPG format, but still, with rare exceptions, they cannot do it better than we, much smarter people. :) So, I'll paraphrase the famous Michurin phrase: "Let's not wait for mercy from digital technology, our goal is to take it ourselves!"
So let's get started...
- Workflow Options- First you need to decide on Workflow Options (by clicking on the line marked in red under the photo). You must choose in which color space ( Space) we will work (if the photo will be printed, then select Adobe RGB 1998, if you need the file exclusively for web applications, then sRGB is enough), and also select the depth ( Depth), the size ( size) and resolution ( Resolution) of our future file. I want to note that converting in a wider space, with great depth, maximum sizes and resolution, of course, is best for the quality of the final result, but we should not forget that all this will eventually give us a file of a rather impressive size (50-70 MB in average), and the hard disk space is not rubber. So let's be reasonable and try to match our needs with the need.
- Conversion Data Management- On the right side of the control panel in the line next to the inscription Basic there is a rather inconspicuous button, but meanwhile, very convenient and necessary functions are hidden behind it. With their help, we can save the data of any conversion, and then with a single click apply it to any other rav. By default, all conversion data is saved in a small file format .xmp, which is automatically saved to the folder where the converted rav. If this does not happen (you could, for example, cancel this function), then the data can be saved by clicking on Save Settings... In the future, if you want to apply the saved data to any other rav, just load the appropriate .xmp file via function Load Setting...
ACR also makes it possible to convert and make changes to a large number of equals at the same time, but I will talk about this a little later.
- White Balance Tool- Before we move on to the next part, I would like to draw your attention to one more thing - the white balance tool. This is an eyedropper that works on the same principle as the gray eyedropper in Curves in Photoshop (more on this topic in "Simple wonders of color grading")
Though White Balance Tool and convenient, but still the main tool for changing the white balance, as well as many other extremely useful ones, is located elsewhere. To do this, let's go back to the right, main part of the toolbars. basic:

- white balance- In this drop-down box, you can select several standard automatic white balance settings, which are also available on any camera. It should be borne in mind that, despite the "standard", they can vary quite significantly from camera to camera and from program to program, and, most importantly, not always correspond to the true state of affairs, that is, these settings are very average and approximate.
You can always try clicking on the option Auto, it is not so rare that it produces quite acceptable results. Well, if none of the proposed ones suits you, then you have tools for manually setting the white balance at your disposal - temperature and Tint. Well, again, do not forget about the White Balance Tool pipette! - exposure- One of the most important converter tools. With it, you can make a significant exposure compensation of the existing frame. For example, my owl portrait is quite noticeably underexposed (dark), which is easily corrected by moving the lever to plus. If the frame is overexposed (overexposed), this is corrected by moving the lever to minus. Track the changes on the photo preview - overexposed fragments will be filled in red, which is very convenient and visual.
- Recovery- My owl has white plumage, and the white color goes into overexposure very easily. So, having adjusted the exposure to plus, I got obvious overexposures in some places on the feathers. To fix this, let's use a truly wonderful tool Recovery. It allows you to expand the dynamic range of the photo even in the process of elementary rav conversion, removing overexposure in the necessary places, (almost) without affecting the rest of the frame.
- fill light- A second tool to help expand the dynamic range. With it, if necessary, you can brighten excessively dark areas in the shadows, (almost) without affecting the rest of the photo. I want to draw your attention to the fact that with the tools fill light and Recovery should be handled with care and not lose a sense of proportion, because, overdoing it with their use, you can easily get ugly, flat and noisy photos. With proper and moderate use, these tools are priceless!
- Clarity- Another wonderful tool with which you can increase the tonal contrast of the image (increase the micro-contrast and get more detail) or, conversely, reduce it, getting a kind of "soft focus" effect. But be careful! Excessive use can adversely affect the image - noise and artifacts will appear, especially noticeable in out-of-focus areas, or details in the least contrasting areas of the image will easily disappear.

Now let's move on to the next page - Tone curve.
Everything related to contrast (and indirectly color) can be fine-tuned here by working directly with the histogram graph and individual zones of highlights, shadows and midtones. The principle of operation is the same as in Curves of Photoshop itself, but also more simplified.
If you work with the second tab point, then we get the same graph in which you can work on any arbitrary points, as in Photoshop.
And here in the bookmark Paramtric changing the data is done by changing the values on four points (lights in two values and shadows also in two values). For people not very good feeling photoshop Curves, bookmark Parametric should be much more obvious and intuitive.
In earlier versions of ACR, the function point, unfortunately, it was quite buggy and it was almost impossible to use it (maybe it was just me, I don’t know). So after a bit of pissing and spitting, I got used to using functions Parametric. In the latest version I have, the points finally started working, but I'm already so used to working with parameters that I first go to this tab on the machine, make changes ... and then turn over to the second one and finalize the chart points. How much it makes sense, to be honest, I don’t know, but I’m already used to working that way. :)
Moving on to the next page - Detail. Here we will work on sharpening the image and dealing with noise.
 NB! As the text under the tools rightly says, before you start making any changes in this window, increase the preview size to 100% or higher, only in this way you can reliably track the changes you are making.
Tool noise reduction consists of two parts - Luminance and color. In the first one, you work with luminance noise reduction, and in the second, you work with color noise. If this is necessary, in the column color the slider can be safely moved almost to the maximum value, there will be no harm from this. WITH Luminance but you need to be careful - the higher the value, the more the overall sharpness of the image will fall. However, this can be improved somewhat.
sharpening- Using this tool, you can significantly increase the sharpness of the image. It operates on approximately the same principle as the most popular tool of this series in Photoshop - unsharp mask.
For myself, I can say that I use this tool in the converter very moderately and most often only in cases where I had to work with noise suppression first.
Now let's go to HSL/Greyscale- the most important part of color correction in the converter.
Here you can quite flexibly and quickly convert the image to black and white, for this it is enough to check the box next to the inscription Convert to Grayscale. We are now working with color, so we leave this place untouched and move on to the HSL tool tabs - an interesting and, in my opinion, quite a successful mixture of Photoshop Hue/Saturation, selective color and Channel Mixer.
Hue- Working with different color channels, here you can choose shades of any of the colors presented. For example, I did not want the red in the photo to give off pink, and I wanted to make the yellow a little warmer - so I moved the corresponding levers.
Saturation- By the same principle as in the previous part, here you can work with the saturation of various colors without affecting any others.
Luminance- The same tool allows you to change the brightness of colors by channel from darker to lighter, or vice versa.
All of these tools are very visual and intuitive. But, as in working with most other converter tools, the main thing here is not to lose a sense of proportion.


So, our image is almost ready, the final touches are left - fixing the shortcomings of the feedback, which can be done in the section Lens Corrections.
Chromatic Aberration, or chromatic aberration- ugly color contours, spots and stripes, which appeared as a result of the fact that the lens is not always able to correctly bring together all three light components (red, green and blue) at one point on the image-recording plane. As a rule, chromatic aberrations appear in places with the greatest contrasts (for example, along the contour of a dark object against a light background).
It is these unpleasant phenomena that can be combated with the help of a tool Chromatic Aberration. Zoom in to 100% or more, and moving the sliders back and forth, track changes in problem areas of the image until you reach the optimal result.
Lens Vignetting, or lens vignetting, which means darkening the image at the edges of the frame.
This tool allows you to deal with these blackouts or vice versa to create them. It should be noted that the problem of vignetting in working with modern optics is less and less common, so this tool is more often used not to reduce, but to increase the vignetting index. This artistic technique allows you to darken empty or unimportant parts of the frame, draw more attention to the center, emphasize the main subject and convey a certain atmosphere of the plot.
.xmp ) for future use. Every time you open this already converted rav, these parameters will automatically be applied to it. Also, these parameters can be applied to any other rav, as described above in the "Managing conversion data" section.
When you press open image all conversion parameters are also automatically saved to the .xmp file.
And in conclusion, I want to tell you that all of the above can be applied both to one file and to the whole package. To do this, just select the required number of equals - and all of them will open in ACR at the same time in a separate window on the left.

After pressing Select All(or selecting a few selective files from the list) and then pressing Synchronize a new control window will open, in which you can mark exactly what parameters you would like the conversion to be applied synchronously to all selected files.
Then through open image(s) or Done you can still open the converted raves in Photoshop or save the conversion settings for each of them.