Many building and finishing materials came to us from North America. So siding was invented on this continent back in the 19th century, and such an option as vinyl appeared already in the middle of the 50s of the last century.
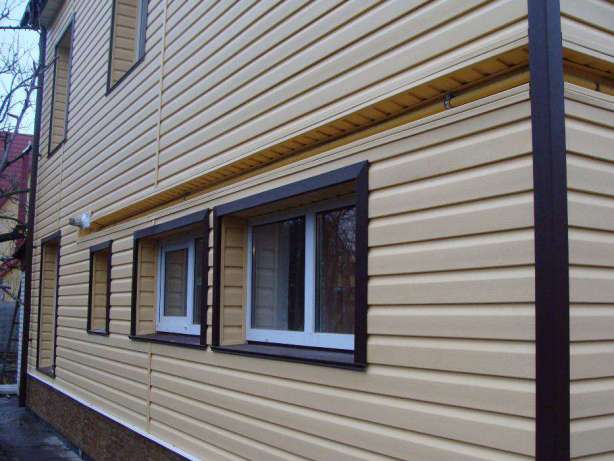
We have facade decoration siding appeared in the 90s and quickly became a hit. Still, a lot of advantages: quick and easy installation, the possibility of insulation, availability and others, gave impetus to the decoration of houses.
But, if everything is clear with the decoration of the external walls (assembly of the frame with subsequent work on the cladding), then what to do with such an inconvenient element as windows? You can't leave it like that, it spoils appearance, using other material is also not an option. How to sheathe a window with siding, and what are the advantages of such a finish?
The advantage of siding slopes
Several types of such cladding are produced:
- Wood. The very first of the invented types, is still being produced.
- Steel (metal siding). Essentially a steel strip, it is a durable and extremely strong siding.
- Cement. It consists of two main materials - cement and cellulose. Does not burn at all.
- Vinyl. 80% of the composition is PVC. The most affordable and most commonly used type of cladding.
Today, metal and vinyl types are most often used. Siding around the window with these materials gives the overall structure of the facade a lot of positive aspects, namely:
- Resistance to aggressive influences environment... Such material does not lend itself to changes in temperature, humidity, even acid rain will not affect the quality of the finish.
- The strength of the elements perfectly resists mechanical stress: shock, bend, rupture.
- Each of the types of siding has its own properties to resist corrosion or decay.
- Metal or PVC, perfectly resists biological influences (rodents and insects are simply not interested in such material).
- Easy installation, and the ability to carry out work at different times of the year.
- The material is completely unpretentious to care and maintenance, and has a very long service life.
- The aesthetic appearance allows you to restore old buildings in a short time.
- Processing does not require the use of special equipment and expensive tools.
Of course, this type of cladding also has its drawbacks, but they are largely reduced to adherence to technologies and installation rules. Ideal building material does not exist, and the window trim with siding has more positive properties, which allows it to be used in different configurations.
What do you need
Installation of siding around windows requires the required minimum of tools and materials.
- Screwdriver.
- Metal cutting tool (scissors or grinder).
- A hacksaw with fine teeth, or a jigsaw.
- Punch. It is used for making holes.
- Level, tape measure.
In addition to tools, you will need to purchase material. At the same time, window cladding with siding is possible in several ways, each of which is applicable for certain sizes of slopes.
- Slopes less than 190 millimeters.
- More than 190 millimeters.
If the openings are less than 190 mm
This is the European standard. In this case, a window siding strip is used. Her design feature in that it can completely cover the plane of the window opening.
Also, in addition to the window strip, you can use a combination of a J-profile and a chamfer, which will also completely cover the window cut.
More than 190 mm

In our country, walls are usually thicker, and as a result, there are wide window slopes... In this case, the siding of the openings is carried out by installing the external corner strips and the J-profile, into which the sheathing strips are mounted.
No slopes
There may be such an option when the window is installed far ahead, and there are no street slopes as such.
Then the simplest finishing method is used, using a casing installed around the perimeter. And already the facade cladding is mounted in it.
Arches
If there is an arched window, then buy a flexible profile. Alternatively, you can mount the J-profile by trimming and bending its edges.
Metal slopes
With wide slopes, you can also revet them using painted sheet metal, which is mounted in the opening with self-tapping screws.
Taking into account the size of the window openings, one or another set of profiles and material is purchased.
- External corner strips.
- J-profiles for creating a bend.
- Window trims.
- Siding on the area of the opening.
- Mounting screws.
Finishing narrow slopes
In accordance with European standards for windows, installation of window strips is carried out along the entire perimeter.
- Measurement of window cuts is made.
- Inside, near the frame, the finishing profile is fixed (fastening is done to the wall surface!) On the left and right.
- The side strips are cut from the top and bottom by 20-30 mm for the installation of the upper and lower flashing.
- The side strips are inserted at the finish profile lock and fixed to the wall.
- The upper and lower ones are trimmed and folded along the cut on the side slopes.
- They are inserted into the lock of the finishing profile and fixed to the wall.
In the future, the facade cladding is mounted in the lock of the window slats.
The second method of finishing, if the slopes are practically absent.
- Make measurements of openings.
- Finishing strips are installed along the perimeter of the inner corner, having previously cut them at an angle of 45 degrees, for docking.
- Corner profiles with the same trimmed edges are installed on the outer edges of the slopes.
- The installation of such corners occurs by closing them into a groove in the finish strip.
Also, in this case, you can make the installation of special platbands, which have a curved edge and a lock for further installation of the facade finish.
And what to do with wide openings, how to install siding on window cuts?
Finishing wide openings
You can also trim wide openings in several ways, which of them to choose depends on the chosen design. The step-by-step instructions are as follows.
Sheet metal finishing
- The first step is to install a street ebb. To do this, measure the length and depth of the opening. The ebb itself should be more than 20 millimeters from the cut of the wall, and wider by 100 millimeters.
- The low tide is trimmed to the right and left, and the edges are folded. It is mounted under the frame, where there is a special groove for mounting. The space under the ebb is filled with foam, and the fastening is provided with self-tapping screws. And be sure to remember about the slope for water drainage!
- An upper ebb is mounted, at which the edges are also cut and bent, but it should not protrude beyond the wall cut. Having made all the bends, it is installed in the opening.
- The framing of the metal window on the sides is installed by making cuts at the top and bottom for the bends of the ebb. The fastening is also provided on self-tapping screws. Also, the lower edge is trimmed taking into account the slope of the ebb.
In no case should such a finish be mounted directly on the frame. All fixing points are on the walls of the house.
Siding decoration
For this method of designing deep window openings, the classic installation of siding strips is used. When assembling the frame for finishing the facade, it must also be mounted in window openings.
The frame is assembled using a rack-mount profile, or wooden blocks.
- The first step is to fix the J-profile in the inner corner near the frame.
- For every outer edge the opening is fixed by the corner profiles. All edges for a beautiful design of the joints, cut at an angle of 45 degrees.
- Cut the siding to the required size. Be sure to take into account thermal deformations, the strips should be several millimeters shorter.
- In the resulting structure from the corner and J-profile, the cut siding strips are inserted, closing them with a lock. In this case, they must be additionally fixed with self-tapping screws in the holes provided by the manufacturer.
Finishing nuances
- Facade siding can be combined with insulation. At the same time, initially, insulation is mounted on the walls and slopes (best of all, mineral wool). After insulation, the frame is compulsorily assembled with a slight deviation from the insulation (ventilated facade).
- If only slopes are insulated, then this is done using mineral wool, or foam plastic having a density of at least 35.
- Self-tapping screws during fastening are not screwed in too tightly, there should be about a millimeter of clearance of the cap from the surface. All fasteners must be galvanized. They are fixed only at right angles and in the provided holes exactly in the center.
- Also, there should not be any gaps between the individual elements, otherwise water will enter the structure, which will soon lead to damage to the entire finish.
- In places with high humidity, mold may appear on the surface of the finish, which must be periodically removed with special compounds.
- Siding strips should not enter the corner profiles with difficulty and without gaps. They are made a little shorter by a few millimeters. These tolerances are made for thermal deformations.
- For the frame, you can use wooden blocks or slats, but in this case they must be well dried and treated with a protective compound against mold.
In general, decorating windows with siding with your own hands does not present any problems, the main thing is the use of materials for their intended purpose and compliance with the installation rules.
On their own, many are confused by whether they will be able to carry out the installation of material around window and door openings. Of course, window siding finishing has its own characteristics, but if you wish, this work can be done on your own.
Fittings for installation
The quality and beauty of the finishing of window and door openings largely depends on high-quality fittings for fasteners. Before finishing the window with siding, when purchasing material, it is advisable to immediately buy the original fasteners offered by the manufacturer of this particular finishing material. It is also advisable to calculate the required number of fasteners in advance.
Calculation of the necessary fittings for fastening the panels
In order not to buy the necessary materials later, besides, it can be difficult to find strips of the same color and the same manufacturer, we calculate the material consumption in advance. To do this, we measure all window and door openings around the perimeter.
Only the distance under the windows is not taken into account, since a window sill and ebb tides will be installed in this place... We add up all the values obtained and take a stock for trimming about ten percent.
Although the price for high-quality elements is rather big, it is not worth saving on this. The beauty and durability of the facing depends on what decorative elements will be used. The easiest way to calculate the required amount of material is if there is a blueprint.
Looking at the cladding scheme, you can immediately determine which fasteners can be replaced with more economical options. And without which you can do without.
Important. Having made the decision to do it yourself, you will also have to purchase the materials yourself. And sellers often try to offer the buyer the maximum number of unnecessary fasteners (this is their job). Therefore, knowing what is needed can save a lot.
Fasteners
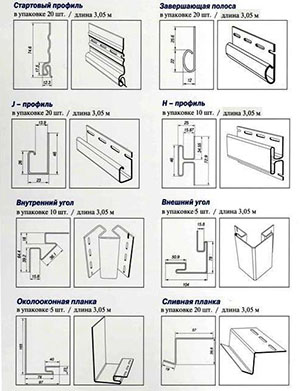
Finishing window openings with siding assumes the presence of the following fasteners:
- H-profile;
- J-profile is a universal element that can be used instead of a window strip and other elements;
- External and internal corner for decorating the joint of panels;
- Finishing bar;
- Chamfer:
- Low tide;
- Window strip.
It is advisable to choose fixing accessories that match the color and texture to the cladding panels. Or, if this is conceived by the design concept, the hardware may contrast with the color of the main trim.
Features of installing siding around windows
Since the architecture of each house is individual, then the window openings can be completely different. The decoration of window slopes with siding and its features depend on the configuration of the window.
There are three main types of positioning windows relative to walls:
- The windows are recessed into the wall by five to nineteen centimeters;
- The window opening is located on the wall without slopes;
- The slopes of the windows are more than nineteen centimeters;
- Arched or lancet window openings.
Naturally, the installation of siding in each of these options will be different.
Slopes around window openings are less than nineteen centimeters
Since according to European building codes slopes are made no more than nineteen centimeters, then the window strip has a standard size - up to twenty two centimeters.
To fasten the window strip at the frame, a finishing profile is used, into which the window strip is inserted. Decorating the window with siding with your own hands using a window strip is not at all a difficult process.
If desired, the window strip can be replaced with cheaper fittings - a chamfer and a J-profile (as you can see, this fastener can be used in almost all window finishes).
Slopes around windows are more than nineteen centimeters
But building standards in Russia differ from European ones, so the slope around the window and doorway can be much more than nineteen centimeters. In this case, finishing with siding of windows involves the use of external corners, which are mounted along the perimeter of the window opening.
A universal J-strip is exposed near the frame, and an outer corner around the perimeter of the window opening. The slope is decorated with cut-to-size siding panels that are inserted into the hardware grooves around the window opening.
Windows without slopes
The easiest option for self-assembly of panels.
For finishing, you can choose a platband with a width of 6.2 centimeters, then the accent in the design of the facade will be placed on the window openings. First, the platband is installed, and the trim panels are inserted into it.
If the design requires an inconspicuous window finish, then it is better to choose a narrow J-profile for attaching siding around windows. When finishing siding of window openings is done independently, then it is quite possible to choose the option that suits the cost and decor.
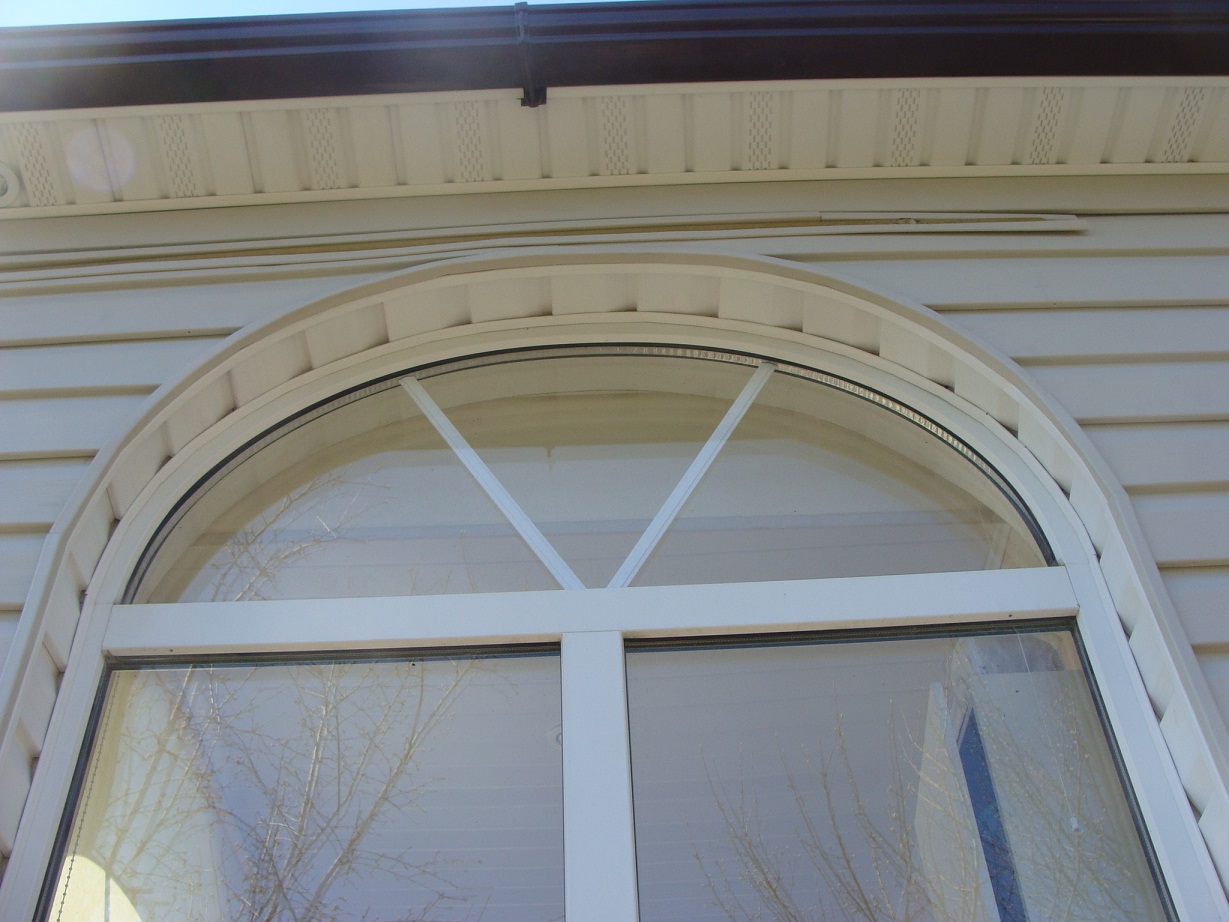
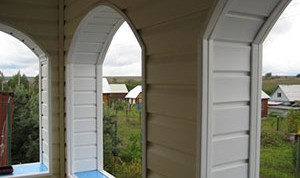
Arched or lancet windows
Siding manufacturers recommend using a flexible J-profile for finishing arched windows, but it is quite possible to replace it with a standard one. Just during installation, you need to cut it a little, placing it around the window opening, as shown in Figure 6.
Important. Arched windows are trimmed with siding with a profile trimming every twenty centimeters. This will prevent the hardware from cracking.
On the Internet, you can find a lot of photo and video materials with step-by-step instructions for installing siding around window and doorways. Therefore, let's pay attention to the most basic principles that should be followed when installing material around windows.
Useful information is contained in the article.
Features of installing siding around window openings
Siding window openings according to the instructions requires the following conditions to be met:
- Fasteners (screws or dowels) must be galvanized to prevent rust;
- The fasteners should not be screwed tightly into the panel, leaving a gap for expansion of the material of one millimeter;
- The fastening screws should be screwed in straight, and in no case at an angle;
- The self-tapping screw should be screwed in clearly in the middle of the hole for fastening in the panels of the material. If this condition is not adhered to, then the panel or fittings can easily crack or deform;
- The corners when connecting the fittings are cut by forty-five degrees;
- The part of the fittings adjacent to the slope is cut at an angle at one docking plank, and wrapped at the other. This is required for a tighter connection of elements, without gaps and cracks;
- For a more durable and reliable fastening under the window, it is worth installing a terminal strip, which will securely fix the panel.
- Since the outside of the finish is exposed to adverse weather conditions (rain and wind), the fasteners must be tightly joined;
We draw a conclusion - decorating the window with siding with your own hands is doable. The main thing is to adhere to the installation instructions and not neglect the basic requirements. When installing the cladding yourself, you can significantly save money and make an original and effective facade decor. There would be free time and a desire to show imagination and creativity.
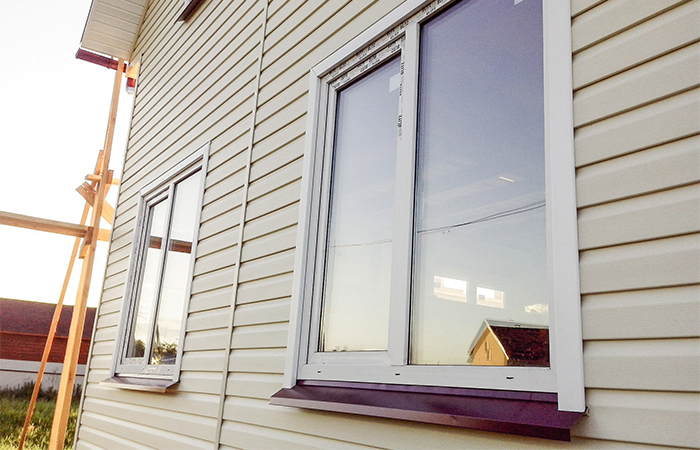
When cladding buildings of any type, it is recommended to use materials that will not only be beautiful, but also strong, durable, and can also protect the building from the negative effects of precipitation, a sharp drop in temperature, etc. Today, siding window trim is more and more in demand.
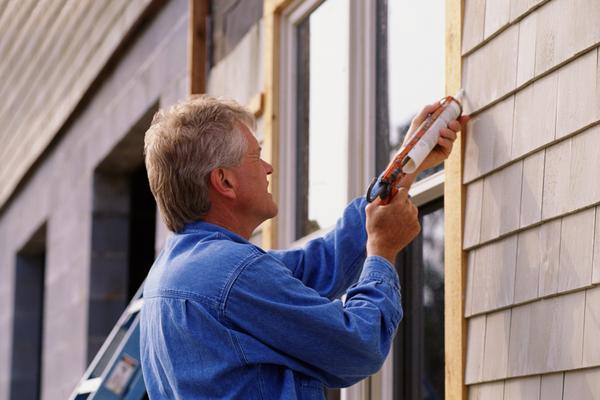
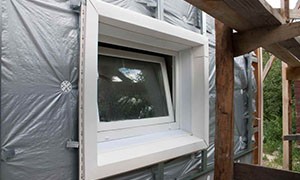
In the photo - the process of installing siding
This article, illustrated with a photo, describes in detail how to decorate windows with siding with your own hands.
The main characteristics of siding
DIY siding window decoration is becoming more and more popular for several reasons:
- acceptable price;
- ease of installation;
- high aesthetics.
It is worth noting the negative characteristics that are inherent in these products:
- relative fragility;
- susceptibility to rust (typical for metal products);
- intolerance to high levels of humidity (typical for wooden products).
Advice. To protect the panels from moisture and corrosion, they can be varnished or painted.
Getting started finishing step by step instructions
Finishing window slopes with siding from the outside is not a complicated process, however, for the successful implementation of this work, you need certain tools:
- hacksaw;
- hammer;
- square;
- level;
- pencil;
- roulette;
- screwdriver or screwdriver;
- self-tapping screws.
Advice. The choice of tool for cutting panels depends on the time of year in which you are involved in the cladding. If in winter, then a hacksaw with small teeth will be optimal, and if in summer, then metal scissors are best suited.
Preparatory stage
High-quality finishing of windows outside with siding involves certain preparatory measures.
They include:
- removal of decorative elements;
- cleaning from old plaster;
- removal of old wooden structures;
- removal of communications - wires, pipes, drains, etc.
Naturally, it is necessary to photograph various large objects - air conditioners, antennas, etc. It is also recommended to clean and dry the surface.
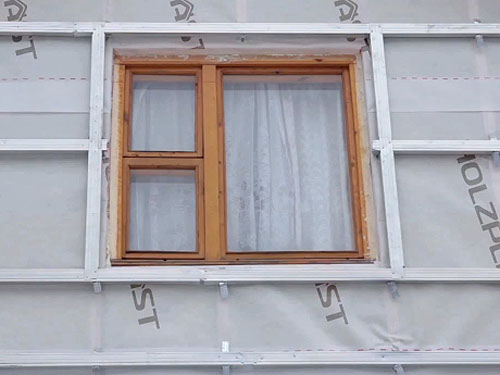
This preparation is especially important if, in addition to windows, you plan to revet the entire facade.
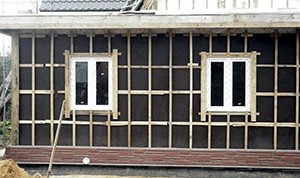
Installing the frame
If you want to know how to trim around the window with siding, then be prepared for the fact that without creating the lathing, it will not work to make the lining.
It is necessary for at least two reasons:
- for simplicity and reliability of fastening the material;
- to ensure leveling of surfaces.
To create a lathing, one of the following two materials is suitable:
- wooden beam with a cross section of 4 by 6 centimeters;
- metallic profile.
Advice. If you use a wooden bar, then before installation it should be treated with a special antiseptic, which will prevent wood from rotting, and also protect it from bugs.
The frame elements are mounted at a distance of about twenty centimeters from each other in a vertical position.
Arrangement of insulation
Finishing windows during the installation of siding involves the arrangement of insulation, which will protect not only the window frame, but the whole house from the negative effects of cold air, a sharp temperature drop.
Advice. To protect the insulation from moisture ingress, it is recommended to lay a layer of film on top.
Since even with the help of insulation you will not be able to avoid the formation of small gaps, prepare a sealant that will increase the waterproofing properties of the entire structure.
If you are cladding a facade
And although the article is devoted to the topic of how to decorate a window for siding, we cannot help but talk about exactly how it costs. Since quite often complex cladding of the entire structure is performed.
Advice. Please note that at least 1500 fasteners are needed for one hundred square meters of finishing. It is recommended to use self-tapping screws, as they guarantee the highest possible fastening reliability and will not damage the panels. Unlike nails.
Well, and most importantly, self-tapping screws will allow you to perform fasteners according to all the rules, which implies a small space "for walking" panels, which will prevent damage to the panels during their thermal expansion or contraction at different times of the year.
Installation of siding is installed strictly from the bottom up and not vice versa, and when you reach the window openings, be ready to cut the panels.
Facing window slopes
According to experts, finishing windows for siding involves arranging a drainage system, which will protect against the negative effects of moisture:
- window;
- frames;
- walls;
- insulation.
The following can be used as a drainage system:
- special drainage;
- a plastic pipe cut in half.
The drain is secured as follows:
- cut the pipe to the desired length;
- bend it around the edges;
- this will create a border;
- the structure should be at a distance of about five centimeters or much more from the wall;
- a little polyurethane foam should be applied to the ledge under the frame;
- apply a drain and squeeze it into the foam until it hardens;
- wait until everything hardens and additionally secure with self-tapping screws.
After the drainage is fixed, you can start installing the slopes, which will be small strips of siding:
- the side parts are started under the upper ones;
- to ensure the most tight fit, the tongue of the top panel is cut at an angle of 45 degrees;
- it is recommended to seal the joints with a sealant.
It is also worth installing an aluminum dripstone, which will protect walls and windows from moisture.
Such installation will provide the maximum level of insulation, protecting the structure from moisture penetration. As you can see, the essence of arranging slopes is exactly the same as wall cladding - the only difference is that you need to pay special attention to the joints.
Decorating arched windows with siding will also not cause problems - you just need to create an arch-shaped lathing.
Installation secrets
There are certain secrets on how to properly trim a window with siding so that the work is done as efficiently as possible ().
Guided by the secrets below, you can make the facing of openings no worse than professional craftsmen.
- Among the variety of fasteners, it is recommended to choose galvanized models that are resistant to corrosion.
- Fasteners, in particular self-tapping screws, are not recommended to be tightened as tightly as possible - there should be a space of one millimeter between the cap and the surface of the panel.
- The screws are screwed in clearly in the center of the panels, which will prevent panels from breaking.
- When joining panels on the same window slopes, they should be trimmed at an angle of 45 degrees.
- Do not forget to install a finishing profile - it will provide maximum strength and durability of the cladding.
- Do the joining as efficiently as possible, tightly in order to avoid moisture penetration into the finish.
Basic rules for caring for siding
In order for the window slopes to retain their unsurpassed appearance as long as possible, it is important not only to carry out the installation correctly, but also to ensure the subsequent care of the material.
In general, siding is unpretentious, and its operational properties are quite high, but do not forget that on the street it will be constantly negatively affected:
- rain;
- snow;
- direct sunlight;
- frost;
- dust;
- wind, etc.
First of all, it is necessary to ensure the washing of the panels, which will increase their durability and operational properties.
For these purposes use:
- warm soapy water;
- a soft bristled brush.
If the contamination is so strong that ordinary soap solution is unable to cope with the contamination, then it is recommended to use the following mixture:
- water;
- detergent;
- trisodium phosphate.
Advice. Do not use solutions or detergents, which include chlorine compounds and organic solvents.
If you live in regions with high level humidity, be prepared for mold. To combat this, you need a 5% sodium hydrochloride solution.
In conclusion
The process of installing siding on window slopes does not require professional skills and abilities from you. Moreover, if you have already dealt with cladding.
In the video presented in this article, you will find additional information on this topic.
Window opening slopes
To finally complete the cladding of the facade, you need to pay special attention to the question of how to sheathe a window with siding. Novice craftsmen may have difficulties in this matter, because it is not so easy to ideally hide the gap with your own hands without experience. This process requires careful measurements and fitting of the frame, so our instructions will tell you general rules how to sheathe windows with siding.
Required tools
For a simpler and better installation process, we need the following set of tools:
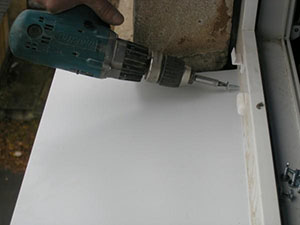
- Screwdriver- indispensable for almost any installation work. It will be needed to fasten the frame, strips and siding to self-tapping screws.
- Standard tools: hammer, square, hacksaw, metal scissors... With a circular saw or jigsaw, work will go faster. It is best to cut vinyl siding for windows with small teeth.
- For marking you will need tape measure, cord, pencil... Required availability bubble level to check a flat plane.
Component elements
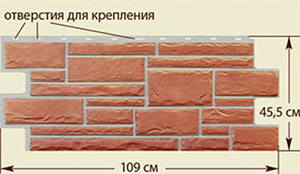
Many types of siding have ready-made solutions of the same color in their collection: ebbs, window sills, corner elements, cornices. Using the component parts, you can make the siding framing of the windows more beautiful and harmonious.
In the photo you can see the popular components for attaching siding:
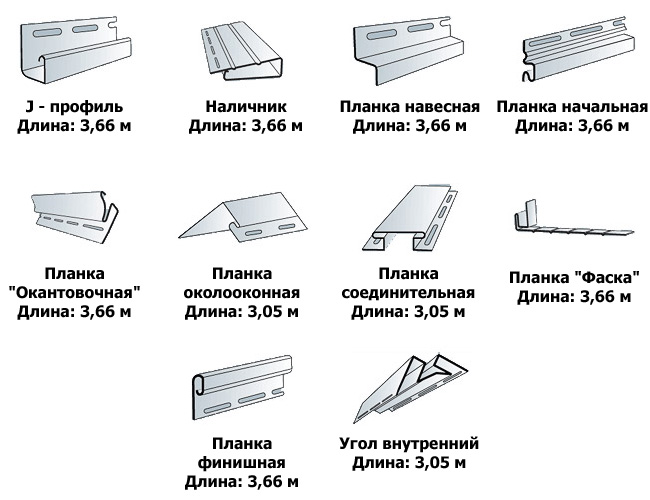
Window siding is made using the following components:
- J-profile is a universal element for fastening many types of corners.
- Finishing strip - attaches close to the frame around the perimeter (except for the bottom). Holds one edge of a window strip or short siding trims.
- Siding near-window profile - fastened along the perimeter of the slopes. It has a length of 3 meters, but it should be taken into account when calculating and buying that it will not work to join their trims, since the seams will be noticeable. Used to design slopes (not to be confused with the J-chamfer, which is needed for filing the roof). One side is inserted into the finishing strip at the frame, while the other is used to attach the siding to the wall.
- Ebb tides - most likely, the standard ones will be installed, which come with plastic windows. They are usually small in width, so you have to buy new ones. They also cannot be joined from the scraps.
- Drain bar - installed to protect the plinth and foundation from water. Fastened over a window, on a plinth or cornice. Usually, ebb tides are used instead, since the drain bar has a small width (4 cm).
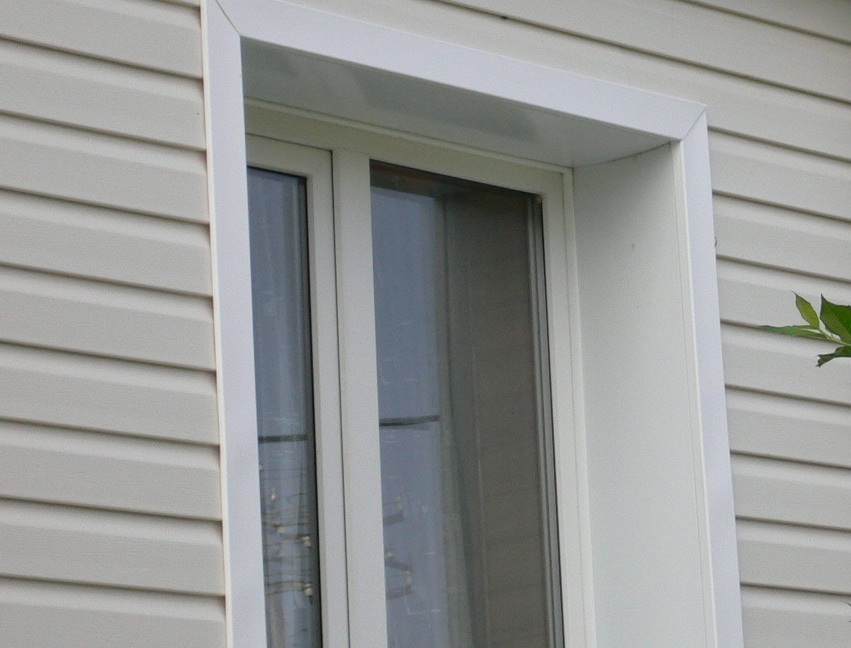
- Platband (wide J-profile) - used if the window is flush with the siding, which is very rare. Installed along the perimeter of the opening.
There are several options for trimming a recessed window:
- Making the slopes with a window strip is easier, but not suitable for every opening width.
- Making narrow trims of siding is more labor intensive, in order to form a slope, you will have to cut narrow trims and insert between two J-planks.
- Use of window frames from OLMA or other manufacturers. For installation, the frame of the opening is first assembled with rivets, and then this box is attached to the walls and the window at the corners.
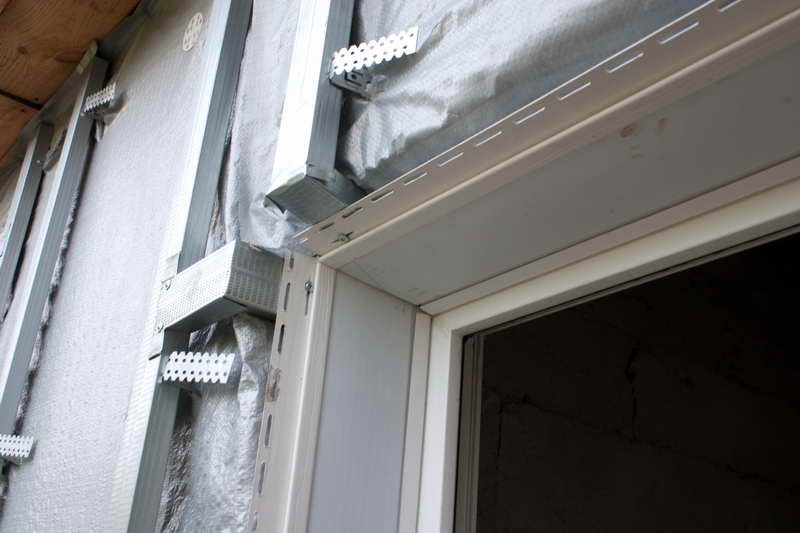
Installation of battens and insulation
To create a frame, it is best to use ordinary 60 * 27 drywall profiles, they are much more durable than wood and the metal is guaranteed to retain its shape when the humidity changes. If you nevertheless decide to use wood, then dry bars 50 * 50, impregnated with an antiseptic, will do.
The profiles are attached to the wall using straight hangers for 2 dowels / self-tapping screws. The lathing should be around the perimeter of all corners, around door and window openings. As with the installation of drywall structures, if you want to fix something on the facade, for example, hang a lantern, then you will need to make embedded profiles in this place.
After creating the lathing in the cells, we glue the insulation on the facade and additionally fix them with the help of umbrella dowels with a large head, 6-12 pieces per 1 m2.
When insulating, be sure to cover the insulation layer with a vapor barrier film. Since the insulation is placed inside the lathing, and the film is attached to it, it will be necessary to create a counter lattice for installing the siding. Thin wooden slats 1.5-2.5 cm are perfect for this, their price is less than metal profiles and they will not be warped over time. If insulation of the facade is not planned, then waterproofing is not necessary, but in wooden and gas silicate houses it is highly desirable.
Note! Siding around the window is not a waterproof material, so the manufacturer does not guarantee its complete waterproofness. In case of oblique rain, moisture can get inside the facade, and if a waterproofing layer is not installed, then the insulation can quickly become unusable.
Fastening siding to the facade
All these layers significantly complicate the framing of window openings with siding, an extra area for cladding is added, since windows are usually obtained in a recess.
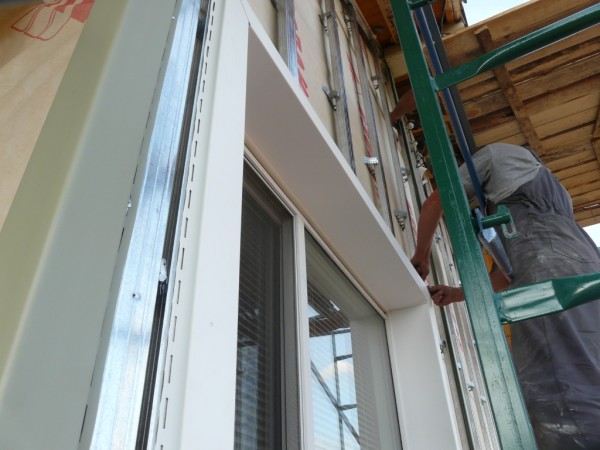
Slope finishing
The installation of windows usually takes place before the cladding of the facade. As a rule, the recess of the window when it is installed is 2/3 the width of the slopes, but when insulating the facade, you can put it flush with the outer wall or a quarter.
In this case, it is important to hide the polyurethane foam in the cracks from the sun, especially if you decide to produce facade work next year. For the design of internal slopes, sandwich panels with a layer of insulation are used.
We will tell you in more detail how window openings are clad with siding if the window is in a recess. This is the most common option, with which problems arise, since almost always a layer of insulation adds the width of the facade.
In order to secure the drainage, you need to trim and bend its edges, creating small curbs so that water does not penetrate into the cracks near the wall. Like window sills, the ebbs should protrude slightly from the outer wall and from the ends should be 5-10 cm wider. As a result, it should not be installed straight, but at an angle towards the street, so that the water slides down unhindered. While the foam is dry, place a heavy object on the low tide.
Close to the frame in the inner corner, a finishing strip is attached on top and on the sides, it should reach low tide from the bottom.
Advice! If window cladding with sidingoccurs on metal profiles using suspensions, it may turn out that there will be nothing to fix the finishing strip along the frame. To fix this, you can make corners from the starting profiles and screw them to the opening.
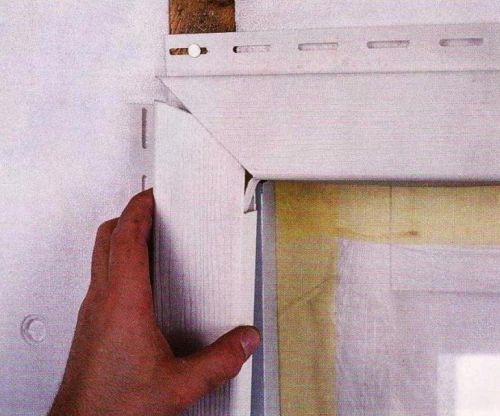
Now you can start installing the top slope from the near-fiber profile or narrow strips of siding. If you have chosen a profile, then we take its length 5-10 cm longer than the opening and cut it in such a way that it overlaps the side walls.
And last of all, we make the side slopes. It is necessary to fix them so as to maximally protect the insides from moisture. Since you made the upper slope wider than the window, we start the side profiles under it so that it covers them.
For a beautiful joining, we cut the tongue of the upper slope at 45 degrees. To make it clearer, see how you can do this in the photo.
Cut off the lower ends of the slopes
BEFORE how to sheathe the cornice with siding without problems! " height = "360 ″ width =" 640 ″ allowfullscreen = "" frameborder = "0 ″>
Decorating a building with siding is one of the quickest and most reliable options. The advantages of this solution are the speed of installation work and the possibility of simultaneous insulation of the facade of the house.
Although technologically the process of such finishing is not complicated in itself, difficulties arise if it is necessary to improve the window and door openings. It is not surprising that window siding decoration requires clarification and a step-by-step description of installation work.
Required set of tools
In order to secure the siding, you need a standard set of tools. It includes:
- Hammer
- Hacksaw for metal. Needed for precise sawing of a workpiece material
- Angle grinder
- Metal scissors
- Gon
- Screwdriver
- Roulette
- Level
- Puncher
In addition to the listed tools, you may need a plumb line and a water level. The standard set of tools is identical to those used when using plastic finishing materials.
Siding window finishing tools
What material do you need?
In order to carry out the decoration around the window openings, you will need special accessories and galvanized profiles. Namely:
- Siding strips
- Outer and inner corner
- J - profile
- Metal profile or wooden planks
- Self-tapping screws and dowels
If euro windows are installed in the house, then installation of ebbs under the windows and visors is not required. If not, then you need to purchase these components as well.
It is advisable to choose fixing accessories that match the color and texture to the cladding panels. Or, if this is conceived by the design concept, the hardware may contrast with the color of the main trim.
Preparation for installation work
 Making slopes is a painstaking work that will require accuracy and precision from the master.
In order for the final result of the work to please, it is necessary to create all conditions for safe and comfortable work. To do this, you need to provide the following:
- Install desktop. Cutting the material on the knee, stool, canopy will definitely lead to chips and defects. Some people use a circular saw for these purposes. It makes a perfectly straight cut, and also makes it possible to cut the workpiece at an angle.
- Prepare all the necessary tools. Everything should be at hand. Practice shows that frequent interruptions in the workflow to find the necessary tool affects the quality of the result and the speed of installation.
- Install window sills. This will allow you to accurately calculate the length of the last strip that fits the window. The distance between it and the ebb should be minimal.
Important! Some siding manufacturers also produce all the necessary fittings for making slopes. So from them you can additionally purchase special ebb tides that will match the tone of the building.
Siding of windows
 Siding is attached to the pre-fabricated grill. This happens in the following sequence:
- The starting strip is fixed on the window openings
- The outer corner is fixed, which, as a rule, has a two-sided notch
- Internal corners are installed at the joints of the abutment between the stripes in the window opening
- Carried out around the window
 It is worth noting that the siding that you have chosen is laid around the window. If you have chosen metal siding, then you need to install it. is no different from the installation of any other. The installation scheme is identical.
If you want to give the house a more aesthetic look, we recommend that you carry out the installation of basement siding with your own hands. reviewed step-by-step instruction its installation.
The installation process itself is quite simple, of course, provided that the lathing for it is made correctly.
How to make a crate for siding?
 Lathing is a series of vertical beams made of wood or metal, mounted vertically on the outer walls of the building. The outer edges of these beams form a "virtual" contour.
The main function of the lathing- support for securing the siding panels. And the smoother this support is, the more presentable the wall sheathed with siding will look like.
The main difficulty that a master performing this work has to face is the need to strictly observe the angles, as well as the horizontal and vertical level. For this, the markup is initially performed, then the rest of the installation work is carried out. They do it as follows:
- Determine the right angle at the bottom of the window opening
- Establish the starting profile according to the marks made
- Starting from the lower dimensions, they make the rest of the markup
- In the corners of the opening, it is necessary to make a kind of corner from the profile. To do this, you can attach the UD and CD profile to each other. Then the inner corner of the siding will lie on this blank.
It should be noted that the installation of siding without the use of lathing is a gross violation of the technological process. The only exceptions are openings with a width of less than 19 cm.
Finishing the window with siding on the crate
If all angles and levels are observed, installation is not difficult. You just need to sheathe the finished window opening with finishing material. Difficulties arise only when it is required to make slopes around arched windows. How do you accomplish this task?
Varieties of the outer corner of the J-profile
 J-profile is a versatile profile used for edging door and window openings.
Sometimes a J-profile is used instead of a start and finish bar.
Depending on the size of the window or door openings and their depth, it may be necessary to use a different J-profile. They are of the following type:
- Double. Placed on the corner. Has two slots for fastening on each side. Used for deep window openings
- Single. This profile is recommended for use in those houses where the depth of the slopes is less than 19 cm.
- Flexible. Such an outer corner of the J-profile is also called arched. It allows you to ensure a reliable abutment to semicircular and round window openings
Siding arched windows
 Installation begins with securing the arched profile. It is fixed quite rigidly with a maximum pitch of 15 cm. The fasteners are completely hammered through the vinyl siding.
At the junction with the longitudinal strip, special recesses are cut out, which, after joining, are fastened with nylon rivets.
Such fasteners are made so that the trimming does not come off over time and does not lose its original shape. The rest of the installation is done in the usual way.
What should be considered when installing siding around a window?
 Siding is a so-called ventilated facade. Its specificity is that under it the house continues to breathe. It leaves its mark on technological process installation.
- The fastening of the starting strip and the corner must be carried out without twisting the dowel to the end. Only the arched profile is fixed by the rigid method
- It is only necessary to cut the workpieces on a special table. It is recommended to use a circular saw
- For deep slopes, lathing is required
Some features apply only to openings with a shallow depth.
What if the slope is less than 19 centimeters?
For the manufacture of such slopes, you do not need to make a crate. It will be enough to secure the outer corner of the J-profile and the starter strip and insert a siding bar between them. This usually gives a rigid mount and does not require additional crate fabrication.
Windows without slopes
For such structures, there is a special one-sided corner. Usually, its width is quite enough for arranging slopes. It is sewn onto a metal profile that is installed around the entire perimeter of the window.
Construction for arched or lancet windows
In such a situation, a special flexible arched corner is used for finishing. It requires rigid fixation with a step of 10-15 cm. The rest of the installation is carried out in a manner similar to the cladding of the walls of a building.
- The last siding strip under the eaves should be mounted only after fixing the finishing profile
- It is necessary to leave a gap of a few millimeters between the corner profile and the ebb. This will take into account possible expansion when changing the temperature regime.
Installation of siding, especially window and doorways, requires a professional approach. Manufacturers provide all the necessary fittings for the work to be done as quickly and efficiently as possible.
Siding window trim video
We bring to your attention several videos that talk about the installation of window openings with siding.