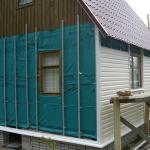
This cladding method is quite appropriate in the case when the house was built earlier and needs repair of the facade, while the base of the walls can be made of various building materials. For example, from foam blocks, reinforced concrete slabs or wooden beams.
What is decorative brick
![]()
To be absolutely precise, this finishing material can be called a brick only with a big stretch, if only because after firing the briquettes are cut into two halves. Accordingly, such a material becomes much thinner and lighter than a full-fledged brick. In all other respects, decorative facing brick meets all the necessary qualities and properties.
Thanks to the huge choice of materials in colors and textures, you can change the design of the entire site by revealing the walls of various buildings with it. Due to its light weight, facing brick does not weigh down the poured foundation and does not require additional reinforcement.
Correct installation of brick cladding

As in other construction work, this technology requires a well-designed technical plan. In this article, a detailed diagram of the installation of cladding works has been prepared. The information provided by construction professionals will help you complete these steps yourself.
Preliminary surface preparation
There will be no problems with finishing the surface of the newly erected building. But if the house was built a long time ago and there are defects and damage on its facade walls, they must be eliminated. First of all, biological contamination from surfaces must be removed. Microorganisms such as molds pose a threat to the integrity of your home. If chips and cracks are found, they must be plastered or putty with building mixtures ( Recommended to read).
Do not forget about such important details as the presence of ventilation holes in the brick wall. This will help to avoid the unpleasant phenomenon - the "greenhouse effect". Thanks to the holes in the facade, the optimal temperature regime of the house will be observed. To do this, it is necessary to leave every fourth vertical layer between the brick without a mounting mortar.
Preparation of mortar
Wherever masonry work is carried out, special attention is paid to the quality of the mortar. For the result to be satisfactory, it is necessary enforce a few simple rules:

- Before you start laying decorative bricks, the mortar must be thoroughly mixed;
- In the process of mixing, it is necessary to strictly adhere to the solution preparation technology indicated by the manufacturer on the product packaging. This will help to achieve its optimal consistency. The solution is applied in a neat even layer;
- The thickness of the joints between brick cladding can vary from 10 to 14 mm.
Important details of the installation work
In order for all the facing work to be performed efficiently, we suggest that you familiarize yourself with the following advice:
- If drops of solution get on the front side of the brick, they must be removed immediately. This procedure will help to avoid additional waste of time and effort on cleaning the facade from the hardened mortar;
- It is necessary to use only high quality mortar in the work. Saving on the mortar mixture, you can face further troubles during the operation of the tiled surface. As a rule, the more expensive the material, the higher its quality indicators;

- The number of bricks for masonry must be calculated in advance and bought in one batch. If you make the calculation correctly, you will not have to buy the missing material, which may differ in color in different consignments;
- To calculate the facing material, it is recommended to measure the area of the surface to be treated and divide it by the area of the brick, excluding the seams. The stock of material should be 10% of the total - in case of battle and marriage.
Facing works

Only after the completion of all preparatory work, including the preparation of the solution, can one proceed directly to the laying of decorative bricks. For a start, it is advisable to conduct a test laying. It will be enough to lay two square meters in order to understand how much mortar is needed, how the seams are filled and how the brick row is laid.
Having found a convenient way of installing a brick, you cannot change its direction. Otherwise, it will not be reflected in the best way on the final result.
Care should be taken to create ventilation openings. It is more convenient to control the thickness of the joints between the bricks using a building level or a simple twine stretched along the wall. Thanks to this tool, you can avoid the appearance of unevenness.
When approaching masonry to window and door openings, it may be necessary to trim the brick. In this case, it is better to purchase a specially designed electric tool. With its help, work will progress faster and be performed better.
Here are some tips to help you with your facing brick work:
- before starting the installation work, it is recommended to lower the bricks into a container with water: the clay briquette will absorb some of the liquid and will not absorb it in large volumes from the solution. From this, the drying time will increase, which will have a positive effect on the strength of the masonry;
- so that the solution does not freeze, all installation work should be carried out at a temperature not lower than +5 degrees Celsius. The use of various anti-freeze additives is not desirable - they reduce the quality of the solution;
- short breaks should be taken during work. This will make it possible to track some of the cladding errors and eliminate them in time.
Brick cladding video
Finishing works

Upon completion of the installation work, the facade needs the final stage of finishing. First of all, the front surface of the brick is cleaned of mortar residues and other contaminants. Then the facade is treated with a special acid solution. It will clean the pores of the brick from dirt and wash away the salt protrusions on its surface. At the very end of such work, you can process the seams between the bricks with decorative plaster. To do this, remove 2 cm of mortar from the joints and apply plaster in its place.
In contact with