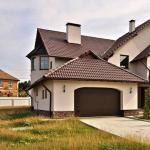
The exterior of a construction project is the factor through which one or another impression is formed about the house. That is why the technology for plastering facades must be selected so that the result of finishing work is aesthetically attractive.
However, in addition to aesthetic appeal, the exterior of a construction project must be resistant to the negative effects of such environmental factors as precipitation, temperature changes, UV radiation, etc.
This time we will look at what and how to plaster the facade so that the exterior of the house meets the previously listed requirements.
Types of facade plasters
In accordance with the purpose, the exterior finishing of a construction project is divided into the following types:
- ordinary (leveling) plaster- is a budget solution in which a layer of finishing material compensates for unevenness in brickwork, concrete slab, etc.;
- , which is used as a finishing touch for a pre-prepared façade;
- special plastering, thanks to which the façade acquires additional heat-insulating, hydrophobic or fire-fighting qualities.
Let's consider each of the listed categories and, based on this review, we can decide which finishing option is optimal.
Leveling finish
![]()
To perform leveling finishing, cement-sand mixtures (CSM) and mixtures made on the basis of cement with the addition of lime and a number of polymer components that increase the strength qualities of the coating are used.
In some cases, to prevent cracking of the finish, polymer fiber may be mixed into the DSP. These polymer fibers perform a reinforcing function, which is important if the construction site is subject to shrinkage processes.
Depending on the dimensions of the surface to be finished, the mixture can be applied manually or by machine.
Among the advantages of leveling finishing, we note the following:
- low price, since the mixture can be used either purchased or made with your own hands;
- short deadlines for completing plastering work, so finishing in most cases is applied in one layer;
- the ability to align walls according to beacons, which greatly simplifies achieving the optimal result even when doing the work yourself.
Among the disadvantages of this type of finishing are low functionality and unattractive appearance.
Decorative plastering

Applying a decorative coating to the facade of a building has minimal practical benefit, and therefore, most often, it is applied on top of a pre-made layer of rough plaster.
As a rule, the price of materials used for decorative plastering is slightly higher than the cost of conventional DSP. This is explained by the fact that decorative mixtures include ingredients such as ground marble, various colors, etc.
Certain methods of decorative design of the facade make it possible to give the surface of load-bearing walls the appearance of brick or stone masonry. For these purposes, ordinary cement mixtures are used, which are molded with special polyurethane dies.
Budget decorative plastering is performed by spraying painted DSP onto a pre-leveled surface. This method has been widely used for a long time, due to its simplicity and the absence of the need for an expensive tool. If the finishing work is carried out correctly, the exterior of the building will look very attractive.
Special plastering

It is no secret that load-bearing walls built from conventional building materials do not have ultra-low thermal conductivity and are not sufficiently resistant to precipitation. Special plastering will help compensate for these shortcomings. But the technology of facade plastering is not universal, and therefore some methods will be relevant to reduce the thermal conductivity of walls, and others to increase waterproofing.
So, we found out what the exterior finishing of construction projects can be like. Now let's take a closer look at the implementation features of the listed methods.
Leveling plastering technology
Finishing of the facade using DSP is carried out in accordance with the steps listed in the following diagram.

Surface preparation involves identifying and dismantling coiled fragments. Subsequently, the surface is dust-free and, if necessary, primed with a deep penetration primer “Betonokontakt”. The need for priming may be due to insufficient density and friability of the surface.
Depending on the thickness of the plaster layer, the use of reinforcing mesh may be required. As a rule, the mesh is stuffed if the layer thickness is 10 mm or more. If previously metal mesh was used for such purposes, today flat welded or polymer mesh is used. The refusal of the chain-link is due to the need for the subsequent installation of metal guides.
Installation of lighthouses is a very important and responsible stage, since the quality of the finish, the degree of evenness of the walls and the consumption of finishing material will depend on it.
Beacons are selected in accordance with the expected thickness of the plaster layer.
Tip: You can determine the expected thickness in accordance with the curvature of the wall. That is, the layer thickness should be equal to the maximum difference in wall level. The curvature is determined by a plumb line or a long rule with a built-in water level.

We install the beacons vertically, starting from the most protruding part of the surface. We fix the first beacon according to the level and set the remaining beacons in accordance with it.
To make it easier to install the guides, in addition to the level and plumb line, you can pull the cords from the initially placed outer beacons and install intermediate guides along the cord. On average, the distance between beacons should not exceed one meter.
Tip: Lighthouses are usually secured with dowels or cement mortar. The first method is labor-intensive, and the second is inconvenient, since the solution takes a long time to set.
We recommend installing beacons on alabaster mortar. We attach the guides with the expectation that the solution decreases in volume when it dries, so we put a reserve solution under the beacon. We place the lighthouse fastenings to the wall at a distance of no more than 0.5 m from each other.

Making a solution from the finished mixture involves mixing with the required volume of water and thoroughly mixing. As a rule, the manufacturer indicates the proportions and preparation details on the packaging.
Self-preparation technology
- We dry and sow sand;
- Mix dry cement and sand until smooth;
- Add water to the mixture and mix thoroughly until smooth.

- to sift sand, you can make a plank frame onto which a painting mesh with a mesh size of 3 * 3 mm is stuffed;
- proportions for making CPSP with your own hands: 1 part cement to 3 parts sand;
- when mixing the components, we determine the consistency of the color, which ultimately should be the same throughout the entire volume;
- for high-quality and intensive mixing of ingredients, it is advisable to use a mechanized mixer;

- if there is no mixer, the solution is mixed in a clean trough with a shovel and glander;
- The consistency of a properly made solution should be such that the material does not fall off or drip, but gradually slides off the trowel.

Technology for sketching and leveling mortar
- We moisten the wall with water;
- Holding the trowel in your right hand, we fill half of its working part with mortar;
- We make a ping-pong movement with the trowel and thus throw the material onto the wall;
- We throw the solution into the gap between adjacent beacons from bottom to top, approximately to a height of 1 meter;

- We apply the rule to the beacons at the bottom of the wall and move upward, collecting excess material;
- Shake the solution from the rule into a bucket and mix with the rest of the material;
- We continue sketching and leveling until the entire wall is ready.

After the wall is plastered and the mortar has not yet begun to set, we grout. We rub the surface with a foam float, periodically wetting the surface to be treated with water from a spray bottle.
Tip: If plastering is carried out in the summer, the wall can be covered with cellophane film while it dries. This way you will prevent cracks from appearing. If there is not enough film, regularly moisten the surface with a spray bottle.
After the plaster has completely dried, the surface can be primed with “Betonokontakt” or similar strengthening impregnations. After the soil has dried, the wall can be painted with one or another type of facade paint.
Characteristics of plaster mixtures and selection of tools
The table lists the comparative characteristics of the materials
BROZEX SAND CONCRETE M-75 is a dry mixture made from Portland cement, purified quartz sand and a number of fillers that ensure high density and elasticity of the solution.

The material has the following characteristics:
- compliance with the requirements of GOST 28013-98;
- high strength and resistance to delamination;
- frost resistance - F100;
- high structure density and, as a result, resistance to precipitation;
- maximum particle size no more than 3.2 mm;
- Possibility of application with a layer thickness of 10 mm;
- consumption when laying a layer 10 mm thick is no more than 20 kg per 1 m²;
- the volume of water when mixing 1 kg of mixture is no more than 0.22 l;
- suitability of the finished solution for use within 2 hours;
REAL M150 is a dry mixture made from Portland cement, lime and purified quartz sand. Externally, the material is a loose, homogeneous mixture of light gray color.

Among the main operational and technical characteristics, we note the following:
- maximum filler grain size - no more than 2.5 mm;
- adhesion of the solution and the base to be finished - not less than 0.5 MPa
- permissible base temperature - from +5°С to +30°С
- possibility of application in a layer thickness from 6 to 20 mm;
- possibility of applying a layer up to 50 mm thick when sealing cracks and small reliefs;
- consumption when laying a layer 1 mm thick - no more than 2 kg per 1 m²
- The ready solution is ready for use within 30 minutes.

Among the wide range of tools we will need the following:
- mixer or container for preparing plaster mortar;
- plaster trowel (trowel) 175-200 mm;
- narrow spatula;
- plastering rule length 1.5 meters;
- water level;
- foam grater;
- spray.
Decorative plastering technology (bark beetle)

“Bark beetle” today is the most common and popular method of finishing a facade.
Important: Please note that decorative plastering in most cases is finishing. That is, initially the surface must be leveled using DSP to a perfectly flat state and primed with “Betonokontakte”.
To decorate the facade with bark beetle, a special mixture is purchased. The difference between this mixture and conventional putties is that marble chips are added to the composition, thanks to which during the grouting process we obtain a characteristic pattern.
Decorating using the “bark beetle” method is carried out in accordance with the following scheme.

Step-by-step review of plastering using the bark beetle method
The finished bark beetle mixture is sold in sealed plastic containers. Before use, the mixture must be thoroughly mixed so that the marble chips are evenly distributed throughout the entire material.

At the next stage, use a narrow spatula to apply the mixture onto the trowel and apply it to the wall, moving away from you. Remove the remaining material from the trowel, dump it into a bucket and mix.
We level the applied but not dried mixture with a trowel, removing excess solution. Remove the excess from the trowel into a bucket and mix.

After the surface is leveled, wait 3 to 5 minutes and begin grouting with a plastic float. Use a grater to make vertical, horizontal or circular movements with medium pressure. We try not to stay in one place for a long time. As soon as the picture appears, we move on.
Popular varieties of bark beetle plaster mixtures are presented in this diagram.
In addition to the mixtures listed, you will need the following tool:
- narrow spatula;
- stainless steel trowel, length at least 35 cm;
- plastic plaster float.
Decorative plastering technology using polyurethane printing stamps

The finishing of the facade can be done using DSP and printing stamps made of polyurethane.
Printing stamps allow you to make an imprint on wet plaster that imitates brick or stonework, wood texture, etc. The method is universal, as it allows you to finish the exterior completely or in separate parts.

The instructions for finishing work consist of the following steps:
- surface preparation;
- preparing the solution;
- applying the solution to the surface;
- formation of texture using a stamp;
- drawing the texture manually;
- painting the trim.
Step-by-step review of plastering using polyurethane stamps
Surface preparation consists of removing dust and moistening with water from a spray bottle immediately before starting plastering.
- 1 part cement;
- 4 parts dry seeded sand;
- fiber - 5% of the solution volume;
- plasticizers - in accordance with the manufacturer's instructions.
The solution is thoroughly mixed until a homogeneous consistency is obtained. Apply the finished solution to the surface in a layer no more than 2 cm thick. At a time, apply the solution to a surface with an area of no more than 2 m².

We wet the inside of the stamp and apply it to the wet plaster. We beat the stamp by hand to get a relief imprint. We remove the stamp, re-wet it and make an impression further.
The finished print can be corrected with a narrow spatula or knife if individual parts of the design are not pressed in enough. After the finish has completely dried, the surface can be painted.
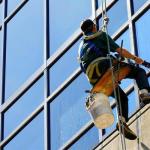
Technology of decorative spray plastering (fur coat)
Perhaps this is the simplest instruction, according to which you can carry out cosmetic repairs to facade plaster.

The essence of the process is that a small broom or brush is dipped into a specially prepared cement-lime mortar. Next, as shown in the diagram, we hit the hand or some object with the brush and splashes of the solution in one quantity or another fall on the surface of the wall.

If time is valuable to you and you want to simplify your work, you can use a mechanized device for finishing the facade using the spray method. A manual machine for applying plaster is a body with a handle and a funnel. The solution is poured into the funnel while the handle rotates. As a result, splashes fly out of the nozzle and settle in an even layer on the surface being treated.
![]()
The price of the device in various stores ranges from 500 to 750 rubles. More expensive modifications are equipped with replaceable brushes, so you can change the droplet size.
Important: Applying plaster using the spray method can only be done on a pre-leveled surface.
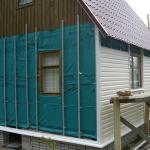
Technology of façade plastering over thermal insulation
If the thickness of the load-bearing walls is less than 40 cm, there is a high probability of freezing during the cold season. As a result, damp spots will appear on the inner surface of the walls and within one or two seasons you will be forced to fight mold.
Of course, freezing and subsequent thawing negatively affects the structure of the building materials from which the walls are erected. The most effective solution to the described problem is to insulate the walls using polystyrene foam boards and subsequent plastering.
The stages of plastering over thermal insulation are listed in this diagram.

Let's consider the above points in more detail. The surface intended for plastering is a wall covered with foam plastic. Our task is to protect the thermal insulation material from the effects of environmental factors and at the same time cover the gaps between the slabs, which act as cold bridges.
Plastering on polystyrene foam - a step-by-step overview
We lay a polymer reinforcing mesh with a cell size of 5*5 mm on top of the slabs. We fasten the mesh with special dowels, the seal of which ends in a wide plastic cap.

Then we prepare the plaster solution. Tile adhesive can be used as a dry mixture for external work. This mixture is characterized by high strength and resistance to cracking. The only drawback of tile adhesive compared to conventional DSP is its high price.

Using a narrow spatula, spread the prepared mixture along the edge of a wide spatula and press it into the mesh, leveling the layer over the surface. After the entire surface is covered with mesh and plastered, we proceed to grouting.
Grouting is done with a foam float, which is carried over the surface in a circular motion with gentle pressure. For greater efficiency, we moisten the plastered surface with water from a spray bottle from time to time.
After finishing the grouting, we wait for the façade finish to dry, after which the surface is primed and painted with special paints intended for exterior work.
Conclusion
So, we looked at the current methods of plastering the facade and how to implement them. In addition, we learned what materials are appropriate to use for these works.
You will find additional details by watching the video in this article, after which you can leave your comment about what you read.