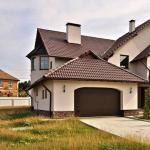
The construction of country houses is gaining momentum every year. As the main building material, the following are mainly used: bricks, floor slabs, FBS and, of course, aerated concrete blocks.
The aerated concrete block attracts with its low price, availability, ease of processing.
According to its external characteristics, it is a porous body in the form of a rectangular parallelepiped.
The porosity gives lightness, which is undoubtedly its huge plus. But at the same time, an equivalent minus appears - poor moisture resistance.
That is why aerated concrete walls are plastering inside and outside the premises. In the case when it is the only and main building material.
Also, aerated concrete is used in tandem with facing bricks, where the latter plays the role of a protector against moisture. Plaster for aerated concrete is selected with special diligence, because it should not only preserve the advantages of the material, but also strengthen them with its qualities.
So, for example, aerated concrete houses have a very good microclimate, which is comparable to a wooden house. From the outside, it absorbs oxygen, and inside it removes excess moisture. Therefore, it is important to maintain the vapor permeability of the material.
What is the vapor permeability of aerated concrete.

The ability to establish the processes of recoil - the reception of excess moisture in the external atmosphere, and the internal microclimate of the house, is called - Vapor permeability.
The importance of this parameter cannot be overshadowed. Therefore, you should be especially responsible for the selection of aerated concrete plaster for interior decoration and exterior work.
There are many tables on the Internet, in which all the necessary numbers can be examined in detail and applied to yourself.
Water vapor permeability is also called “breathing” of walls.
If "breathing" is impaired, then there are consequences:
- cracks inside and on the external facade of the building;
- manifestation of traces from masonry in rain or fog;
- increased humidity in the room;
- the growth of mold in the corners of the rooms.
 Do not confuse aerated concrete with aerated concrete. Despite the external similarity, these are completely different materials, the properties of which are very different.
In the structure of foam concrete, air bubbles do not combine, which contributes to its increased resistance to wetting. As a result, the qualities of thermal conductivity and frost resistance increase.
While in aerated concrete these bubbles are interconnected, moisture can move freely along them, giving off heat or freezing from frost. Therefore, it is important to plaster walls made of aerated concrete indoors and outside on the facade of the house.
Primary tasks for priming walls.
Once again, we emphasize that aerated concrete is different from foam blocks. Internal and external aerated concrete plaster is complicated by the presence of pores. The fact is that aerated concrete was originally planned as a material for wall insulation. Therefore, he was not asked additional qualities. The priming of aerated concrete in front of the plaster is complicated by the increased absorption of the walls.

Therefore, it must be primed twice or three times before plastering. The primer significantly increases the adhesion of the plaster to aerated concrete, reducing the likelihood of fungus.
There are no problems with the choice of primers today, there is a wide range of different options in stores. Therefore, to the question - "how to prime aerated concrete before plastering?", There are many options for implementation from different manufacturers.
Consider a three-layer primer. At the first application, you need to dilute the mixture with water in a ratio of 1: 4, as a rule, the instructions are on the package. This is done to reduce the consumption of the mixture. At the first coating, the pores of aerated concrete will change their properties by absorbing the mixture.
The second and third application will be less costly.
The second is diluted in a smaller ratio, applied in the same way after the previous one has dried. The final third stage is soil made with an undiluted composition.
When aerated concrete walls are plastered indoors, there is a technique of knocking down pieces with a hammer (frequent notches are created on the plane), for better bonding of materials.
Do you need a mesh when plastering aerated concrete? Aerated concrete house facade plaster can be pre-reinforced with a reinforced mesh. Often it is simply necessary to do this. In this case, the plaster is applied over the mesh without using a primer.
Additional vapor barrier for aerated concrete.

To reduce the poor properties of aerated concrete, some customers require additional vapor barrier. In this case, the technology of plastering walls made of aerated concrete changes slightly.
The first method is to lay a plastic wrap between the blocks. If the technique is violated, then there is the likelihood of increased condensation, entailing flaking.
The second, higher-quality method, plastering walls from aerated concrete indoors and outdoors with a cement-sand mixture, without the use of dolomite flour and lime additives. This option will reduce the vapor barrier tenfold, but the likelihood of delamination is still present.
The highest quality method, the use of modern solutions for vapor barrier. They are able to improve the quality of aerated concrete walls by 25 times. For this it is necessary to cover the blocks 3-4 times.
If you cover the wall with oil paint after plastering, the vapor permeability will be further reduced.
Aerated concrete plaster for interior work.
Remember to start finishing inside. This is due to the different moisture content of the blocks for the inner and outer walls. Therefore, it is worth starting with plastering the walls of aerated concrete inside the room. During this time, moisture will be released through the outer wall. When building a house in the summer, it is recommended to leave it for the winter to equalize the moisture balance.
Let's start the step-by-step process of internal plastering of aerated concrete house. First you need to knock off excess glue and slugs from the wall, thereby leveling the surface. Chips need to be cleaned.
The first stage is surface priming. It needs to be selected based on the room to be finished. In stores, you will find coating mixes in the kitchen, living room or bathroom. There is a special primer for rooms that are not heated.
It can be applied using a simple roll or brush. To simplify the process and accelerate, you can use a spray gun.
 The second stage is the placement of beacons. These are special profiles that allow you to easily level the wall coverings. You can read how to choose them in the article -.
They are placed parallel to each other along the width of the rule. This is done so that in the future you can easily slide over them, removing excess from the surface of the wall. Beacons are attached with putty.
Note: Be sure to check the correctness of the placement of the beacons using a vertical level, a small mistake here will lead to the curvature of the wall in the future.
 The third stage is pouring in the solution by hand or by applying (significantly speeds up the process). Average thickness 4 - 8 mm. In case of unevenness, the layer may be slightly larger in some areas. It is not recommended to apply a large mass of the composition at a time, this may lead to collapse.
Internal plastering of aerated concrete is carried out sequentially, from bottom to top, stretching out the excess plaster as a rule. Prevent material flaking and seal voids in a timely manner. Compaction of the composition should be up to 2-3 mm.
The fourth stage is leveling the dried surface with a spatula. This is done in a circular motion with the flat side of the tool. By leveling the surface in this way, beacons are removed. The recesses remaining after them are smeared over. Having completed on one site, they move on to the next, using the same beacons.
If the corner of the room is leveled, then the beacons can be left before it is aligned on another wall. The corner joints of the wall are especially carefully leveled, because the unevenness here is visually more noticeable.
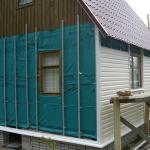
Plastering the facade of the house from aerated concrete.
The internal plastering of the aerated concrete house is completed, we proceed to the external one. The procedure is similar in work inside, but has its own specific features. So let's get started:
The first step is to prime the exterior wall. A strengthening hydrophobizing composition containing acrylatesiloxane is used. Such a coating can protect walls from excessive moisture for a long time. The wall outside, as well as inside, is cleaned from irregularities and residues of glue and mortar that holds the blocks together. The seams are closed in advance. The work is carried out at 10 - 20 degrees above zero.
 The second step is to install the fiberglass mesh for the reinforcement. It is recommended to use alkaline meshes, they have a high PH. That allows them to stay in the wall for a long time without dissolving. In the future, this precaution will protect you from cracking. Of course, the price of such nets is higher, but it is justified by the fact that it will save much more money in the future. The mesh is attached to the outer wall with simple self-tapping screws.
 The third step is facade aerated concrete plaster, applied with a thickness of 7 - 9 millimeters.
The plaster used must be flexible, adherent, economical (low consumption) and easy to apply. Once completely dry, it should repel moisture. Than keeps warm in the house and acquires resistance to frost.
The application process itself is similar to the inner coating. It will be much more convenient to apply using mechanical equipment. Moreover, there is more than enough space outside.
After leveling the coating and waiting for it to dry completely, you can proceed to the final stage, decorating the facade.
The fourth step is decorating and adding beauty. As a decoration, you can use special paints or decorating plasters. Fortunately, there are a lot of them on the market. Which plaster is better to plaster the walls of aerated concrete, only you decide.
You can use a pebble, textured fur coat and bark beetle with effects, or any other. Exterior plaster for walls made of aerated concrete will only benefit from this.
Types of coatings for facade decoration.

Of course, first of all, the plaster of aerated concrete walls outside the room should be:
- vapor permeable;
- frost-resistant;
- crack-resistant;
- with good adhesion.
The best option is considered to be a solution of lime with sand and a low cement content (less than 6% of the total mass). There are also ready-made compositions of lightweight plaster for these tasks.
- - used both inside and outside the house. It is used to reinforce elements with increased stress, for example, a base / plinth. It is used as a decorative type of application. For a long time it keeps its color gamut and invariable texture. It has good adhesion, but the vapor permeability is not very high. Therefore, if the choice fell on her, it is necessary to initially carry out waterproofing.
- Silicate - based on liquid glass. It differs from the previous version in excellent vapor permeability. Besides, its price is very interesting. There are many different textures to choose from with scratches, roughness or pits. It is used in works when plastering external and internal walls on aerated concrete. Disadvantages, strong deposition of dust and dirt on the surface and limited color gamut. It is applied both to the aerated concrete itself and to the insulating elements.
- Silicone plaster is truly the solution to all problems. The exterior decoration of a house made of aerated concrete with this type of plaster has many advantages, but it will be attractive only for the smart and calculating. Its cost is much higher, but it will surely pay off over time. As you know, the miser pays twice. It is based on organic silicon. Has a high vapor permeability, not easily soiled and with a wide range of colors.

The solution adheres more reliably to blocks with roughness;
They are prepared in a cutting way. Facade plaster for aerated concrete is much better to lay on them.
on the outside and inside, the ratio of the layers must be correct. Moisture should not be retained by the outer layer, free air circulation is important. If condensate accumulates there, then with temperature drops, the liquid will begin to freeze and expand, which will inevitably lead to cracking;
the first coating should be carried out with a thin spray and only after that the base coat is applied. So the grip goes much better.
How much materials and work cost.
There are many dry mortars on the market today for external plastering of blocks. And at first glance, it is difficult to figure out which plaster is better for aerated concrete, but when you look at it, everything is not so scary. One of them is "Pobedit" plaster for aerated concrete. It is a multicomponent dry mixture based on binder cement, lime, various additives and fractional quartz sand. It should be remembered that aerated concrete plaster for outdoor use must have special qualities, which are described above.
Bathroom plaster, options and application features Cement-sand plaster for interior and exterior use