- scissors for cutting metal. This tool assumes using the method of cutting the panels from the top, from the mounting holes. Curly cutouts are made with scissors if openings in the form of arches are faced with siding;
- hacksaw for metal and wood with small teeth. It can be replaced with an electric saw;
- knife-cutter, with which lines are outlined on the siding panel. According to this outline, the material should be bent and unbent until it is divided into elements.
Additionally, siding installation requires:

- hammer;
- screwdriver;
- square;
- level (1.5 m long);
- water level;
- chalk and twine;
- mounting screws.
With the help of a square, the angles of installation are marked for even fastening of siding panels on the slopes of the window and around it.
Fasteners must be of a certain size. So, the length of self-tapping screws is optimally 25 mm, the diameter of the head of the self-tapping screw and fasteners is 10 mm. With these parameters, the installation of siding panels is easy.
Preparation of accessories for installation
In order to correctly mount siding panels for external facing of window openings, it is necessary to ensure that there are guides from a metal profile and accessories.

For cladding window openings, J-type load-bearing metal profiles should be prepared. In order to avoid distortions during the installation of siding, the rail must be installed along the entire perimeter of the window opening.
If the finishing work will concern windows with slopes, double-sided corner profiles will come in handy.
Preparatory work before installation
Before starting work on the installation of siding around window openings, you must first remove the platbands and protruding parts that may interfere with the installation work. It is also recommended to thoroughly dry the surface to be treated and slopes, and if necessary, then level them with plastering. Usually the windows have large slopes, therefore it is always necessary to install double-sided corner profiles. Their competent installation involves preliminary leveling of the surfaces of the slopes with a plaster solution, and then coating with a deep penetration primer with water-repellent properties.
Video instruction for the installation of siding panels and platbands around the window
Step-by-step implementation of the installation of siding around windows

In order to cover window openings with siding without any particular difficulty, it is recommended to seriously approach the study of installation technology. To help novice finishers on the Internet, there are videos and photo galleries with step-by-step instructions that will help you avoid making mistakes and get the desired result.
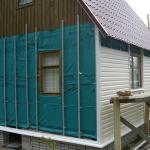
At the first stage, the lathing frame is installed, on which the siding panels will be attached.
Installation of the lathing
The supporting frame for siding should be installed around the perimeter of the window opening. First, the markings are performed, on the basis of which the lathing will be attached. To do this, you need to prepare:

- square with a right angle;
- chalk and twine, with the help of which measurements are beaten off;
- a level of sufficient length required to align the framing elements;
- water level, with which the upper and lower levels of the J-type structural profile are marked.
It will be useful for you to learn also about on our website.
It is important not to make a mistake in marking right angles and skipping lines horizontally and vertically, otherwise it will not be possible to install the frame correctly.
Installation of siding panels around windows without slopes

If the windows of the house are made without slopes, the technology for installing facing siding is as follows:
- First of all, measure the distance under the window opening, then add a margin of 0.6 cm to this value.On the panel that will be attached to the bottom of the window, cut a length that exceeds the original value by the same amount.
- A gap is made using scissors for cutting metal.
- Before installing the bottom panel, it is recommended to first attach the J-type support profile, and only after that insert the siding panel into its grooves. This will make the appearance of the cladding more attractive.
- The next panel is installed flush with the window frame.
- The next step is to install panels above the opening and on both sides.
Find out all about in addition to the current article.
Features of the installation of the outer corner of the J-type profile in the facing of windows with slopes
The facing of window openings with slopes has its own characteristics. Initially, an external double-sided corner metal profile is installed at the corner of the window slope, into which the siding panel is subsequently inserted. When installing this profile, you should pay attention to the location of the fasteners strictly in the center of the technological holes, otherwise there is a risk of deformation of the profile.

Facade treatment with water repellent
A supporting J-profile is mounted along the perimeter of the window opening. Siding panels cut to the size of the window are inserted into the grooves of the already installed profiles. On slopes, horizontal arrangement of panels is recommended - this will increase the strength and reliability of the structure.