But if such wetting occurs in the winter, then this can lead to the development of a destructive process. The fact is that when freezing, water tends to expand, and therefore small cracks will appear in the blocks, which will not only spoil the appearance of the facade, but also significantly weaken the supporting structure.
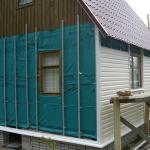
The process of preparing walls, from gas silicate or aerated concrete blocks, for applying cement-based plaster
Facade plaster - the best choice for aerated concrete
Of all the options present on the modern construction market, it is facade plaster that is exactly the material that best meets the technical characteristics of aerated concrete. It has optimal vapor permeability, has excellent adhesion and attractive appearance. Therefore, such aerated concrete plaster will be the best choice for finishing walls made of gas blocks.
Consider its main advantages over analogues:
- High rates of vapor permeability, which allows gas blocks " breathe».
- The minimum amount of water required to mix the mixture. This indicator should not exceed 0.2 liters per 1 kilogram.
- Resistance to low temperatures.
- Excellent adhesion.

- Crack resistance.
- Long viability of the solution.
Which plaster is not suitable for aerated concrete and why

One of the most popular types of plaster is a cement-sand mixture. However, it is completely unsuitable for working with gas blocks. Regardless of what material the blocks themselves were laid on (adhesive mortar or cement), the use of this finishing material is unacceptable for the following reasons:
- The vapor permeability of cement is lower than that of a gas block. This is the main reason why this type of plaster should be avoided.
- Moisture content is also an important indicator for gas blocks. In a cement-sand mortar, it is increased, since for its mixing it is necessary to add a fairly large amount of water. Since aerated concrete is characterized by high moisture absorption, it will absorb water from the solution, which can not only destroy the structure of the blocks themselves, but reduce the quality of the plaster solution.
- Cement mortar is characterized by low adhesion. This is due to the large weight of the solution and the presence of large impurities in its composition.
Gypsum plaster is a good option for plastering aerated concrete walls. But at the same time, it has a number of disadvantages before the facade:
- The vapor permeability of such compositions leaves much to be desired.

The manifestation of white plaque - efflorescence
- When it snows or rains, such compositions are distinguished by fairly rapid wetting.
- On such a surface, spots may appear that need to be painted over.
- Contains more water than specialized plaster mixtures for aerated concrete.
The best time to apply plaster
Given that aerated concrete has a high water absorption, it is necessary to provide good protection against getting wet. As mentioned above, the wetting of this building material is not critical, if frost is not predicted. In any case, after laying the walls, you need to give time to dry. It is enough to wait about a month and you can apply the plaster mixture.

Ideally, plastering of the facade of a house made of aerated concrete is carried out in the warm season. If it is impossible to perform these heat work, then the walls should be covered with a deep penetration primer. It will reduce water absorption. It is also desirable to protect the walls using polyethylene, which is left over from the packaging of aerated concrete pallets.
Masters advise to carry out work during the period when the air temperature at night does not fall below zero degrees. Thus, it is possible to plaster the walls from the end of March to the beginning of November.
How to plaster the walls of a house from gas blocks
One of the main misconceptions is that the main task of plaster is to protect the walls from the outside. The only problem is that if such walls are not primed, then with the advent of spring they will “give up” the accumulated moisture. And since there will be a layer of plaster outside, all the moisture will go inside the house. As a result, cracks on the inner walls are possible.

Advice! The priority of protecting external walls exists only if the construction of the house takes place in close proximity to the sea, lake or any body of water.
Carrying out simultaneous finishing of internal and external walls is also unacceptable. The fact is that in this case, the moisture that the gas block will somehow pick up in itself, in this case, simply will not have any way out. And its settling inside the block will only accelerate the processes of its destruction.
Yes, plaster for outdoor work on aerated concrete has good vapor permeability. But still they will not be enough to quickly remove moisture.. And this becomes especially critical when the average air temperature at night drops below zero. As a result, the gas block will begin to quickly collapse.
Given all of the above, it should be noted that the most profitable and correct option is this: first, the internal plaster is applied, and after the drying of this layer, the external one. In this case, the moisture accumulated inside the aerated concrete blocks will have an outlet to the outside, which will not bring negative consequences to the building itself.
How to do interior decoration
Consider the sequence of work on the interior finishing of aerated concrete walls:
- Preparatory stage. First of all, the walls must be properly prepared: leveled, for which a special planer for aerated concrete is used.
- We apply a primer. Some masters suggest diluting the primer with water in a ratio of 1 to 1, which is incorrect, since it negatively affects the adhesion of the material. The primer composition is selected depending on the purpose of the room. For example, if a deep penetration soil is required for a kitchen or bathroom, then any universal material can be taken for the hallway.
- Installing beacons. They allow you to adjust the thickness of the applied solution. Arrange them according to the width of the rule, and the accuracy is controlled by the level.
- We throw a starting layer or "fur coat". Work should be carried out from the bottom up. Next, we describe the rule for beacons, aligning the resulting layer. When voids form, they are immediately closed.

- Processing the first layer. After the applied plaster dries, it is necessary to moisten it with a spray gun, and then level it. At the same time, it is desirable to dismantle lighthouses, since they are cold bridges. The recesses formed after them are immediately sealed with a solution.
- We form the corners. To create even and durable outer corners, you should use a perforated corner, which is installed on a small piece of the mesh and smeared with composition.

- Applying the final layer. Grouting is carried out if necessary, then paint can be applied to the walls. Finishing the walls is not carried out if they are subsequently covered with wallpaper.
Since the paint is also characterized by certain indicators of porosity, it is necessary to approach its choice with all care. Good options are compositions based on latex, PVA, acrylic emulsions, cement and paints based on organic solvents.
How to plaster walls outside
How to plaster aerated concrete outside? The best material for such a finish is decorative facade plaster. There are two application options here:
- Thick-layer finishing, providing for the application of the material in one thick layer.
- Several layers involve thin-layer plaster. This option for wall decoration will be discussed below. It involves the application of a finishing material with a thickness of not more than 10 mm.
External plaster is applied as follows:
- The wall is being prepared. We are talking about leveling the surface, which is done in order to reduce material consumption.
- Before plastering, the wall must be properly primed.
- After that, the starting layer of the mixture is applied. In thickness, it should not exceed 5 mm.

- The finishing layer is reinforced with a metal mesh having small cells. It is overlapped by 50 mm. At this stage, the corners of the house are also formed, for which a perforated corner is used. The main task of the grid is to prevent the formation of cracks in the plaster layer, which may occur during the shrinkage of the building.
- To "drown" the grid in the solution, a spatula is used.
- Next, you need to align the plaster layer on the laid grid.
- We are waiting for the first layer to dry. If the first layer is not dry when applying the next layer, this can cause both layers of the finish to fall off. It is best to play it safe and wait at least three days.
- We apply the second layer. It is considered leveling, and therefore it is very important to observe the evenness of the application in order to end up with a really smooth surface.

- The third layer is considered the finishing layer, therefore, after its application, grouting is done.
- Wall painting. Instead of paint, the surface can be covered with textured plaster.