Coordination of reconstruction works on the facade of a building in Moscow is regulated by:
- The Urban Planning Code of the Russian Federation;
- Decree of the Moscow Government No. 508-PP dated 10/25/2011 "ON ORGANIZATION OF RE-CONSTRUCTION AND (OR) RE-PLANNING OF RESIDENTIAL AND NON-RESIDENTIAL PREMISES IN APARTMENT BUILDINGS".
In accordance with the Decree of the Government of Moscow No. 508-PP dated 10/25/2011, the following works are referred to the reconstruction works on the facade:
- Creation of entrances, changing entrances and vestibules with the device of porches (stairs to basement and basement rooms), which does not provide for the attachment (occupation) of an additional land plot.
- Creation, elimination, reshaping of window and door openings in external enclosing structures (walls, roofs).
- Creation of awnings, glazed awnings (within the existing boundaries of the terrace) on the operated roofs of apartment buildings, which does not provide for an increase in the height of the building, heating and equipping the newly constructed premises with engineering and sanitary equipment.
- Creation of entrances (stairs, porches and other platforms) to basements or basements or to the first floors of buildings within the dimensions of a land plot belonging to the common property of owners of premises in an apartment building, including with the device of canopies and awnings outside the outer walls of the building.
- Creation (not providing for the organization of the premises) canopies within the dimensions of the existing building elements (landing stages, stylobates, etc.), as well as porches and stairs.
- Creation of showcases within (with a removal of no more than 1 meter) the dimensions of the existing building elements without leaning on the ground, which does not provide for the organization of premises.
- Creation of cold vestibules (entrances) within the existing areas - porches, ramps, stairs outside the outer walls of the building.
- Arrangement of loggias and terraces on the ground floors.
ATTENTION!
All other works affecting the facade of the building and not included in this list are related to the reconstruction of the building. The reconstruction of the building is regulated by the Urban Planning Code of the Russian Federation.
The procedure for coordinating reconstruction work on the facade of the building is as follows:
- Ordering and receiving technical documentation to the object;
- Technical inspection of the facility by a specialist;
- Preparation of a Technical Conclusion on the condition of load-bearing and enclosing structures and on the possibility of the declared reconstruction work based on the results of the survey;
- Preparation of the necessary sections of the project documentation;
- Coordination of project documentation in supervisory authorities;
- Submission of a package of documents to the Moscow Housing Inspectorate of the District (for apartments and non-residential premises in an apartment building).
- Obtaining permission from the Moscow Housing Inspectorate for reconstruction work (for apartments and non-residential premises in an apartment building);
- Repair Work;
- Drawing up acts for hidden work and keeping a log of repair and construction work (for apartments and non-residential premises in an apartment building);
- Calling the inspector of the Moscow Housing Inspectorate for acceptance of repair and construction work (for apartments and non-residential premises in an apartment building);
- Signing of the act on the completed reconstruction in:
- Design organization;
- Construction organization;
- Management company
- Moscow Housing Inspection (for apartments and non-residential premises in an apartment building)
- Ordering technical documentation with a call to a technician;
- Obtaining new technical documentation.
The cost of agreeing on reconstruction works on the facade in residential buildings
| Stages / Price, rub | Deadline, days | Note |
|---|---|---|
| DESIGN DOCUMENTATION: | ||
Refueling complex (technical conclusion) from 15,000 The project, consisting of sections: From 10 000 Constructive solutions (CD) from 15,000 Reconstruction works (RR) from 15,000 Noise calculation (RS) from 15,000 | 5-15 | |
Coordination, receipt of the order of the Moscow Housing Inspection from 25000 | 40 | |
| REPAIR WORKS | ||
Putting the premises (apartment) into operation. Obtaining an act of completed reorganization. | 20 | |
Ordering / Receiving a Technical Plan. | 40 | Official payments |
The cost of agreeing on reconstruction work on the facade in residential buildings (non-residential premises)
| Stages / Price, rub | Deadline, days | Note |
|---|---|---|
| DESIGN DOCUMENTATION: | ||
Refueling complex (technical conclusion) from 15,000 The project, consisting of sections: Architectural and construction solutions (AR) from 15,000 Constructive solutions (CD) from 15,000 Reconstruction works (RR) from 15,000 | 5-30 | depending on the footage and the complexity of the redevelopment. |
Coordination: Obtaining an order from the Moscow Housing Inspection | 60 | If there is a section (PP-reconstruction work on the facade), the approval of the GlavAPU Moskomarkhitektura, Moszhilinspektsiya independently |
| REPAIR WORKS | ||
Putting the premises into operation. Obtaining an act of completed reorganization. from 60,000 | Exit of the inspector of the Moscow Housing Inspection. | |
Application decorative elements on walls and windows is able to transform appearance any building for the better. Columns, keystones, arches, stucco moldings and consoles allow you to hide various flaws and focus on the merits of the building. The main thing is to place everything correctly. If you are planning to build not a simple Vacation home, but a real cottage, a manor - you need to get a basic knowledge of what architectural elements of the facade of the building exist, what they are made of and how they are installed. You can find all this here.
To begin with, consider those decorative elements of the facade that are located not on window openings, but simply on the walls. Most of them are shown in the images above and below.
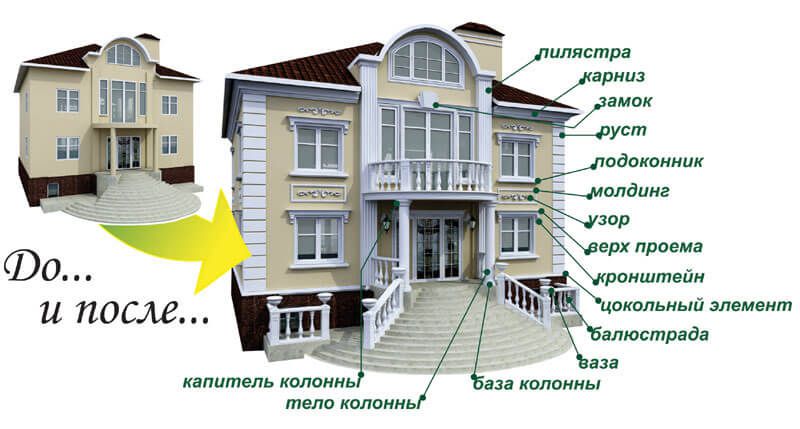
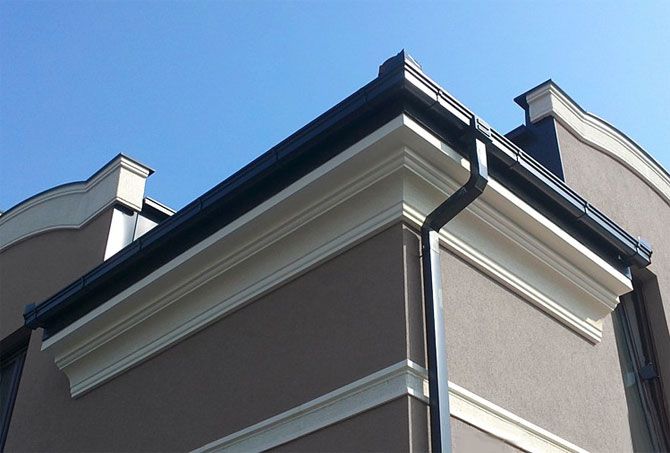
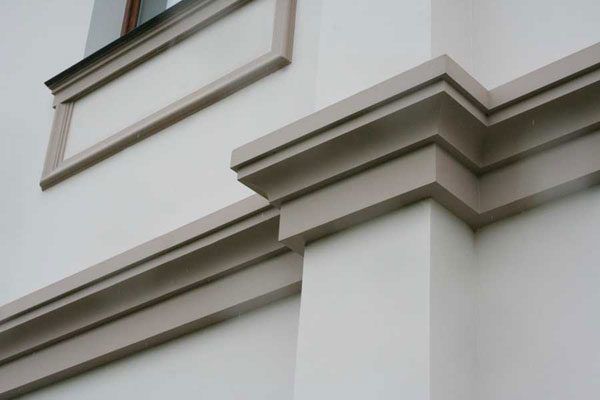
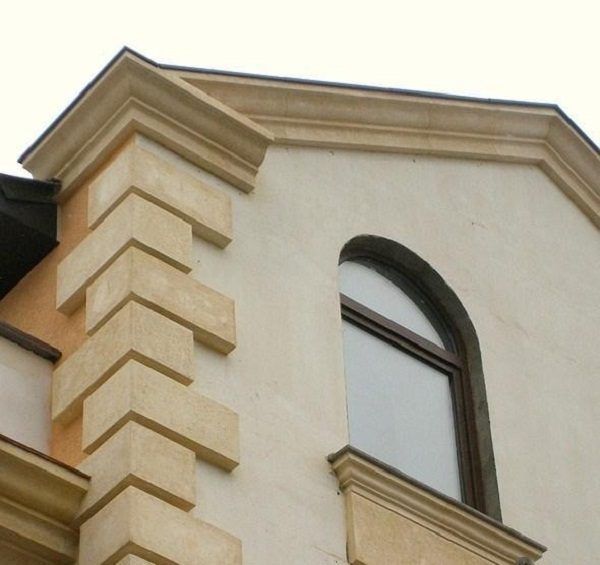
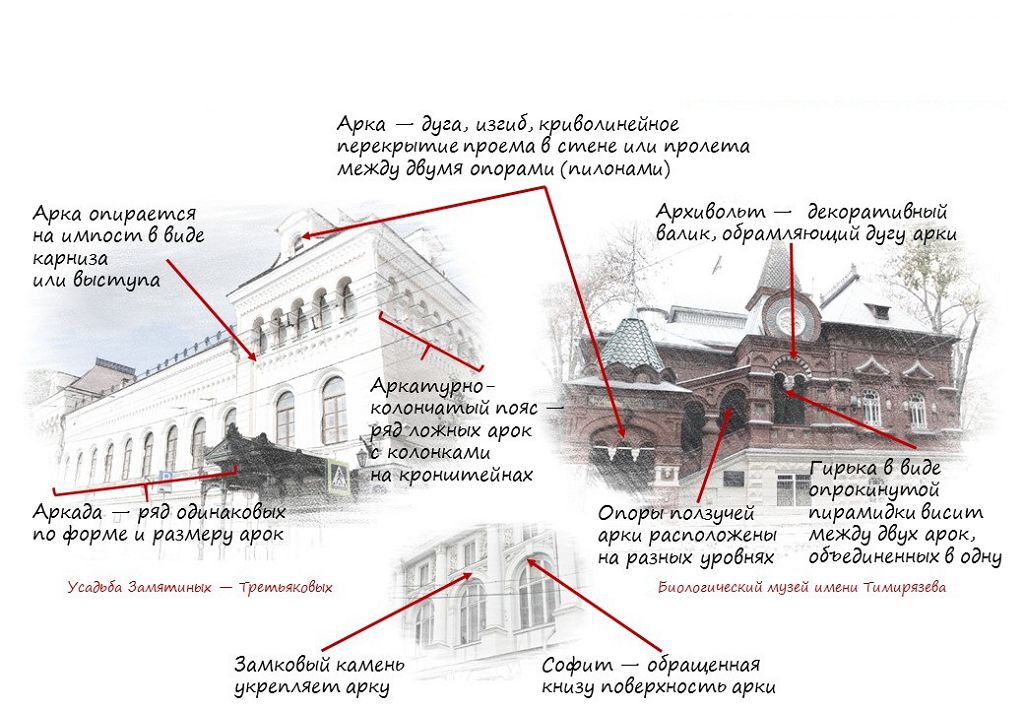
Cornice- protruding element. As a rule, it stretches along the entire wall and visually separates it and the roof, or splits the wall plane itself into several separate zones. At its location, the cornice is under-roof, interfloor and basement.
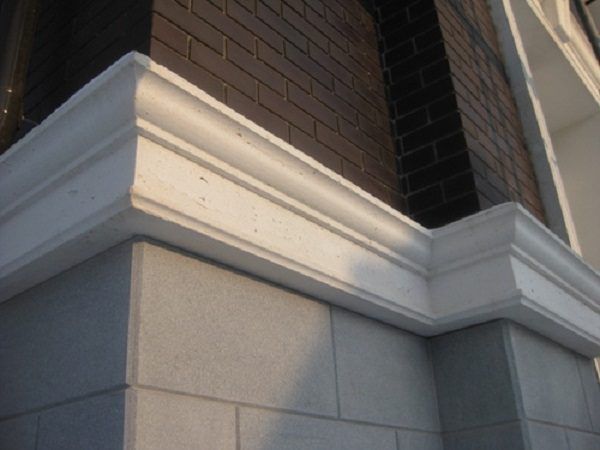
Rust- rectangular wall corners, also known as basses. As a rule, they alternate in size and have small margins between each other. Rust is also called the external decoration of the facade with rectangular stone slabs, the external part of which remains uncouth.
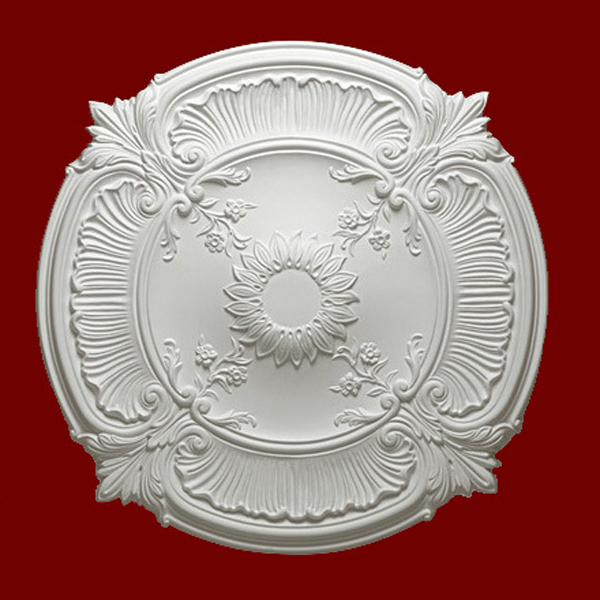
- a round decorative element on the wall, provided with a three-dimensional pattern with patterns. As a rule, it is installed above the entrance to the building or in the center of the pediment.
Fresco- a color image applied to the wall using plaster or other materials. When creating such decorative elements, great attention must be paid to resistance to external influences.
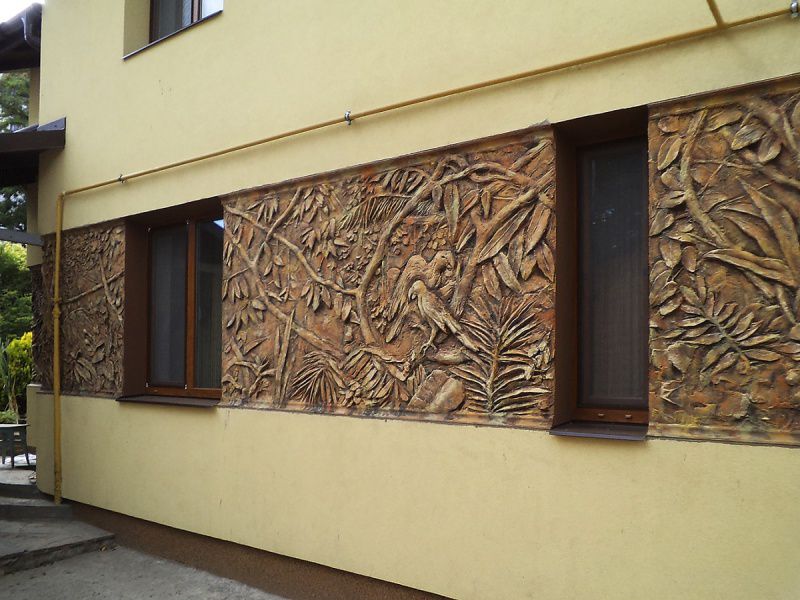
Bas-relief- a volumetric image protruding halfway from the wall. One of the most ancient architectural elements of the facade, and at the same time the most complex. Has a subspecies called high relief- in it, individual parts of the picture can protrude from the wall by more than 50%. Both elements and other similar wall decorations are generally referred to as stucco.

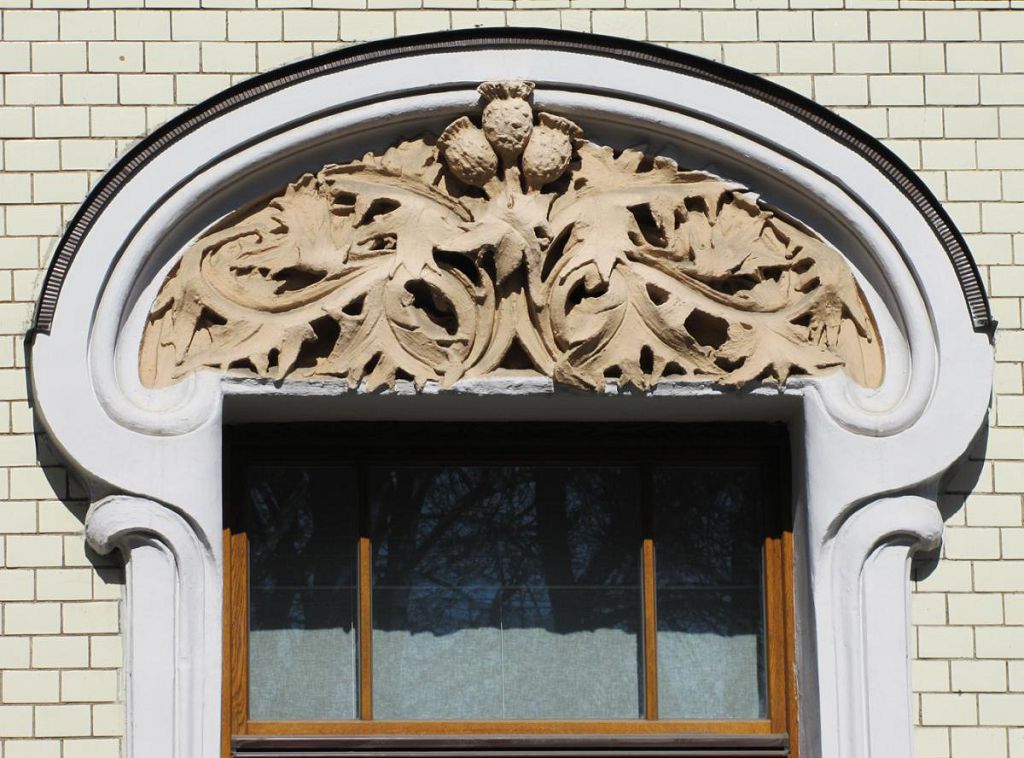
- through or blind opening with a semicircular top. Most often used for framing front door or large windows. It is often supplemented with its own decorative elements.
Filenka- rectangular extended or recessed framing of any decorative element, for example, rosettes. Sometimes there are panels of other shapes, as well as those that do not have any decorations inside.
Frieze- a rectangular strip framing a certain part of the facade. Often located next to the cornice (this sometimes leads to confusion in terms).
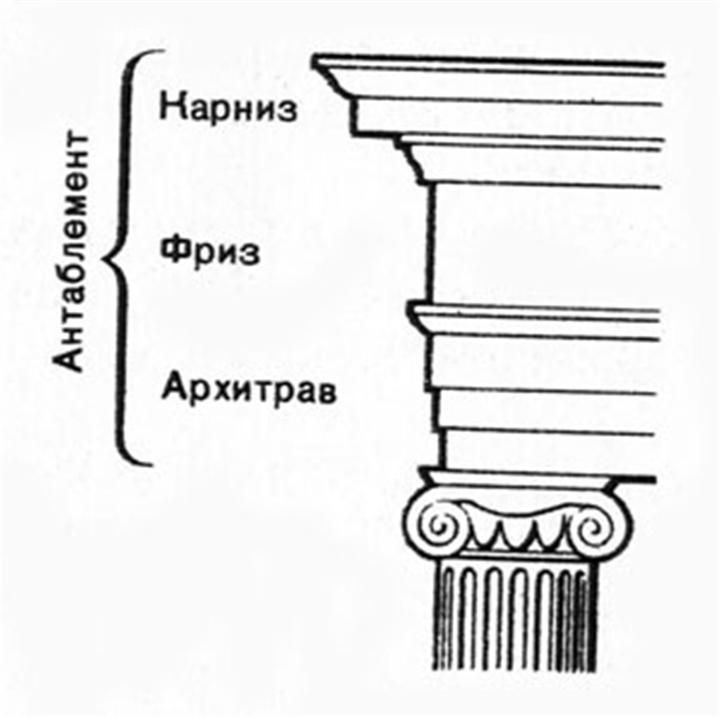
Entablature - the upper horizontal part of the structure
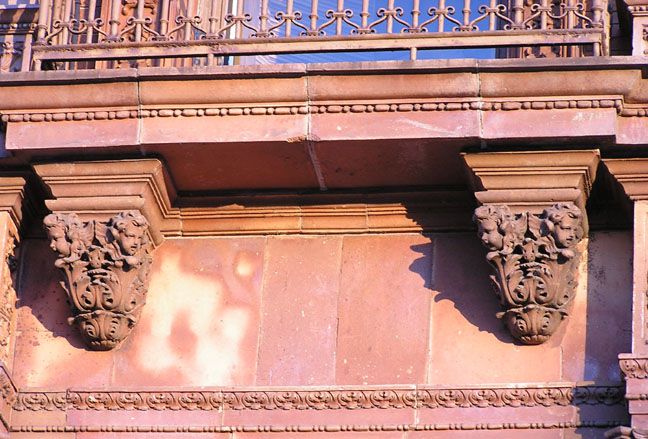
Console- a support protruding from the wall, fixed at only one end. Typically used to support balconies, cornices and other relatively heavy objects extending far beyond the façade plane. The cornice is not only a load-bearing, but also a decorative element - it is decorated with stucco, patterns and high reliefs.
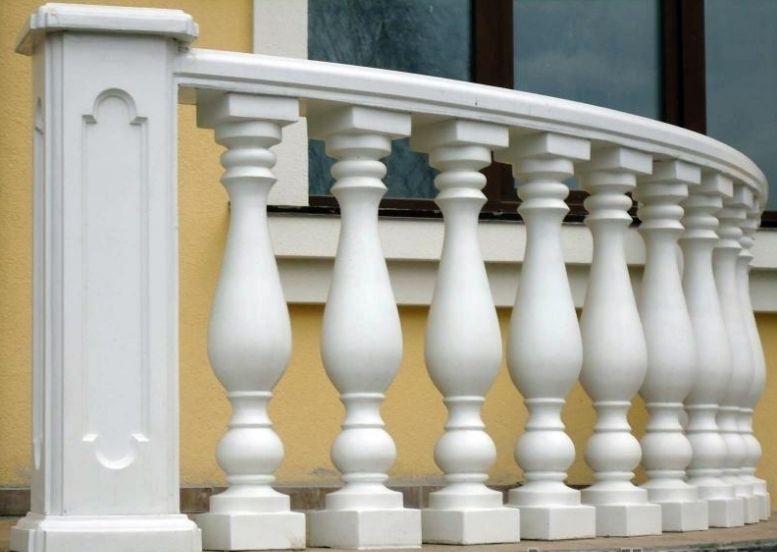
- balcony, terrace or staircase railing made of baluster(curly columns of complex shape). From above it is complemented by a handrail, and in some cases - by vases located on the pedestals.
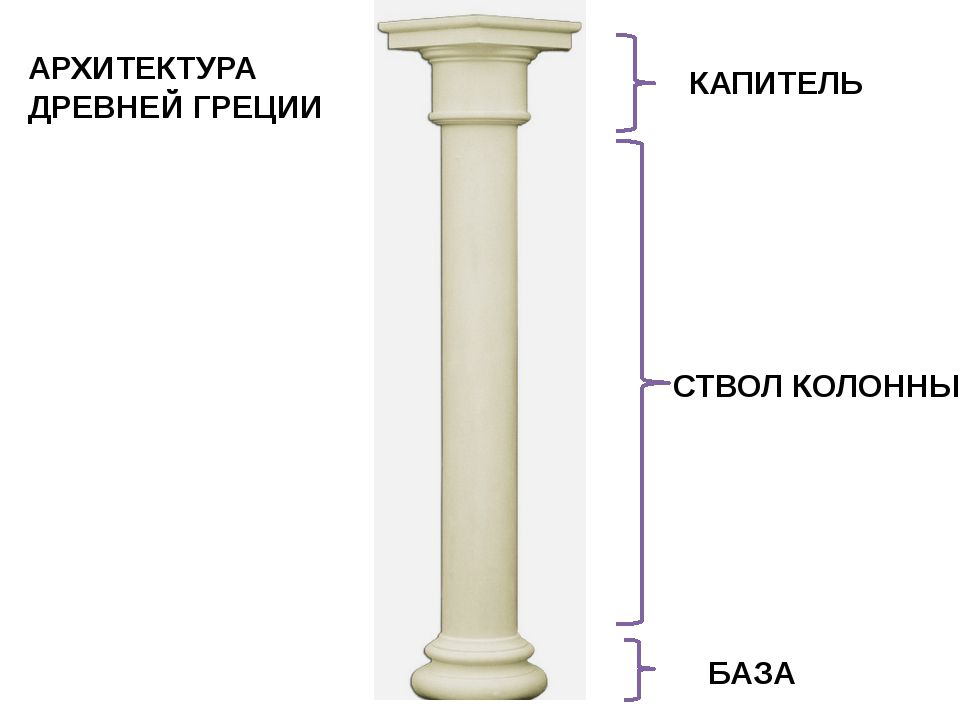
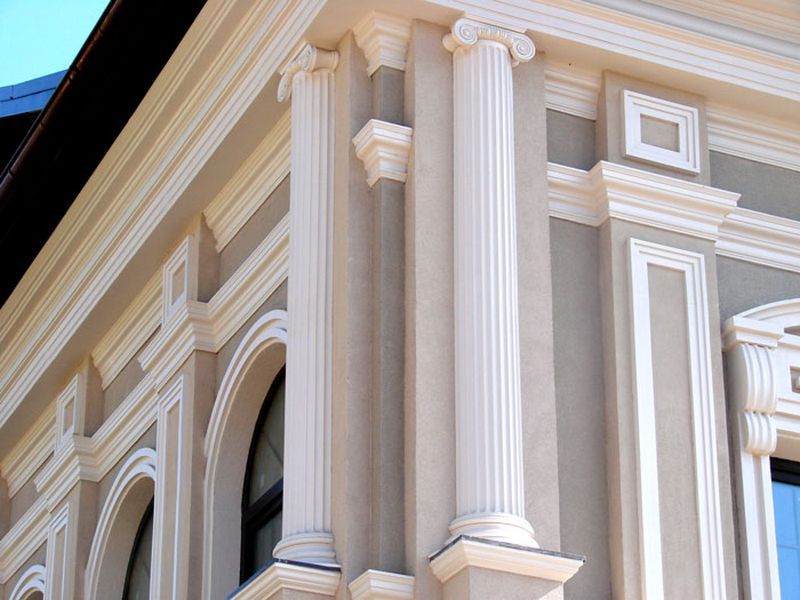
Column and its components
Separately, it is worth highlighting such an architectural element of the building as Column... It is a pillar with a circular or rectangular cross-section, used as both a load-bearing part and a decoration for the exterior of the facade. Made of stone, wood, metal and others building materials... The column can be conditionally divided into three parts.
- Base- the lower base of the column. As a rule, its diameter is larger than that of the main part of the given architectural element. The base of the column must be very strong, since a significant mass is pressing on it.
- Column trunk or body- the main part of the architectural element. As mentioned above, it has a square or round cross section. Sometimes the stem of the column tapers towards its top. The body can be either smooth or embossed - with horizontal and vertical grooves.
- Small caps- the upper part of the column, as a rule, is larger than its main part. Distributes the load on the barrel evenly from the supported structure. The capital is supplied with stucco molding, patterns and consoles.
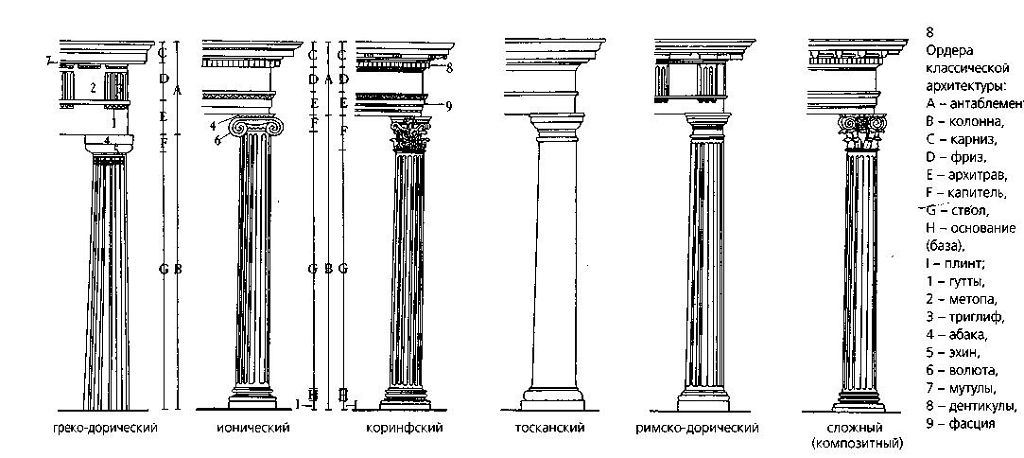
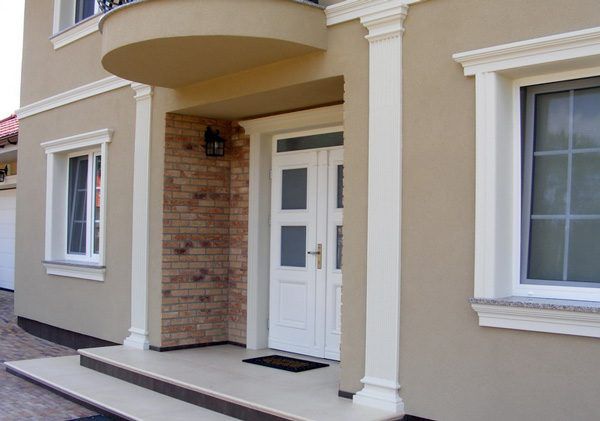
It is also worth noting two subspecies of columns - semi-column and pilaster... The first is an architectural element in the form of a column of round or square cross-section protruding from the wall by 50-75%. As a rule, it is installed near doorways and more often serves not as a structural, but as a decorative element. A pilaster is a small vertical ledge, resembling a column in shape and structure. It has an exclusively decorative function.
Architectural elements of window and door openings
Let's move on to another very important part of the facade - window and door openings. Let's consider the main decorative elements used to frame and decorate them.
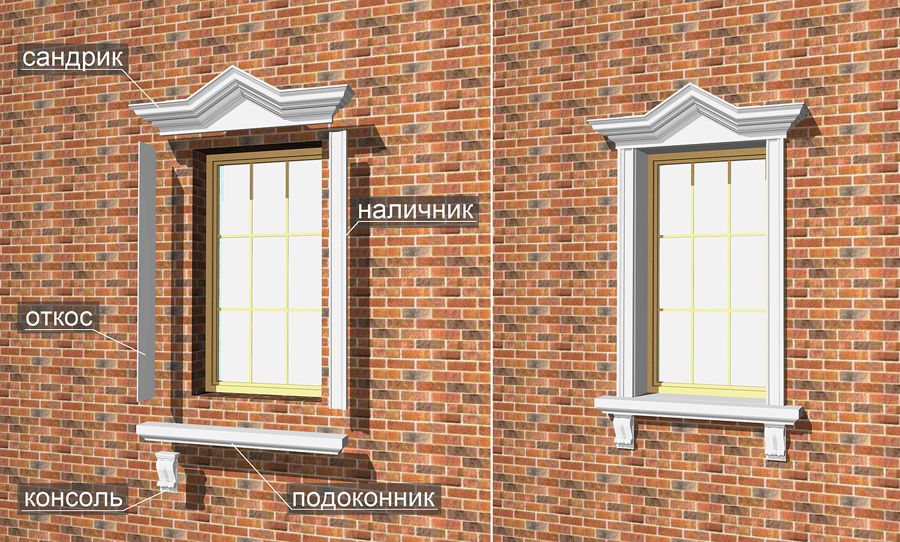
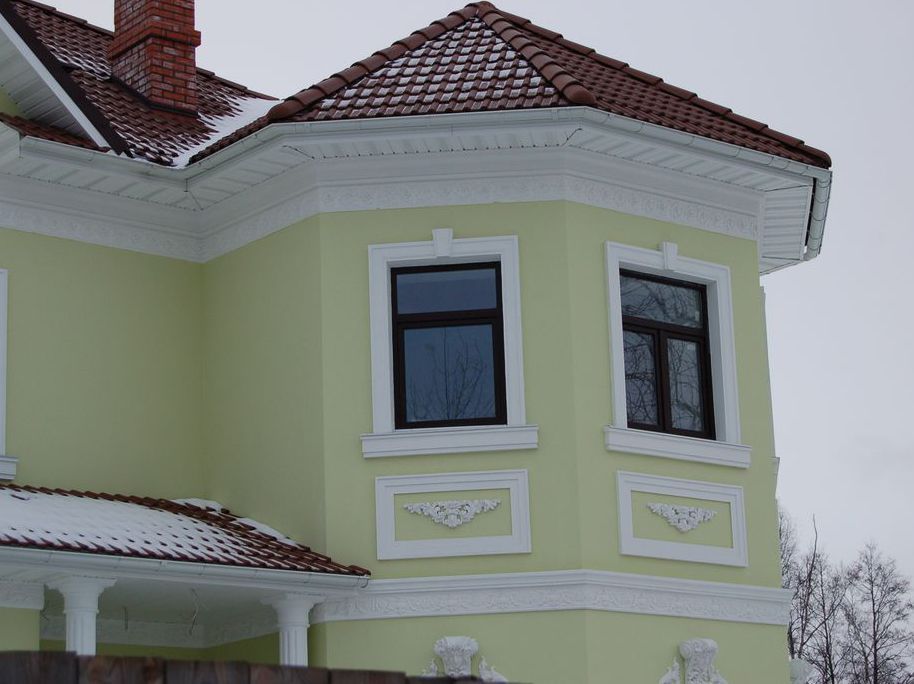
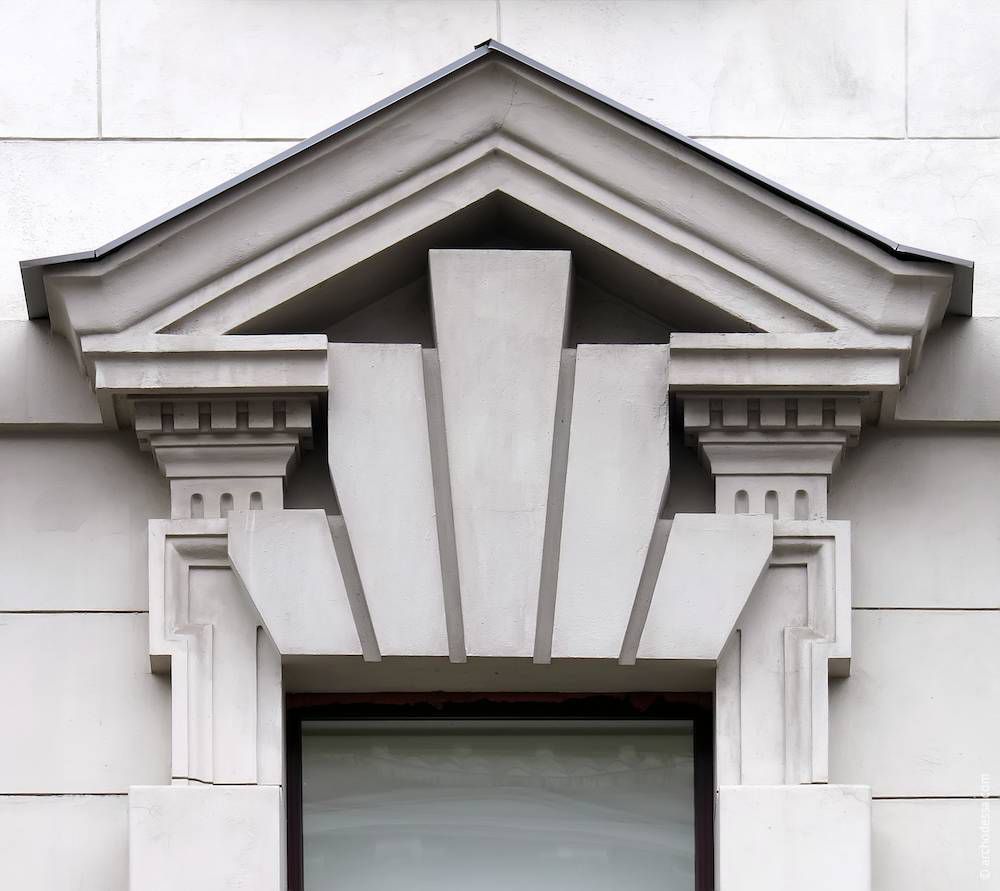
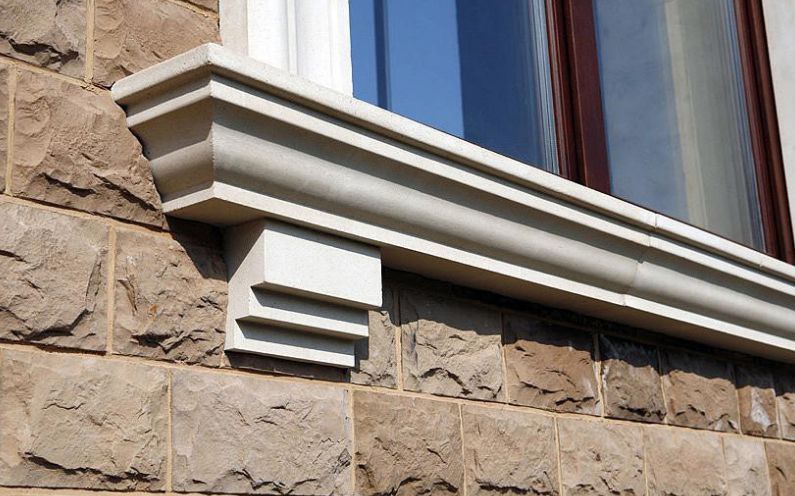
Sandrik- a small cornice, often rectangular in shape and with a pediment, located above the window, door and niche. Supplied with stucco, patterns and other decorative elements. In addition to the function of decorating the facade, sandrik covers the window panes from rain.
Castle stone- a decorative wedge-shaped element located in the middle of the cornice or sandrick of a window opening or arch.
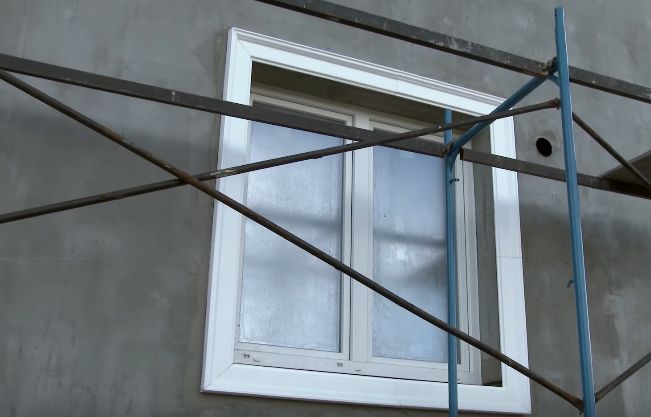
Platbands- planks installed along the edges of the window opening and oriented vertically. Decorated with stucco details and carvings. Supplemented slopes- metal or other surfaces that decorate the window opening along its inner part.
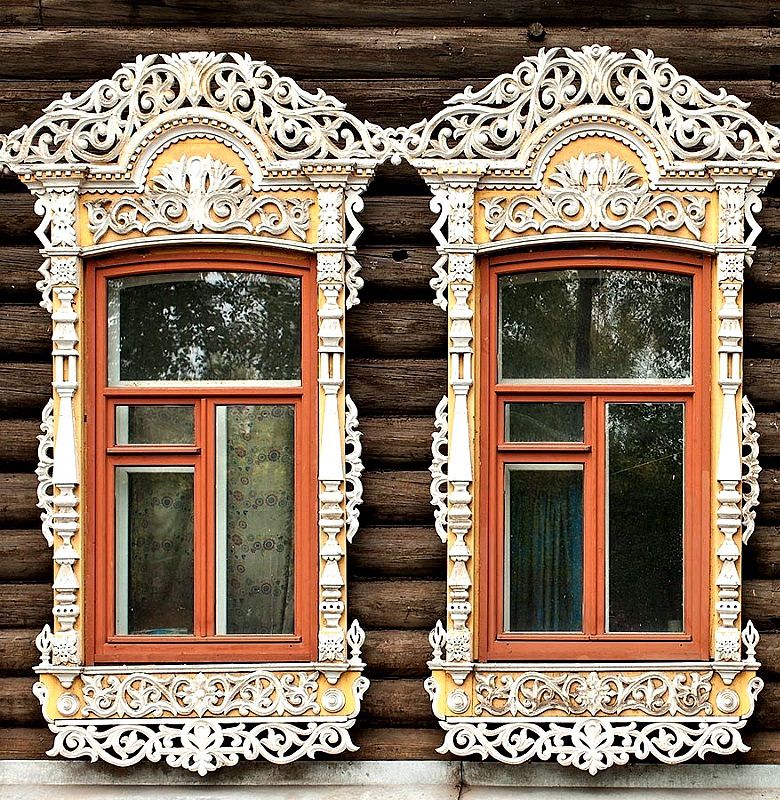
- the plane of the pediment above the window and under the archway framing it. Decorated with stucco, rosette, patterns, bas-reliefs, and sometimes frescoes.
Materials from which the architectural elements of the facade are made
Decorative elements of the facade are made from a variety of materials, here we will consider the most popular options.

Video - Facade decor: step-by-step installation instructions
Installation of architectural elements of the facade made of expanded polystyrene - step by step instructions
Let's consider step by step the process of installing architectural elements for the facade, made of expanded polystyrene.
List of instruments
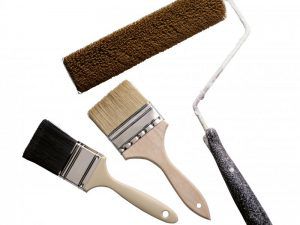
As an introduction, let's take a look at a list of tools you might need to get the job done.
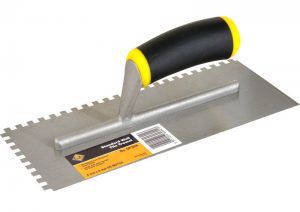
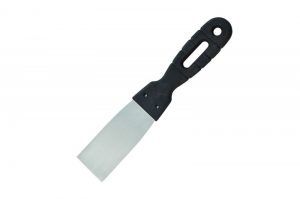
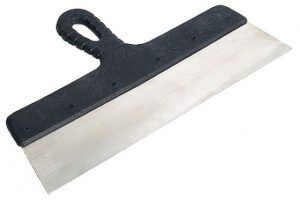
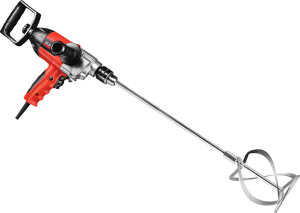
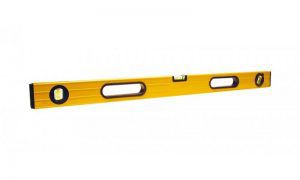
Table. Installation of architectural elements of the facade - a list of tools.
| Tool name | What is it used for |
|---|---|
| Applying an adhesive mixture to the wall or the back of the decorative element. |
| Work with putty or glue mixture on narrow areas of decorative elements or on curved surfaces where special precision is required. |
| Application of a putty or adhesive mixture on straight and large surfaces of decorative foam elements. |
| Preparing an adhesive mixture for styrofoam decor or kneading putty. |
| Preparation and storage of glue mixture and putty. |
| Control of the position of the decorative element vertically and horizontally. |
| Distance measurement. |
| Application of paint to decorative elements and preliminary priming of surfaces for their installation. |
| Cutting foam packaging or small parts. |
| Styrofoam cutting and sawing. If absent, it is replaced with a hacksaw with a fine tooth. |
| For work at a height of over 2 meters. |


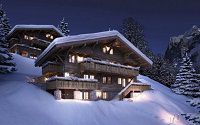
Mountain romance, simplicity and elusive, special beauty are hidden in the houses built in the chalet style. It is not for nothing that they are called combined, because they are built simultaneously from wood and stone. Thanks to this, such buildings acquire unique properties. The projects of which are quite varied have attracted the attention of architects for a long time.
Installation of decorative elements on window openings
Start decorating your home with architectural elements from one of the most important parts of any facade - the window and door openings.
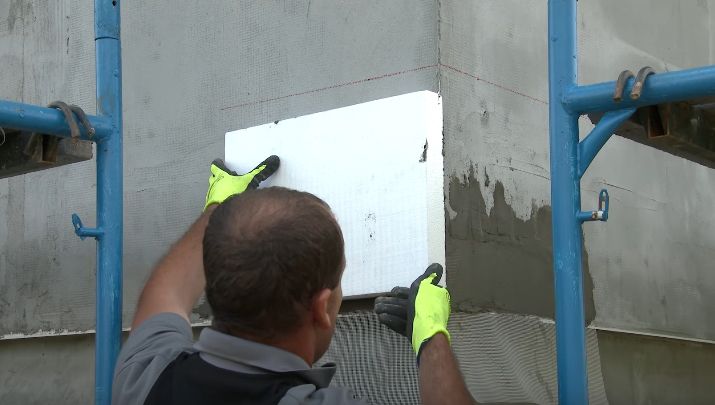
Step 1. Prepare the walls and openings themselves for decoration work - complete the construction of all structures, insulate the house and close the thermal insulation layer with a rough finish. In this case, the cottage is covered with polystyrene slabs, which were then covered with reinforcing mesh and plaster.
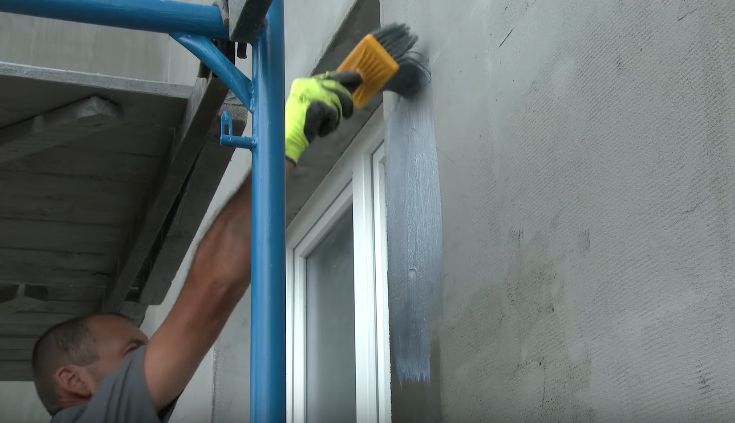
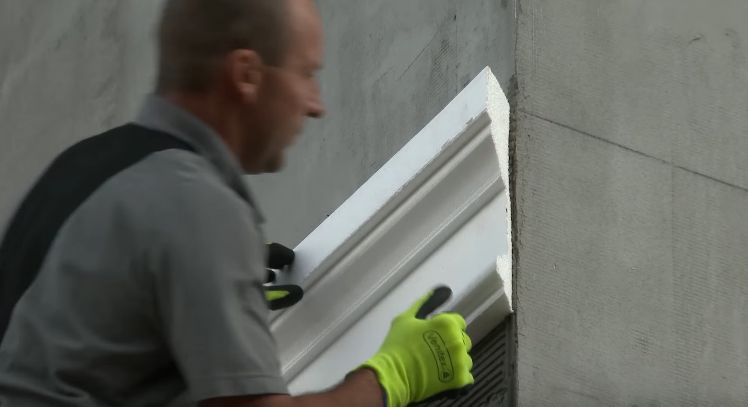
Step 2. All the architectural elements of the house presented in this example will be fixed to the walls using a special adhesive. For better adhesion, first apply a primer to window openings and other parts of the building where the decor will be attached.
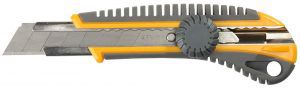
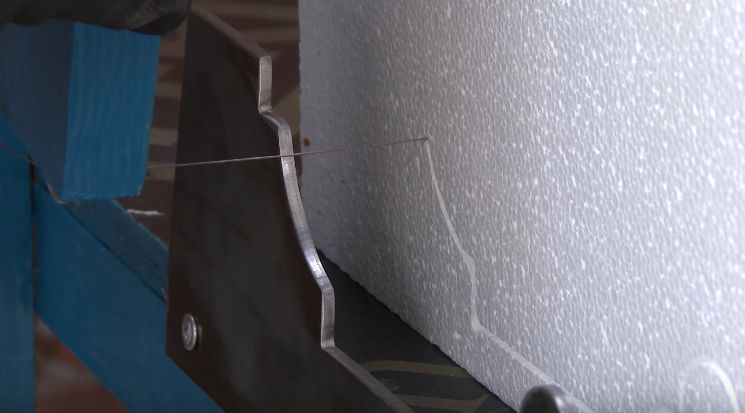
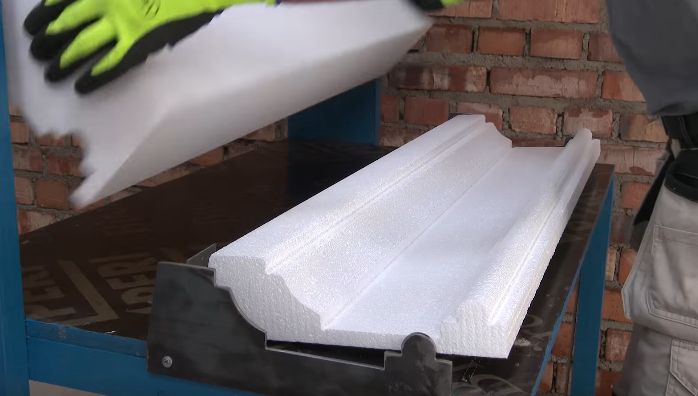
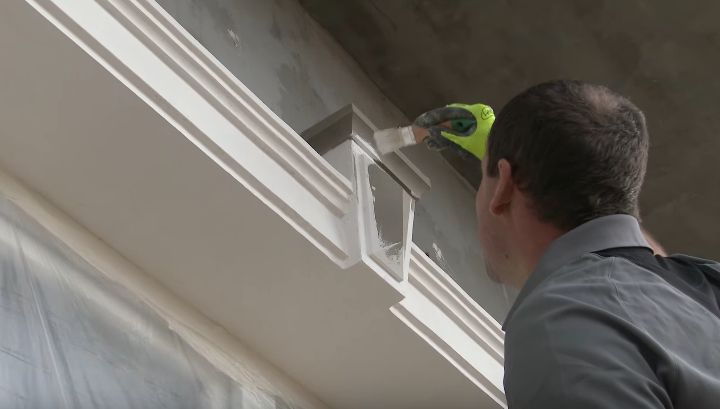
Step 3. Unpack decorative elements for window openings. Check their integrity and completeness. Cut those parts that will be fastened to each other at the corners of window openings at an angle of 45 °. At home, use a retractable knife or a fine-toothed hacksaw to do this. And in the image below you can see how a red-hot nichrome thread is used to accomplish this task - the best tool for cutting foam, allowing you to achieve a perfectly even cut.
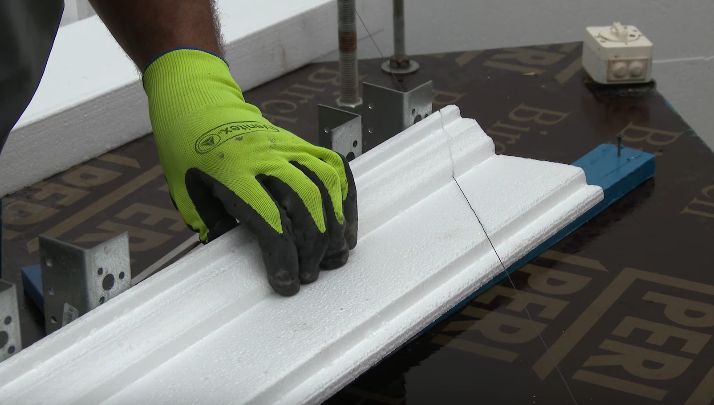
Important! If you wish and have the appropriate tools, you can make decorative elements for the facade yourself. To do this, assemble a machine for cutting polystyrene with nichrome thread and prepare metal templates that repeat in their shape the profiles of certain architectural details.
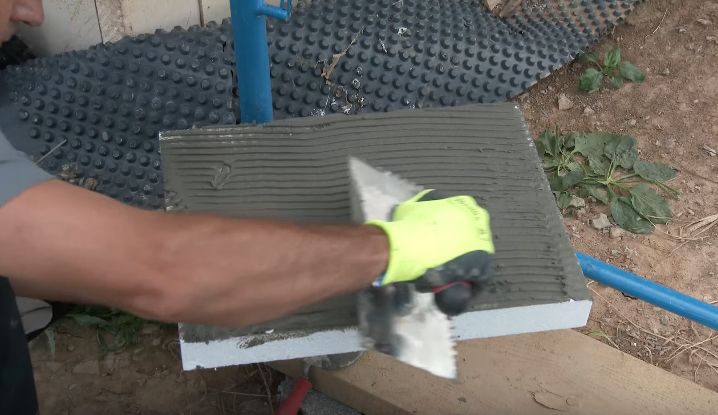
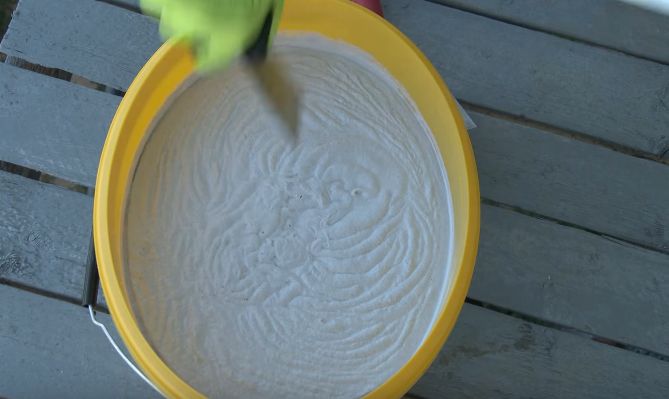
Step 4. Prepare an adhesive mixture for the installation of expanded polystyrene parts.

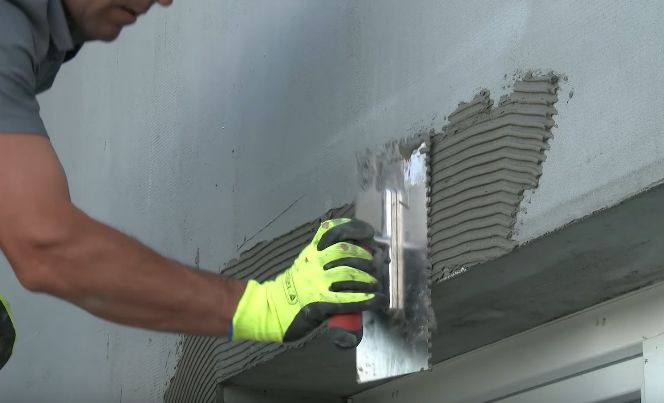
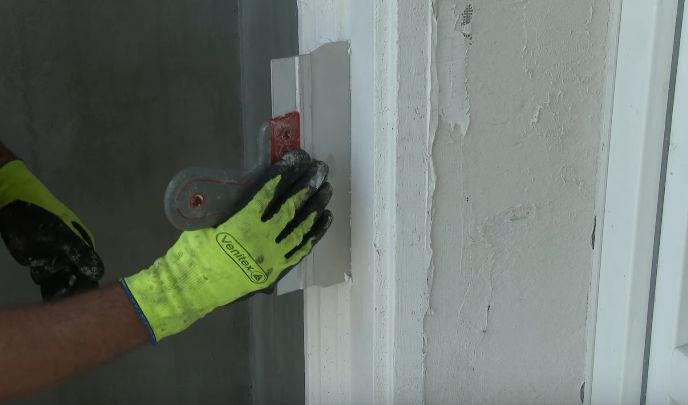
Step 5. Apply a layer of glue to the surfaces near the window openings, where the styrofoam decorative elements will subsequently be applied. Use a notched trowel to do this job.
Step 6. Apply a thin layer of adhesive to the back of the styrofoam decor you are going to this moment install on the facade.

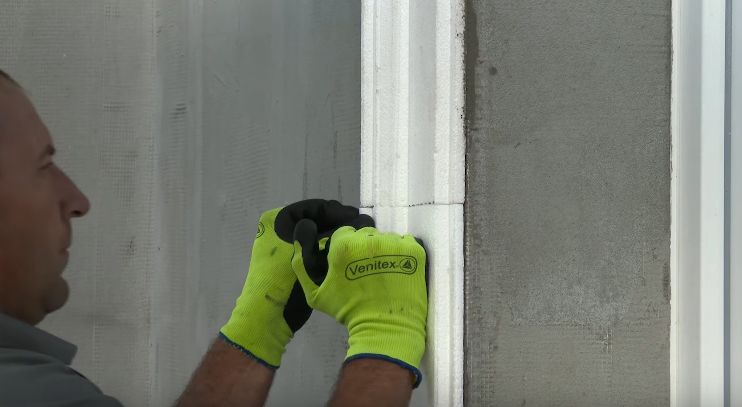
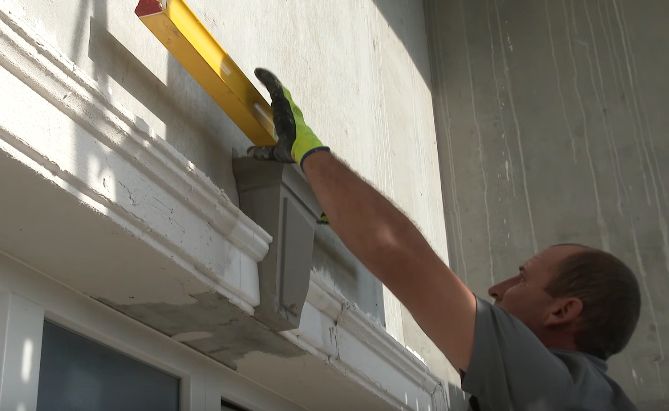
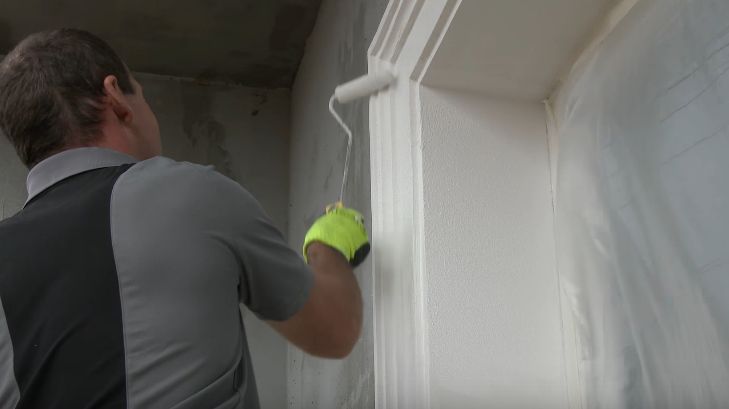
Step 7. Install decorative trims on window openings. As already shown in the previous step, apply glue to the wall itself and apply it, but in a thin layer, to the part itself. Then place it in the right place and press down firmly. Align the position manually or using a builder's level and move on to the rest of the decorative trim.
![]()
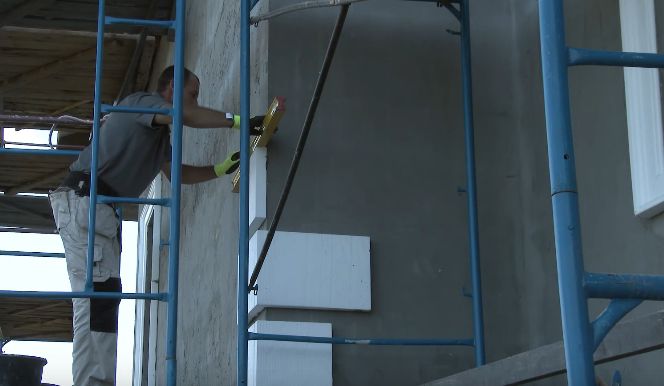
Step 8. Perform similar actions with other decorative elements of openings - window sill and cornice.
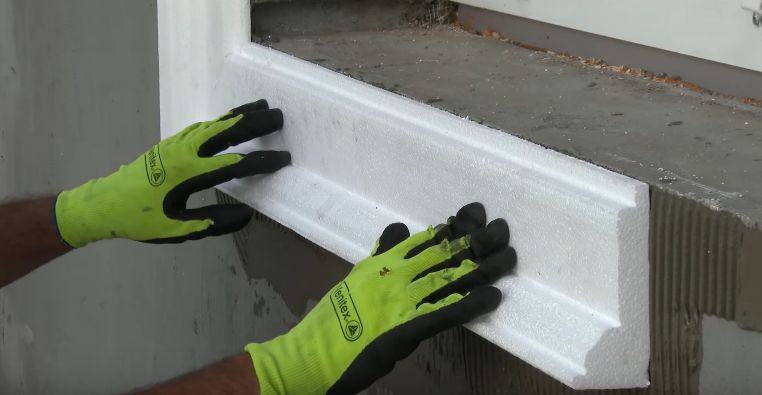
Step 9. Install the styrofoam decorative elements with the adhesive mixture on the balcony opening.
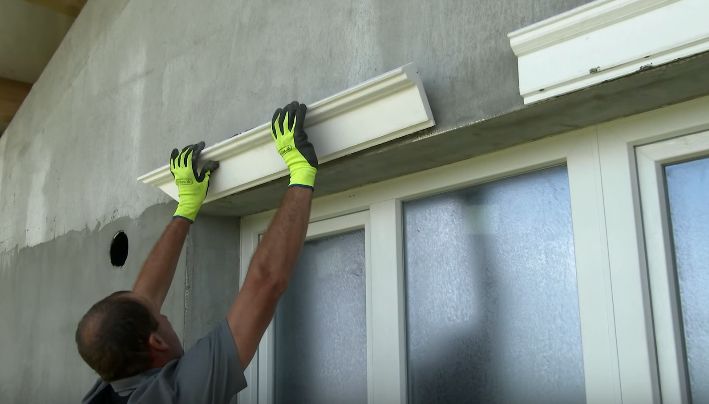
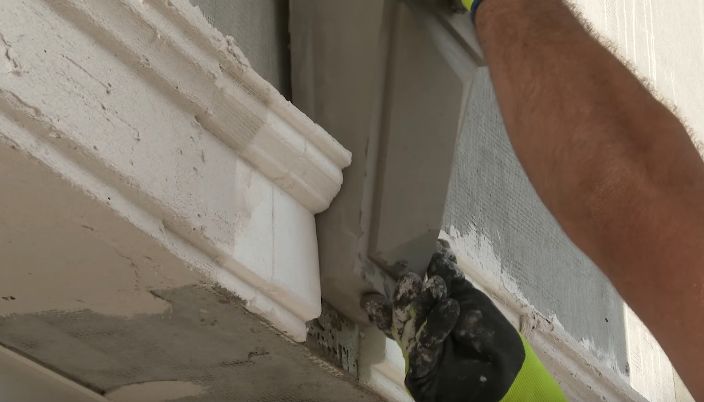
Step 10. Fasten keystones and other particularly complex decorative elements for openings to the pre-marked places. As a rule, they are installed after reinforcement and putty of platbands, cornices and other similar parts.
Installing decorative elements on walls and corners
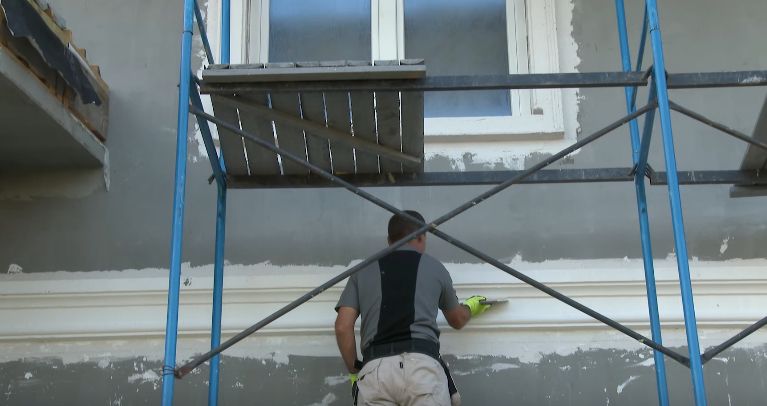
Now let's move on to the wall decorative elements of the facade. In this case, the installation of interfloor molding and corner rustication is carried out.
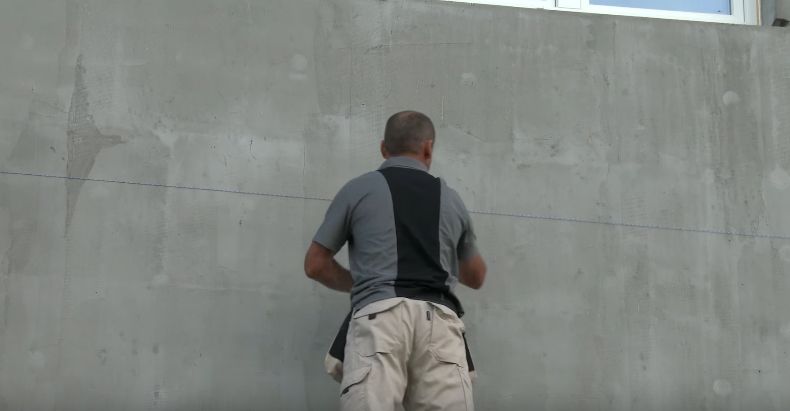
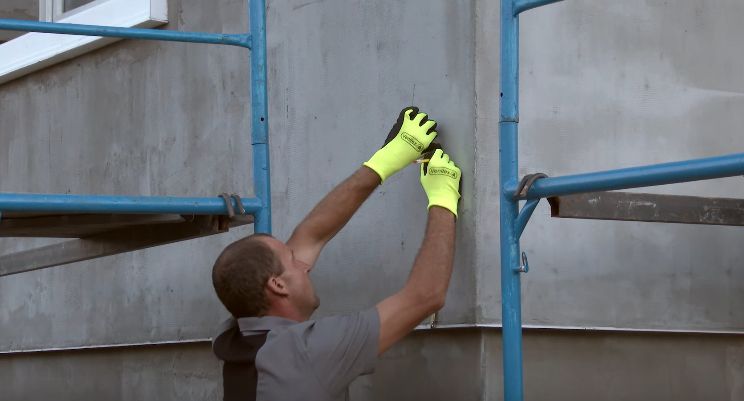
Step 1. Along the perimeter of the walls, measure a perfectly flat horizontal line at the transition between the first and second floors. Bring it out strictly according to the indications of the building level.
Step 2. Along the previously drawn line, apply a strip of adhesive mixture, comparable in height to the decorative element to be installed. As with working with window openings, use a notched trowel.

Step 3. Apply a thin layer of the glue mixture to the back of one of the sections of the interfloor molding, and then glue that section in its place. Start this work from one of the corners of the building.
Step 4. Install this part of the interfloor molding on the other side of the corner. To join with the previous element, cut the edges in advance at an angle of 45 °.
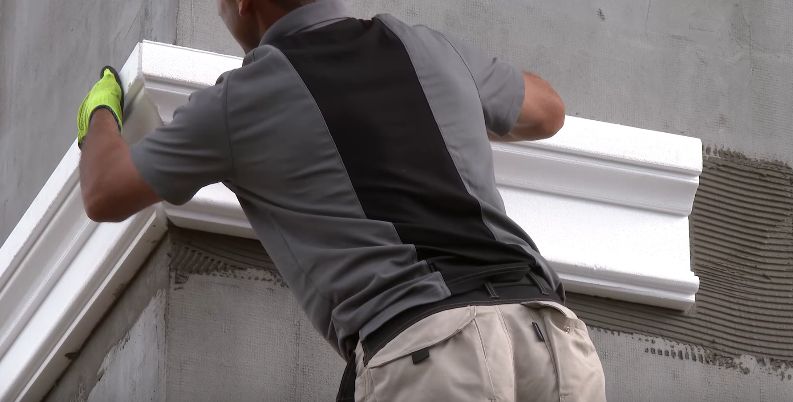
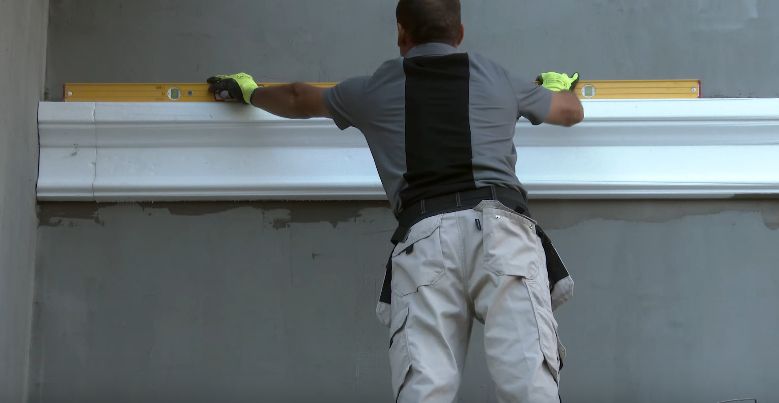
Step 5. Install the rest of the interfloor molding. At the same time, tightly join them to each other and be sure to check the conformity of the horizontal line with the building level.
Important! If, for some reason, the gap between two adjacent foam elements becomes too large, treat the joint with a special adhesive mixture.
Step 6. Calculate in advance on paper at what heights relative to the ground the elements of the corner rustication will be located.
Step 7. Using a ruler and a level, transfer the numbers from the plan to the corners themselves - put down the necessary marks.
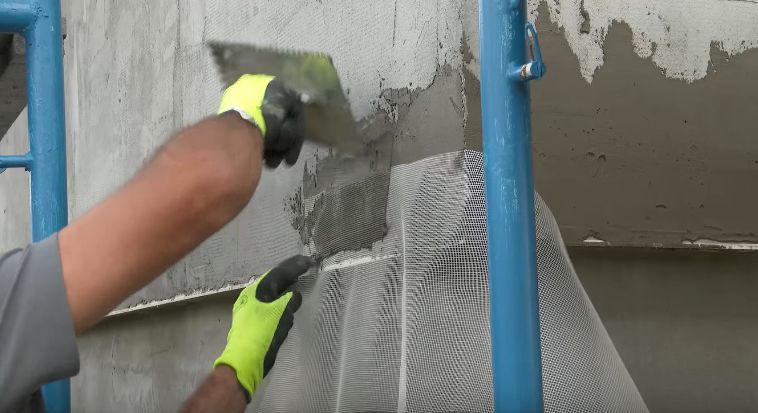
Step 8. In front of the part of the rustication that will adjoin the plinth, fix the reinforcing mesh - apply an adhesive mixture, sink the mesh into it and cover it with the same mixture on top.
Step 9. Apply the glue mixture to the back side of one of the rustic elements and press it firmly to the installation site, guided by the pre-marked marks.
Step 10. Repeat the previous step and install all the rustic elements. The installation of other decorative foam products on the facade of the house is carried out according to the same principles.
Reinforcement and finishing of architectural elements of the facade made of expanded polystyrene
At the installation, work with architectural elements made of foam plastic for the facade does not end - they must be protected with reinforcement and putty, and then finished with paint.
Step 1. Prepare the mixture to secure the reinforcement mesh to the façade decor.
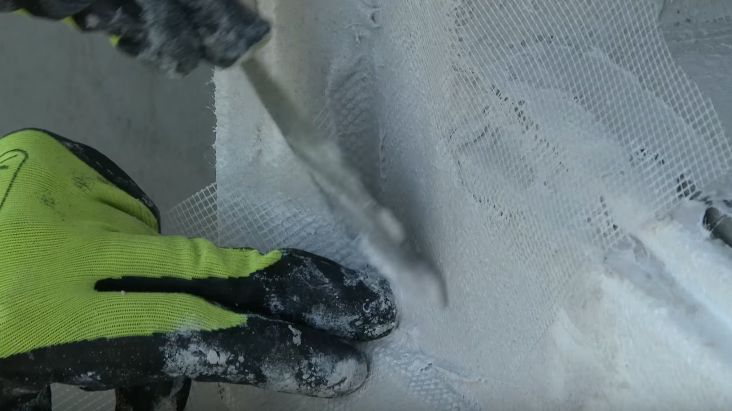
Step 2. Using spatulas of different sizes, apply this mixture in a thin layer to all surfaces of decorative foam elements at corners, transitions between floors and window openings.
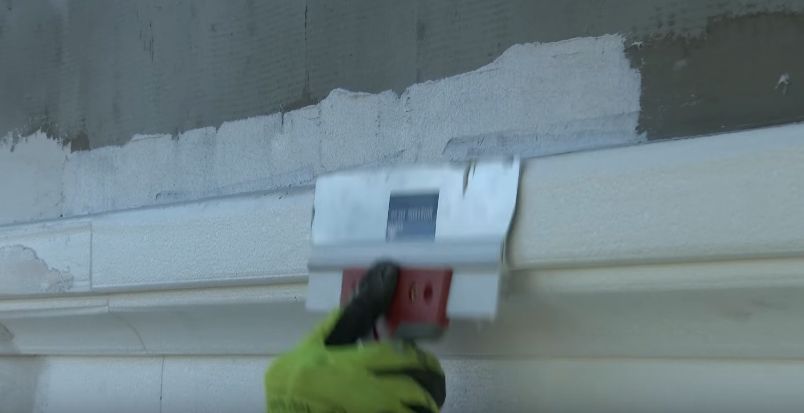
Step 3. Cut out pieces of reinforcing mesh of the required length / width and cover all the styrofoam decor elements with it. In this case, it is necessary to observe the overlap between adjacent segments. Lay the mesh so that its edges protrude beyond the elements themselves and press against the wall.
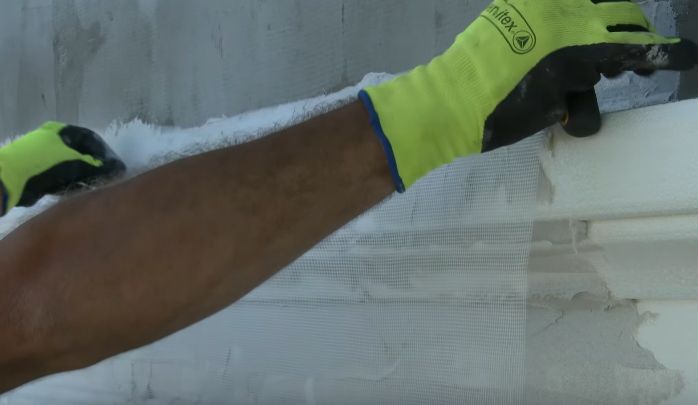
Step 4. Press the reinforcing mesh to the foam parts with spatulas so that the canvas completely repeats the shape of the decorative elements.
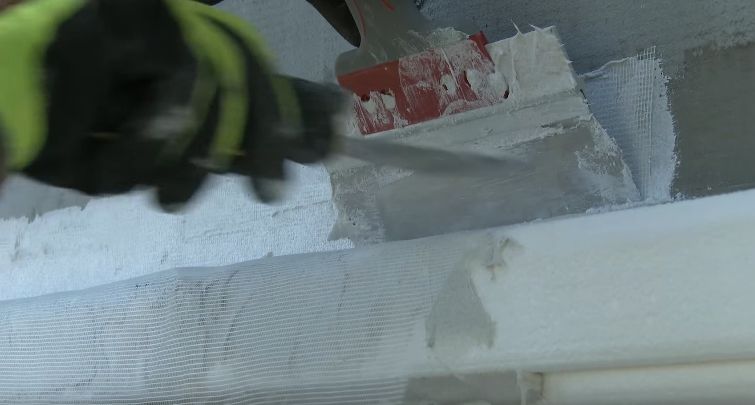
Step 5. Apply another layer of adhesive mixture on top of the mesh and smooth everything with a spatula and a brush.
Step 6. Reinforce the corners between platbands and cornices (and window sill elements) on openings with additional mesh sections.
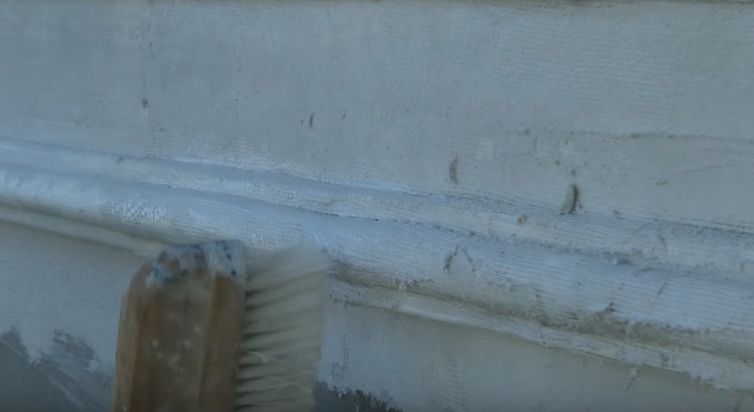
Step 7. Apply a finishing filler to the surfaces of all decorative elements.
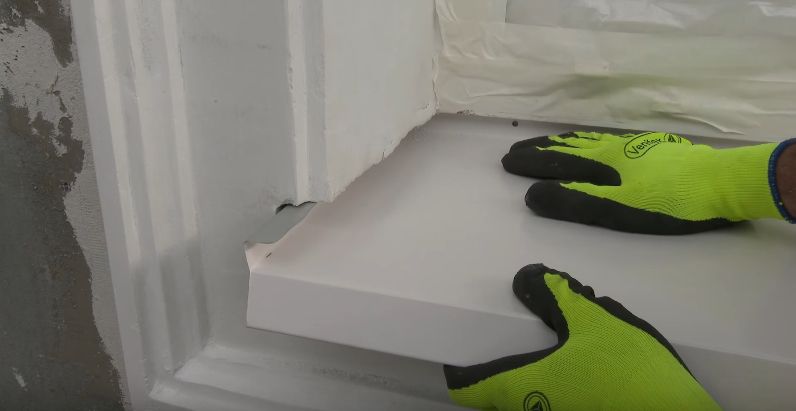
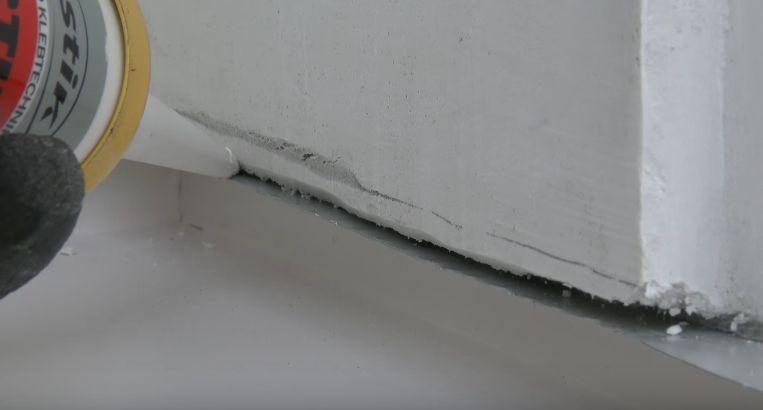
Step 8. Install the window sills by securing them to the self-tapping screws. Then coat the joints of this part with the styrofoam decorative elements with a sealant.
Step 9. Complete the finishing of the decorative elements of the facade - cover them with several coats of paint.
After completing all these operations, proceed with the finishing with colored plaster of the entire surface of the building facade.
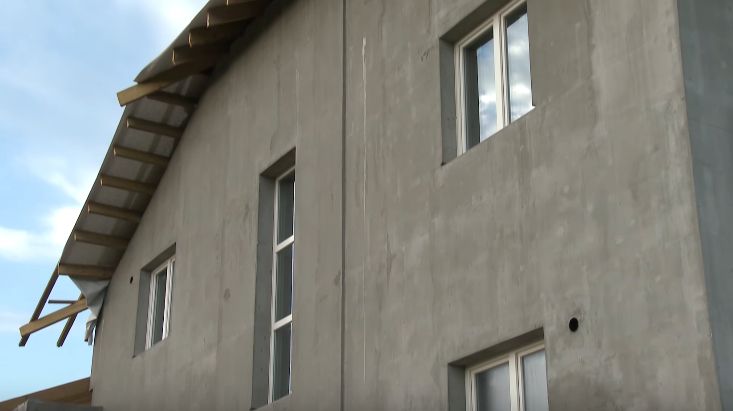
The hallmark of the entire building is the facade. But, its task is not only aesthetic functions, but also the protection of the walls of the house from various external influences. Protective function is the main goal installation of the facade of the building... Environmental loads: snow and rainfall, wind and sun rays greatly damage the walls of the building. Thanks to the assembled facades, the strength and durability of the building are greatly increased. A well-assembled facade is an excellent heat insulator and moisture regulator, preventing its penetration into the room.
Facade - the front of the building
The proportions, shapes and decor of the facade are determined design features structures, purpose and architectural design. Materials used for the installation of facades: panels, brick, stone, plaster, siding.
In their own way constructive decision facades are:
- stone and brick;
- concrete - monolithic;
- plastered (painted);
- composite heat-insulating, with a thin plaster outer layer;
- translucent;
- ventilated hinged, with cladding:
- siding,
- porcelain stoneware,
- composite aluminum panels,
- finishing fiber cement panels,
- clapboard, decorative board, blockhouse,
- metal cassettes,
- lined with facing brick or other small-piece material - on steel brackets.
Types of building facades by type of installation
Facades can be divided into two types: non-ventilated and ventilated.
Not ventilated, any facades on an adhesive or closed basis are called: putty, plaster, facing brick, facing stone, tiles, porcelain stoneware. Hinged non-ventilated facades include: lucorbond, plastic, bark beetle plaster, wet facade.
Ventilated facades, in which the walls of the building do not receive direct influence of atmospheric precipitation, direct influence of weather conditions, are freely ventilated and "breathe", there is no direct influence of temperature. Hinged ventilated facades include: wood, hinged tiles, siding, panels, and so on.
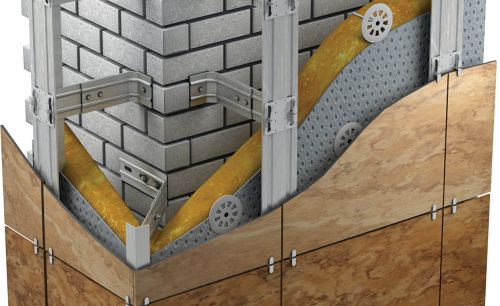
Installation work
Installation of the facade of the building refers to the work performed when installing a ventilated or non-ventilated facade. Facade installation work includes:
- preparation of the facade for work;
- installation of insulation;
- installation of devices for the protective base layer;
- reinforcement with a metal profile of the corners;
- processing of window and door slopes;
- mounting decorative elements;
- mounting of the facing layer.
Advantages of mounted facades
The main advantage that speaks in favor of mounted facades is that they reliably cover the load-bearing structures of the building from all the destructive influences of the external environment.
- Moisture penetration is damaging to any type of material that makes up a building. In addition to outdoor exposure, dampness indoors can also lead to rather unpleasant consequences. The appearance of fungus is the most unfavorable result of the penetration of excess moisture.
- Snow leads to almost the same consequences.
- Especially strongly negative consequences are manifested when a building is exposed to wind load. Blowing out of binding materials, drafts, formation of microcracks - these are all consequences of the action of winds.
- Temperature changes greatly affect the strength of load-bearing structures. A strong amplitude of temperature fluctuations can lead to cracks. In addition, it can be very cold indoors during frost and excessively hot during hot periods.
- From the constant long-term exposure to such unfavorable factors, the appearance of the building over time begins to have a very unaesthetic appearance.
Installation of facades of buildings and structures eliminates almost all of these phenomena. Another important advantage of the installed facade is its aesthetic component. The function of decorating the building, giving it a unique and attractive appearance, the ability to choose not only the finishing material, but also the style is also a strong argument in favor of installing the facade.
Installation of plaster facades of various types
More recently, the "plaster facade" was unknown even to builders. Modern technologies allow the use of this unique coating.
- Ventilated facade systems are widely used during installation. The hinged plaster facade does not require plastering work. It is fixed at some distance from the wall. The advantage is the reduced load on walls and foundations compared to other types of facades.
- A warmed version is possible, when the insulation is glued to the wall and plastered. Moreover, the sequence installation of a plaster facade building is as follows: thermal insulation board, glass-mesh reinforced layer of base plaster, load-bearing walls, layer decorative plaster... The advantage is additional insulation of the building.
- Standard finishing with a thick layer of plaster is as follows: insulation boards, load-bearing walls, steel mesh reinforced with special hinges and plaster laid on it. The advantage is a more durable wall covering. As heaters, stone wool slabs, thermal insulation slabs made of mineral wool with a basalt base, hydrobased laminated slabs with a synthetic binder, styrene foam and extruded styrene foam, mineral wool slabs based on the gabro-basalt group of rocks are used. The advantage of the material is its lightness, which facilitates the load on the walls and simplifies the installation technology. Mastics, adhesives, bitumen-polymer materials of various modifications are used for gluing insulation and additional thermal insulation, waterproofing.
Advantages of installing plaster facades:
- suitability for all types of supporting structures;
- providing the necessary resistances for heat transfer;
- increase in useful internal area;
- protection of interpanel seams and concrete, anti-corrosion protection;
- increasing sound, heat, hydro insulation;
- lack of temperature deformations.
Installation of wet building facades
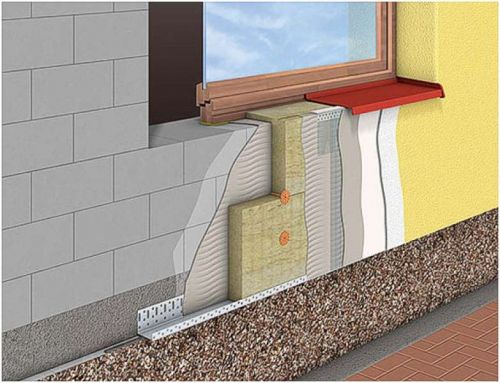
This external thermal insulation system is a wet-type plaster facade, a very young technology. However, the wet facade technology is perhaps the most in demand, especially in low-rise construction. External insulation of the facade using this method is made from environmentally friendly, high-tech materials that reduce heat loss, and therefore the cost of air conditioning and heating.
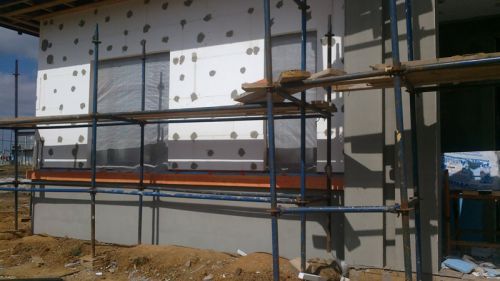
Installation of building facades according to the technology, a wet facade is a sequential application of layers bonded to each other on the base:
- Primer. Strengthens the wall - the base, ensures a snug fit of the next layer.
- A layer of styrene foam or mineral wool - insulation. They are firmly glued to the wall using special adhesives for thermal insulation boards. Additionally secured with poppet-headed dowels.
- The next layer is applied to the reinforcing solution with the fixing of the alkali-resistant reinforcing mesh, for adhesion of subsequent layers and creating a base for them.
- The system is then primed with a special primer to prepare it for decorative finishing.
- The system is reinforced with a protective and basement profile.
- A decorative layer is applied.
Decorative plasters for the wet facade system - structural. They differ from plastering plasters, which are used for thick-walled leveling with subsequent decoration: painting, tiles, etc. Structural plasters - the final layer, are divided according to the structure and type of binders. By structure:
- Reibeputs or "bark beetle"
- Rollputz or "fur coat"
- Kratzputs or "lamb"
- Streichputs or plaster paint
The texture of the resulting coating depends on the methods of application, the tool and the grain of the filler.
The type of binders divides the plasters into:
- Cement based - mineral. Dry mixtures require dilution with water. They do not burn, are vapor-proof, the cheapest, but require careful, high-quality cooking.
- Acrylic based on acrylic resins. Water-dispersive composition, ready to use. They are inferior to the first in terms of vapor permeability, but climatically more resistant.
- Silicate, with a base of potash "liquid" glass. Ready to use, suitable for all coatings, vapor tight, but more expensive and poor colors, are only compatible with silicate primers.
- Silicone, with a silicone resin base. Ready to use, applied to any coating, vapor-proof, water-repellent and dirt-repellent. Expensive, used exclusively with silicone primers, but the most durable.
Opportunity wide choice structure, texture and color adds another plus in favor of holding private houses or other buildings.
LLC "ElitStroy" provides services for the installation and decoration of external walls of buildings using the wet facade technology. We carry out decorative trim facades using plaster and decorative elements. We work in Moscow and the Moscow region.